Definitive Guide to micro:bit [+Free Access to 10 micro:bit Game Tutorials]
- Pallabi Mohanty |
- May 30, 2024
Updated By
Reviewed By
Contents

micro:bit is a pocket-sized computer designed for kids. It provides a unique learning experience to children in the field of digital literacy, coding and game development. There are many interesting features of micro:bit that engages a child’s thinking capacity and enhances their problem-solving capabilities. In this blog, we will discuss all the exciting features of micro:bit along with free access to 10 micro:bit game tutorials, let’s dive in!
Looking to learn Robotics? Explore Wiingy’s Online Micro:bit Classes For Kids to learn from top micro:bit experts.
About micro:bit
let’s understand the origin, purpose and users of micro:bit
What is micro:bit?
The micro:bit is a pocket-sized computer that introduces kids to how software and hardware work together. It is an interactive and programmable device, which consists of various input-output features such as LED light display, sensors, buttons, etc. It is also referred to as BBC micro:bit since BBC designed the device to encourage young people to become the digital innovators of the future. A more technical definition can be:
“The micro:bit is an open-source programmable hardware ARM-based embedded system.”
Who invented micro:bit?
The Micro:bit was originally created by BBC, in collaboration with 29 other leaders in business and academia as part of BBC’s Make it Digital Initiative. The major UK-wide product was launched in 2014, with a focus on creating the next generation of digital innovators. In early 2016, up to 1 million micro:bits were distributed to Year 7 students in non-formal education settings and libraries across the United Kingdom, in a project led by BBC Education.
In 2016, BBC created Micro:bit educational foundation, a non-profit organization to scale the product and maximize opportunities for students across the world, to learn programming and hardware.
What is micro:bit educational foundation?
The Micro:bit Educational Foundation is a nonprofit organization, established by BBC Education and distinguished partners from academia and industry including ARM, British Council, Lancaster University, Microsoft, Nominet, etc with an aim of maximizing opportunities for students internationally.
Mission of the micro:bit Educational Foundation
 Inspiring children– We enable and inspire all children to participate in the digital world, with a particular focus on girls and those from disadvantaged groups |  Making Easy & effective learning– We make micro: bit the easiest and most effective learning tool for digital skills and creativity |
 Collaborating with Educators– We work in collaboration with educators to create and curate exceptional curriculum materials, training programs, and resources. Collaborating with Educators– We work in collaboration with educators to create and curate exceptional curriculum materials, training programs, and resources. |  Support communities of educators and partners– We build and support communities of educators and partners to remove the barriers to learning digital skills |
When was the micro:bit launched?
The micro:bit was launched in 2014, in the United Kingdom by BBC in collaboration with 29 other leaders. Check out several milestones in the history of micro:bit here.
Who is micro:bit designed for?
micro:bit is primarily designed for kids, to learn how to code. In March 2020, there were more than 4 Million micro:bits in the market across 60+ Countries. The board is used by learners and educators across the world.
Components of micro:bit
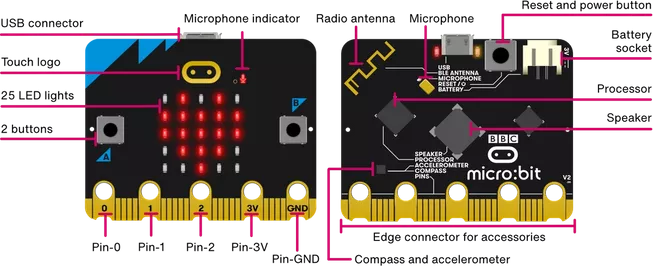
We will now deep-dive into each of the components, their location in the micro:bit, and their utility:
Input devices
Input devices allow us to pass on information to the computer from the outer world. These are important when you have to logically change the output of the
Experiment, by logically passing multiple inputs. Your computer has multiple kinds of input devices, such as a Keyboard, Mouse, Mic, etc. micro:bit also consists of multiple components which can take inputs:
Buttons
Buttons are very common input devices, which are used as switches in multiple places. micro:bit has three buttons altogether, two buttons are programmable, and one button is a reset button for the micro:bit.
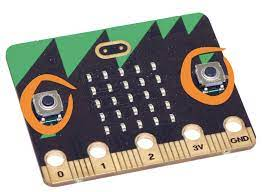
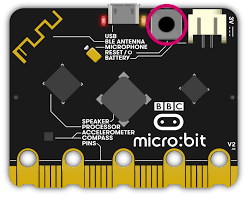
The programmable buttons exist on the same side as an LED matrix, while the reset button exists on the opposite side of micro:bit.
Light sensors
The micro:bit uses the LED Display matrix as the light sensor. The LED display also detect measure and respond to the level o flight where it is placed. Check out the link here to find out how the light sensors work in a micro:bit?
Temperature sensors
A temperature sensor is an input device that measures temperature. Your BBC micro:bit has a temperature sensor inside the processor which can give you an approximation of the air temperature.
Acceleration sensors
An accelerometer is a motion sensor that measures movement. The accelerometer in your BBC micro:bit detects when you tilt it left to right, backward and forwards, and up and down.
micro:bit v1
Features of micro:bit v1
The Mico: Bit v1 is 43mm x 52mm in dimensions and includes:
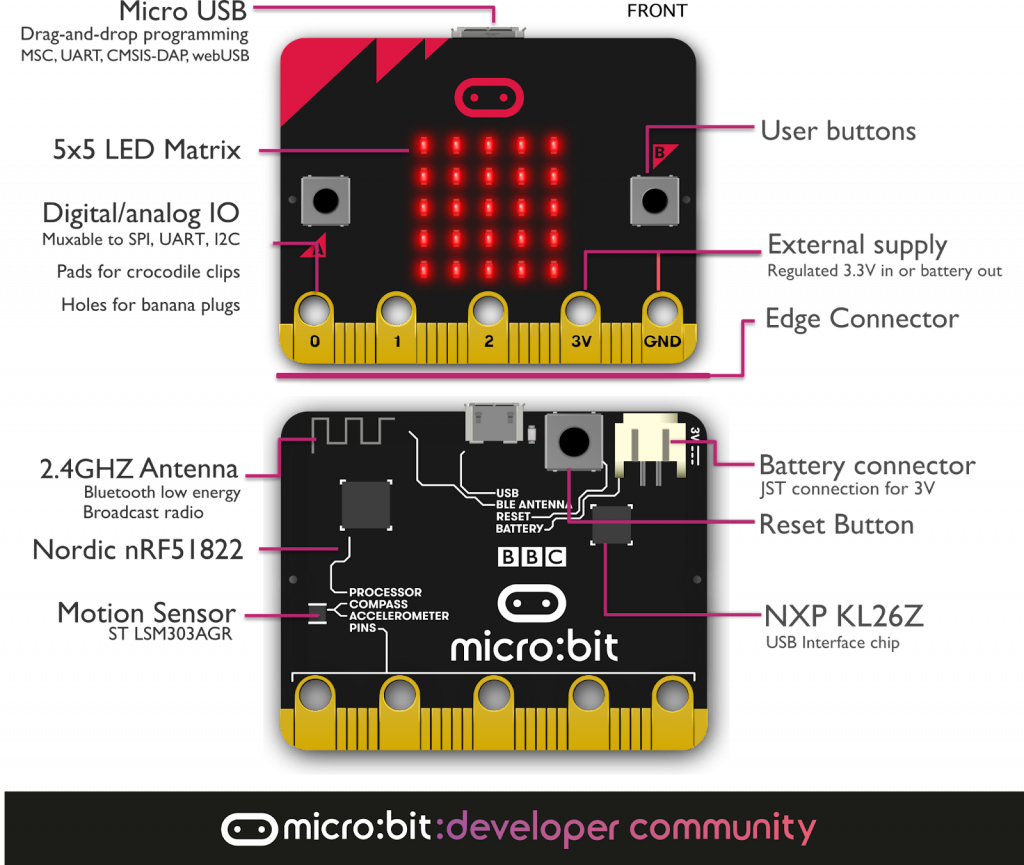
Processing unit
- Nordic nRF51822 – 16 MHz 32-bit ARM Cortex-MO microcontroller.
Memory Unit - 256 KB Flash Memory and 16 KB static RAM>
General Purpose Input/Output - 2.4 GHz Bluetooth low energy wireless networking.
- OTG USB 2.0 controller, used as a communication interface between USB and main Nordic Microcontroller.
- 3 Axis Accelerometer Sensor.
- 3 Axis Magnetometer Sensor.
- MicroUSB connector, battery connector, 25-pin edge connector.
- Display 25 LEDs in a 5×5 array.
- Three tactile pushbuttons. (two for applications and one for reset)
- I/O also includes three-ring connectors, which accept crocodile clips or 4 mm banana plugs as well as a 25-pin edge connector with two or three PWM outputs.
Unlike early prototypes, which had an integral battery, an external battery pack (AAA batteries) can be used to power the device as a standalone or wearable product.
Connecting additional sensors to the micro:bit v1
Additional sensors can be connected to the micro:bit v1, using the additional 3 general purpose Input-output pins provided at one edge of the micro:bit.
Connecting additional input/output devices to the micro:bit v1
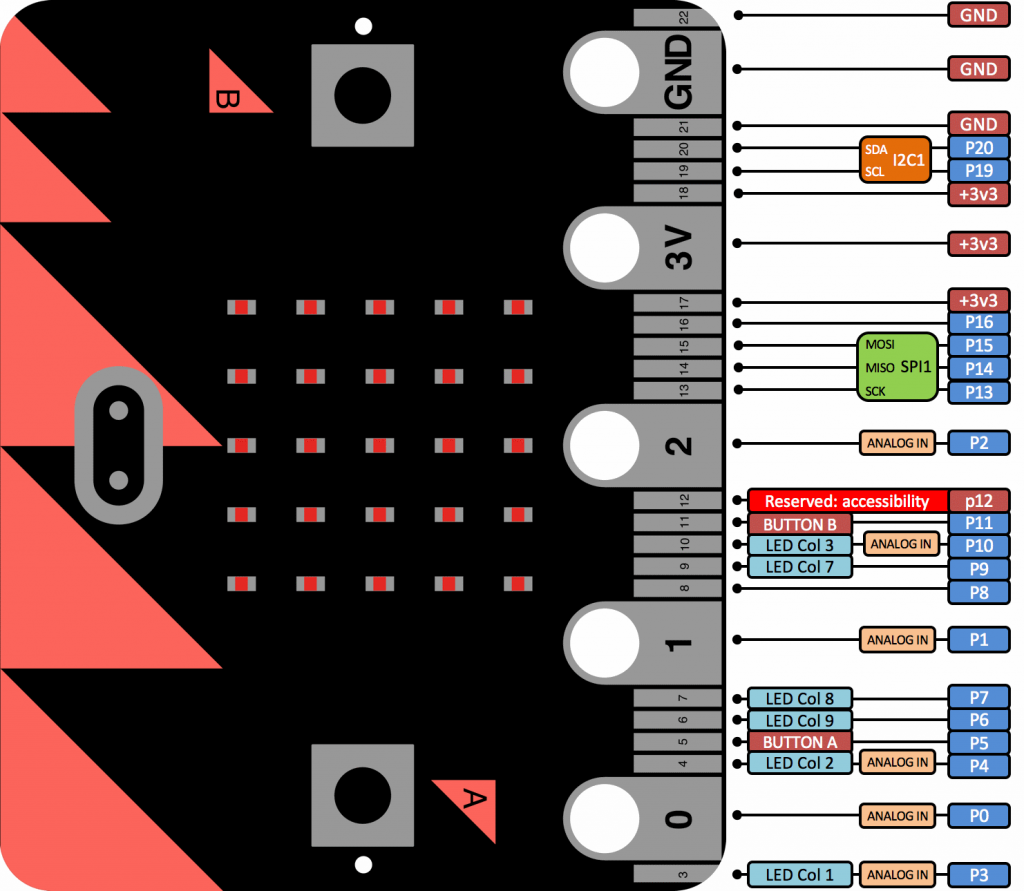
The micro:bit has 25 external connections on the edge connector of the board, which we refer to as pins. The edge connector is at the opposite edge of the micro:bit logo. It consists of 5 large pins, that are also connected to holes in the board labelled: 0, 1, 2, 3V, and GND. And along the same edge, there are 20 small pins, which can be used using an edge connector.
Large pins
You can easily attach crocodile clips or 4mm banana plugs to the five large pins.
- 0: GPIO (general-purpose digital input and output) with analog-to-digital converter (ADC).
- 1: GPIO with ADC
- 2: GPIO with ADC
- 3V: 3-volt power output or power input. (1) power output: If the micro: bit is powered by USB or a battery, then you can use the 3V pin as a power output to power peripherals with; (2) power input: If the micro: bit is not being powered by USB or battery, you can use the 3V pin as a power input to power the micro: bit
- GND: attaches to the ground in order to complete a circuit (required when using the 3V pin)
Small pins
- pin 3: GPIO shared with LED Col 1 of the LED screen; can be used for ADC and digital I/O when the LED screen is turned off.
- pin 4: GPIO shared with LED Col 2 of the LED screen; can be used for ADC and digital I/O when the LED screen is turned off.
- pin 5: GPIO shared with Button A. This lets you trigger or detect a button “A” click externally. This pin has a pull-up resistor, which means that by default it is at a voltage of 3V. To replace button A on the micro:bit with an external button, connect one end of the external button to pin 5 and the other end to GND. When the button is pressed, the voltage on pin 5 is pulled down to 0, which generates a button click event.
- pin 6: GPIO shared with LED Col 9 of the LED screen; can be used for digital I/O when the LED screen is turned off.
- pin 7: GPIO shared with LED Col 8 of the LED screen; can be used for digital I/O when the LED screen is turned off.
- pin 8: Dedicated GPIO, for sending and sensing digital signals.
- pin 9: GPIO shared with LED Col 7 of the LED screen; can be used for digital I/O when the LED screen is turned off.
- pin 10: GPIO shared with LED Col 3 of the LED screen; can be used for ADC and digital I/O when the LED screen is turned off.
- pin 11: GPIO shared with Button B. This lets you trigger or detect a button “B” click externally.
- pin 12: this GPIO pin has been reserved to provide support for accessibility.
- pin 13: GPIO that is conventionally used for the serial clock (SCK) signal of the 3-wire Serial Peripheral Interface (SPI) bus.
- pin 14: GPIO that is conventionally used for the Master In Slave Out (MISO) signal of the SPI bus.
- pin 15: GPIO that is conventionally used for the Master Out Slave In (MOSI) signal of the SPI bus.
- pin 16: Dedicated GPIO (conventionally also used for SPI ‘Chip Select’ function).
- pins 17 and 18: these pins are wired to the 3V supply, like the large ‘3V’ pad.
- pins 19 and 20: implement the clock signal (SCL) and data line (SDA) of the I2C bus communication protocol. With I2C, several devices can be connected on the same bus and send/read messages to and from the CPU. Internally, the accelerometer and the compass are connected to i2c.
- pins 21 and 22: these pins are wired to the GND pin and serve no other function
Unlike the three large pins, which are dedicated to external connections, some of the small pins are shared with other components, on the micro: bit board. So make sure you check which pins you should use if you want to parallelly use the features.
micro:bit v2
micro:bit v2 was launched recently in October 2020. The v2 version supports all the features of v1 micro:bit. This version of micro:bit consists of many more features:
Following is an illustration of the added components on the board:
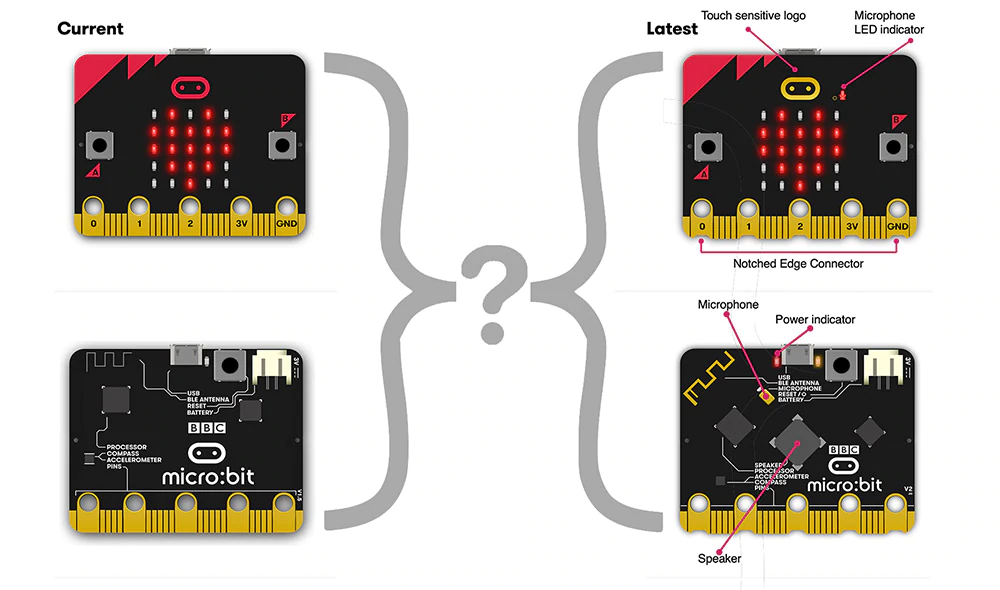
Differences between micro:bit V1 and V2?
The table below summarizes the differences between micro:bit V1 and V2 on key dimensions.
| micro:bit v1 | Feature | micro:bit v2 |
| Nordic Semiconductor nRF51822 | Processor | Nordic Semiconductor nRF52833 |
| 256kB Flash 16kB RAM | Memory | 512kB Flash, 128kB RAM |
| NXP KL26Z, 16kB RAM | Interface | NXP KL27Z, 32kB RAM |
| 25 pins. 3 dedicated GPIO, PWM, i2c, SPI, and ext. power. 3 ring pins for connecting crocodile clips/banana plugs. | Edge Connector | 25 pins. 4 dedicated GPIO, PWM, i2c, SPI, and ext. power. 3 ring pins for connecting crocodile clips/banana plugs. Notched for easier connection |
| Shared I2C Bus | I2C | Dedicated I2C bus for peripherals |
| 2.4Ghz micro:bit Radio/BLE Bluetooth 4.0 | Wireless | 2.4Ghz Micro:bit Radio/BLE Bluetooth 5.0 |
| 5V via Micro USB port, 3V via edge connector or battery pack. | Power | 5V via Micro USB port, 3V via edge connector or battery pack, LED power indicator, Power off (push and hold power button) |
| 90mA available for accessories | Current available | 200mA available for accessories |
| ST LSM 303 | Motion sensor | ST LSM 303 |
| 5cm(w) x 4cm(h) | Size | 5cm(w) x 4cm(h) |
How to program a micro:bit?
In order to code any piece of hardware, we need a language in which we can communicate with the device and a medium through which we can do so. Coding is a set of instructions that we provide to micro:bit to make it perform the desired action.
There is a huge community of people who are making tools for programming and interacting with the micro:bit which means you can program your micro:bit in Python, C++, and other languages, including other block editors.
There are several editors which are suggested on the micro:bit website, to get started with coding the micro:bit and creating interesting micro:bit projects. For the purpose of illustration, we will showcase how to code using MakeCode.
Creating your first micro:bit project using blocks in Microsoft MakeCode
Microsoft’s MakeCode editor is the perfect way to start programming and get creating with the BBC micro:bit. Microsoft as a partner in the micro:bit program has developed this kid-friendly colored block-based coding platform. You can use this platform from anywhere in the world, by going to makecode.microbit.org
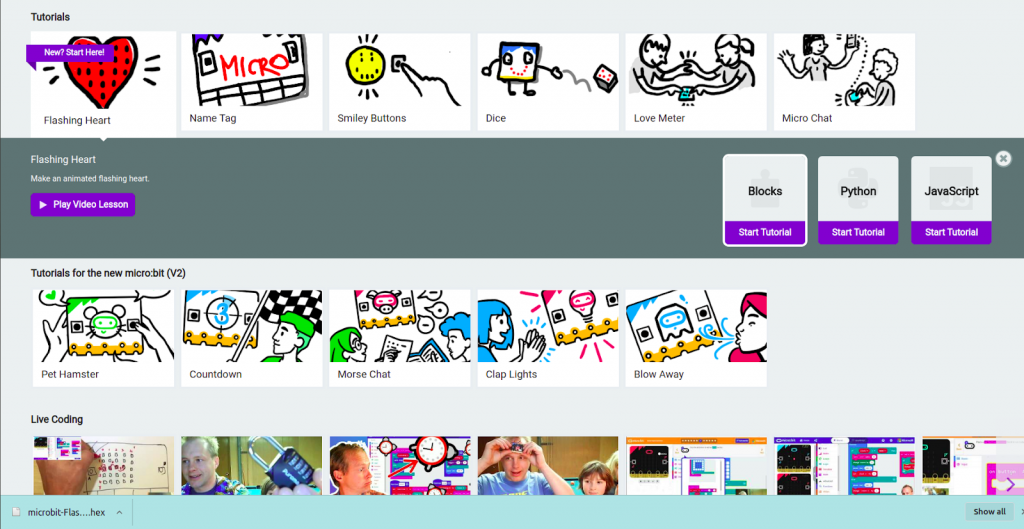
- Step 1: Go to makecode.microbit.org
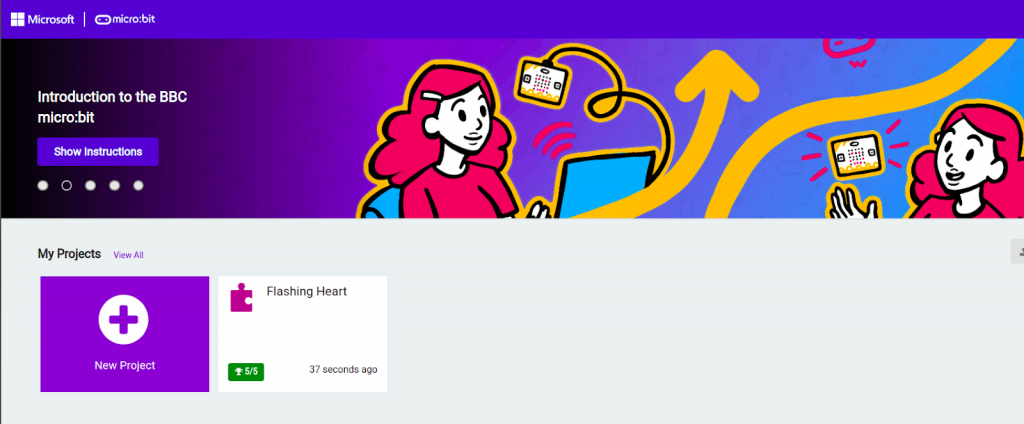
- Step 2: Click on the tutorials section, and select the first tutorial, called flashing heart
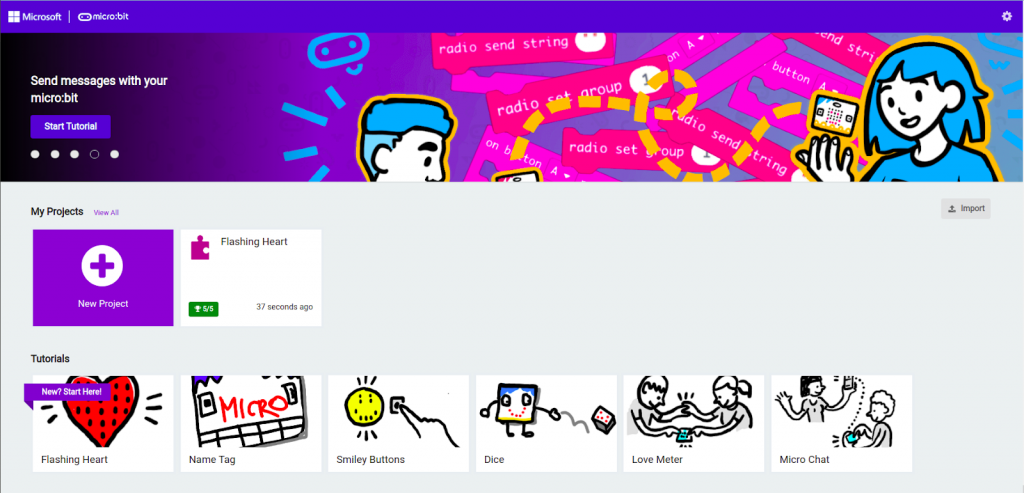
- Step 3: Select Block Coding from the options provided
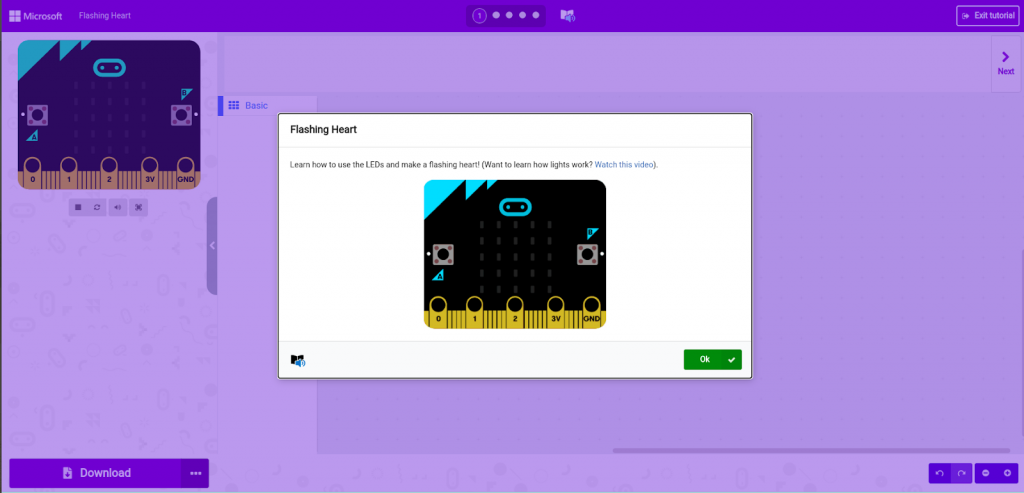
- Step 4: You will get a pop-up mentioning the project description. Click ok.
- Step 5: Check out the hints given on the right side of the screen
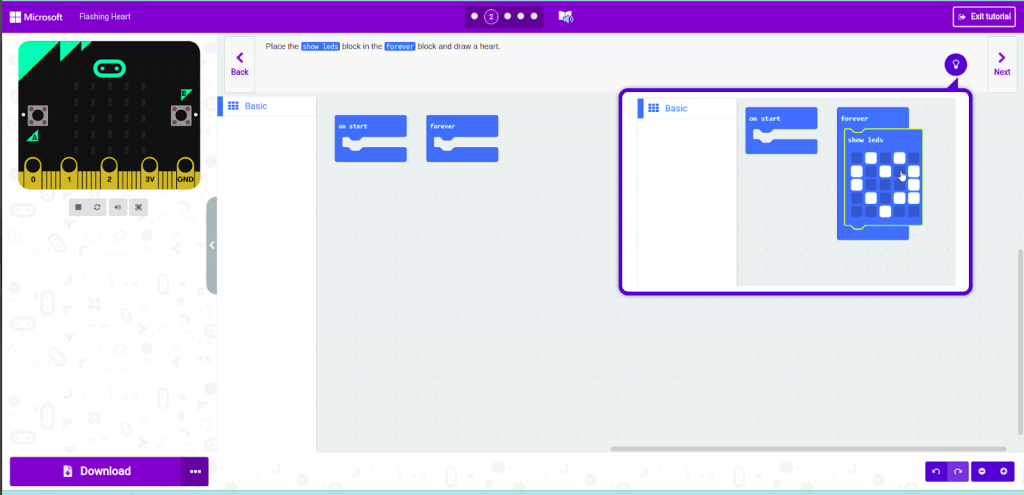
- Step 6: Select the LED Matrix Block from the left dashboard
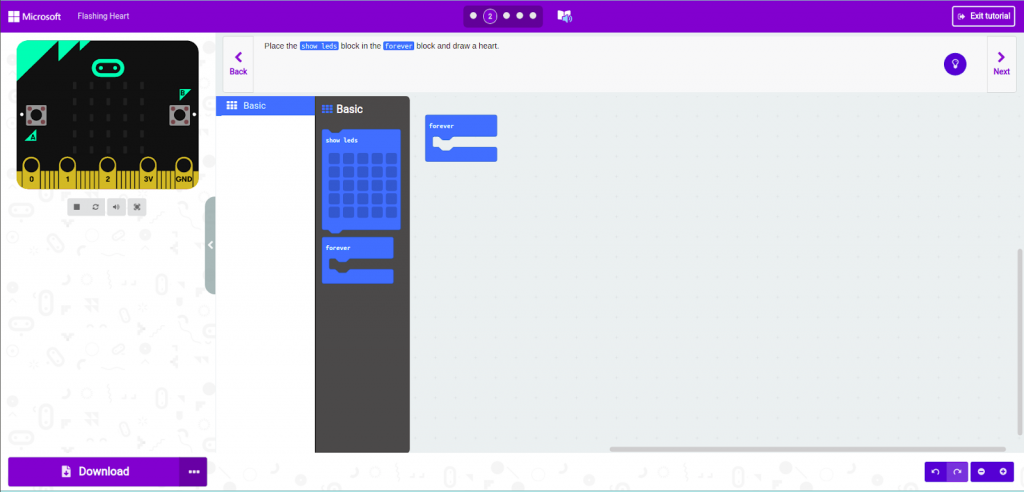
- Step 7: Put the LED Matrix in the forever block, and select the LEDs which you want to light up. In this case a flashing heart.
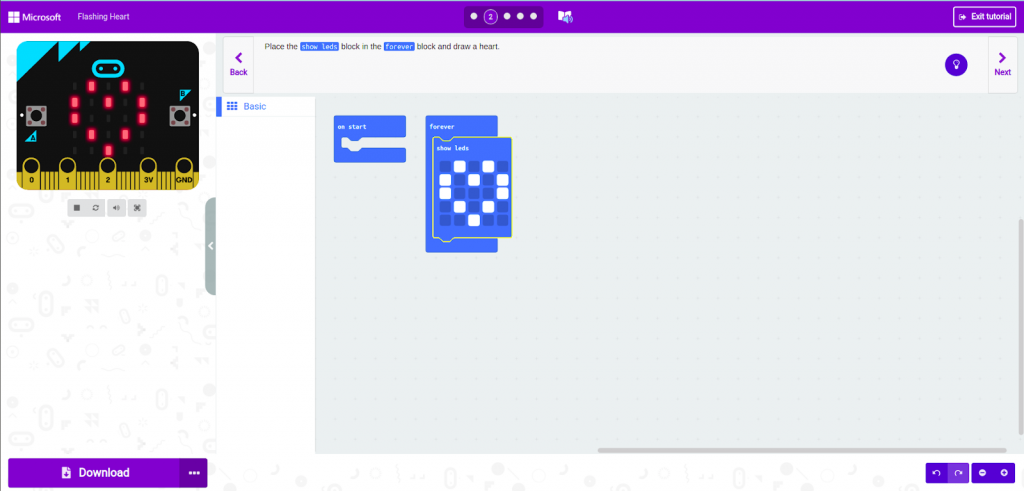
See the simulation of the code you have written in the on-screen micro-bit present on the left side of the screen. In order to transfer the code to the physical micro:bit, perform the steps below:
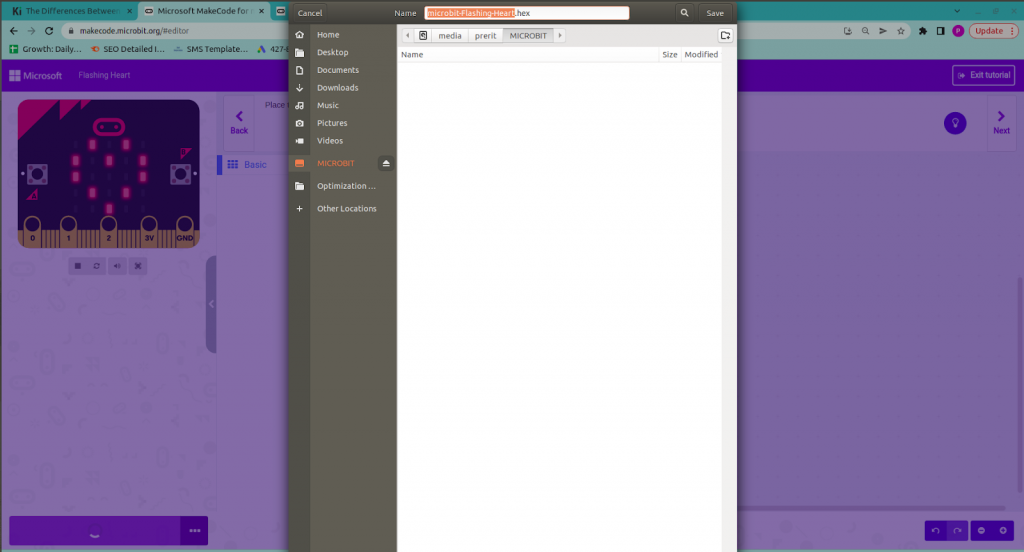
- Step 8: Connect the micro:bit with your computer, using the USB Cable. You will notice that the power LED will light up in your micro:bit, as soon as you connect the USB cable. You can also see a drive added to your computer called micro:bit.
- Step 9: Click on the Download button, and save the hex file in the micro:bit folder on your computer. You will notice, that a twinkling yellow light will start glowing in your micro bit, this is because your code is getting transferred to it.
Make and play the 10 most popular games on micro:bit!
We have curated a list of 10 popular and beginner-friendly games to create on micro:bit. Check out the games and the related tutorials for step-by-step instructions on how to build the games. Wiingy also provides online instructor-led tutorials that can help you build these games and many more games on micro:bit.
1.Make a snap the dot game on micro:bit
2. Space invaders on micro:bit
3. Animated animals on micro:bit
4. Flappy bird game on micro:bit
6. Flashing heart on micro:bit
10. Apple catching game on micro:bit
References
- Micro:bit Educational Foundation | micro:bit
- https://en.wikipedia.org/wiki/Micro_Bit/
- https://cacm.acm.org/magazines/2020/3/243028-the-bbc-microbit-from-the-uk-to-the-world/fulltext
- https://makecode.microbit.org/device/pins
- https://microbit.org/get-started/user-guide/features-in-depth/
Looking to learn Robotics? Explore Wiingy’s Online Micro:bit Classes For Kids to learn from top micro:bit experts.
FAQs on BBC micro:bit
What are micro:bit projects?
micro:bit is a small programmable device that allows users, especially kids, to learn to code by making many fun and interesting projects. These projects can be created in different types of coding languages like MakeCode, Python, Scratch, and Javascript. micro:bit projects enable children to learn to code from an early age.
What is micro:bit MakeCode?
micro:bit MakeCode editor is a simple programming language developed by Microsoft where users can create projects. It has a drag-and-drop interface, which means the codes are in the shape of blocks and can be dragged and dropped onto the editor in order to create and run a script. The blocks are snapped together to build programs. It is a free open-source platform.
What are the differences between micro:bit v1 and v2?
The major difference between micro:bit v1 and v2 can be observed in the memory feature, v1 has a memory of 256kB Flash 16kB RAM and v2 has a memory of 512kB Flash, 128kB RAM. v1 has a processor of Nordic Semiconductor nRF51822 and v2 has a processor of Nordic Semiconductor nRF52833 and v1 has 3 dedicated GPIO, while v2 has 4 dedicated GPIO.
How does a micro:bit work?
To work with micro:bit, you will need to connect micro:bit to the web browser, and select your preferred programming language, which is all browser-based so there is no need to install any application as long as you have a good internet connection.
How many types of micro:bit are available in the market today?
There are two types of micro:bit existing in the market right now, they are called micro:bit v1 and micro:bit v2 versions of micro:bit.
From where can I buy a micro:bit?
micro:bit has partnered with several companies, which resell the micro:bit in different countries. You can go to the micro:bit website and the buy section in the navigation bar. You can choose the country you are residing in, and then choose the suitable supplier and order your micro:bit.
How do I download micro:bit?
You can download the micro:bit projects by puggling your micro:bit into your computer, micro:bit will now appear in your computer like a USB stick called “MICROBIT” Then you can download your program as a hex file from the code editor to your computer.
micro:bit can be a fun and creative way to learn coding and game development, especially for children. Creating projects using micro:bit can enhance one’s creativity and help one learn the computational skills required for the 21st century. micro:bit is also a safe and secure platform only focused on teaching kids about coding. So, start creating your first project on micro:bit today!
For further learning, read out the blog on what is Microsoft MakeCode and how to get started with it!