A Beginner’s Guide to Scratch Programming [+Free Access to 10 Scratch Game Tutorials]
- Aditi |
- May 30, 2024
Updated By
Reviewed By
Contents

Scratch is a free block-based visual programming language developed by MIT labs primarily for children between the ages of 8 to 16. It is designed as an educational tool that enables children to produce projects such as interactive narratives, animations, games, music, and visual art. Scratch allows users to create these projects and share them online. Scratch can be used in a web browser or downloaded to a web/mobile device. Scratch coding is designed, developed, and moderated by the Scratch Foundation, a nonprofit organization.
Looking to learn Scratch coding? Explore Wiingy’s Online Scratch Coding Classes For Kids to learn from top Scratch coding experts.
Overview of Scratch
Here’s a quick overview of Scratch programming language for kids:
| Parameters | Details |
| Programming Language Type | Block Based Visual Programming Language |
| Founded by | MIT Media Lab |
| Launch | Jan 8,2007 |
| Age Group | Primarily for children between 8 to 16 |
| Mode | Offline/Online |
| Purpose | Educational Tool |
| Languages Supported | 122 Languages* |
| Official Website | scratch.mit.edu |
*Scratch can be used in 40+ languages as of now. However, Scratch has planned to have more than 122 languages on its platform in the future.
Uses of Scratch
Scratch is designed primarily for kids to learn the fundamentals of programming in a fun and interactive way. Since Scratch programming can be used to make games, stories and interactive animation it has become a very popular platform among kids, especially between the ages of 8 to 16. It is a great tool for beginners with no prior coding knowledge to get started with coding.
Getting Started with Scratch
There are two ways to begin Scratch programming:
Method 1: Launch the Scratch Online Editor:
Open scratch.mit.edu in your browser and click on create. This will open the Scratch Online Editor. You can now begin creating scratch projects.
Method 2: Download the Scratch Offline Editor:
If you would like to create and save projects on Scratch without an internet connection you can download the Scratch Offline Editor also known as the Scratch App. Different versions of Scratch are available for download for both Windows and Mac.
Check out our step-by-step guide on downloading the Scratch offline editor.
Scratch Online Editor
The Scratch Online Editor is the interface you use to build your games, animations, and stories in Scratch programming. When you launch the Scratch editor through the web browser, the default Scratch programming interface will open up.
Scratch programming interface contains:
- Code Tab: This is the main code editor and default tab of the Scratch online editor. This section is used to access all the code blocks such as Motion blocks, Looks Blocks, Control Blocks, Operator Blocks, and so on.
- Costumes Tab: The costume tab opens up a costume editor. This is a place where you can make and modify sprites. Scratch has tonnes of in-built sprites and you can always import a new one from your drive or make something completely new.
- Sounds Tab: Sounds tab opens up a sound editor. This is a place where you can make and modify sounds. Scratch has tonnes of in-built sounds that can be used to make games and animations. You can always import something new from your drive or create something entirely new.
- Green Flag (Start Button): This is used to start the code execution and see the result on the preview panel.
- Red Dot (Stop Button): This is used to stop the code execution.
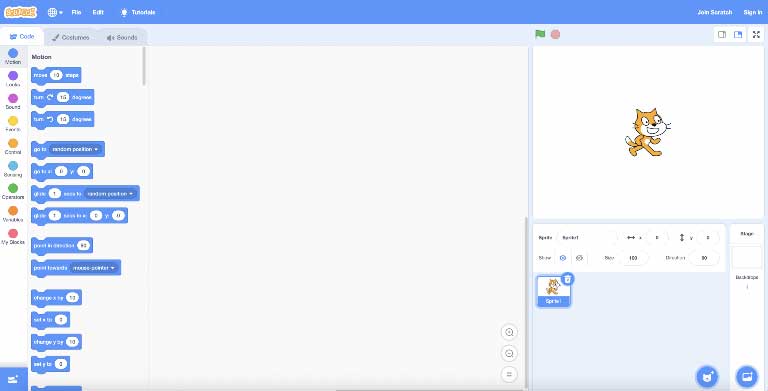
Components of Scratch Online Editor
When you launch the Scratch editor you will see the editor interface comprising of different sections as shown in the image below:
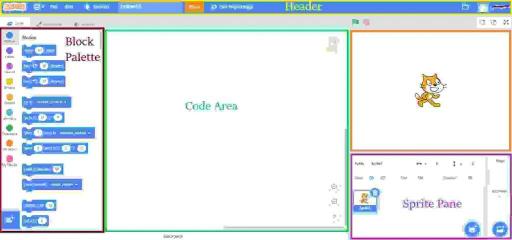
Block Palette
The Block Palette is the area on the left of the screen when the Code button is pressed. On the left, there is an area that contains the nine-block categories in Scratch. These blocks can be dragged into the Code Area to make scripts.
Code Area
The Code Area is the large space to the right of the Block Palette. It is an area for storing blocks that run the project. Blocks can be dragged from the Block Palette into the Code Area and arranged to form scripts. Each sprite has its own script, and sprites can be selected using the Sprite Pane.
Stage
The stage is the area where the sprites are displayed and perform their actions. It is located at the top of the area to the right of the Code Area.
Sprite Pane
The Sprite Pane is located to the right of the Code Area and at the bottom of the stage. It allows one to quickly switch sprites and view the different scripts each sprite contains.
Menu Bar or The Header
Menu Bar is used to open new projects, edit existing projects, and save and share them with other Scratchers. The menu bar comprises of the following elements
- Scratch
- Translate
- File menu
- Edit Menu
- Tutorials button
- Project Name
- Share button
- See Project Page
- My stuff
- Profile
Scratch Components
Scratch project is the generic term used to refer to any program written in Scratch such as a game or a story or animation or any other application. Any Scratch project is built using three fundamental components:
- Sprites
- Backdrops
- Code Blocks
Let us understand each of these building components of Scratch programming one by one
Sprites in Scratch Programming
Sprites are the key objects (images) that are programmed in Scratch. Sprites can range from animals, people, objects, and things like sports, music, food, and fashion. Scratch has a rich library of inbuilt sprites which come attached with a set of code blocks. For example, a drum kit sprite can be used to play different levels of bass, high tom, and low tom.
You can also edit an existing sprite, import one from your drive, or make a new one using the costume editor. Sprites can be selected from the Sprite library as shown below:

Backdrops in Scratch Programming
Backdrops are creative backgrounds that you can use for your game or story. You can choose from an existing backdrop, paint a new one, or upload from an existing file on your computer or drive. When a backdrop is added to a scratch project, it appears on the stage.
Scratch has tonnes of in-built backdrops across categories such as fantasy, sports, outdoors, indoors, space, underwater, patterns, and much more.

Code Blocks in Scratch Programming
Scratch Code blocks are used to perform actions on sprites in a game or story. Scratch provides code blocks such as motion blocks, which can be used to set a sprite into motion, or sound blocks, which can be used to add sound effects to a sprite, or event blocks, which are used to define when the code is run.

Code blocks can be used by dragging them into your project to create a script. A collection of code blocks that interlock with each other to perform a certain action or story or game is called a script.
Scratch provides 9 types of code blocks:
- Motion Blocks
- Looks Blocks
- Sound Blocks
- Event Blocks
- Control Blocks
- Sensing Blocks
- Operator Blocks
- Variable Blocks
- My Blocks
Let us look at the coding blocks one by one:
1. Motion Blocks
These are used to move the sprite on the stage. Let us look a some of the popular motion blocks
Move steps block: this block is used to move the sprite by a finite number of steps

Turn degrees blocks: these are used to turn the sprite by a specified angle in a clockwise or anti-clockwise direction

Go to block: is used to move the sprite to a specific position on the stage

Glide to blocks: is used to move the sprite to a specific position using a gliding movement

If on edge, bounce block: This is one of the most popular motion blocks used in game design. If the sprite hits any of the edges on the stage it will bounce back onto the stage.

2. Looks Blocks
These are used to define how the sprite and background will look. Let’s look at some of the popular Looks blocks
Say & think blocks: Say blocks can be used to represent speech by sprites

Switch costume block: This is used to change the costume of a sprite. This block comes in very handy to denote the motion of a sprite such as a bird flapping its wings where each costume can be defined as a stage of motion in the bird’s flight

Change effect by block: This block is used to change the color, brightness, or pixelation of the sprite

3. Sound Blocks
These are used to add sound effects to a sprite e.g.
Play sound block: will play selected sound example a “magic spell” sound until done

Change pitch effect block: is used to change the pitch by specified points

Set volume to block: is used to set the sound effect volume to the desired level

4. Events Blocks
Events blocks are used to define the triggers when the script should run. All the other blocks will have no meaning till an event block is used to define when a script is to be run. Some examples of events and associated blocks are as below:
When the green flag clicked block

When key pressed block

When backdrop switches block

Broadcast message and wait block

5. Control Blocks
These are the logic blocks of Scratch allowing power over when and how the script is run e.g.
Repeat block: is used to define that the code within the repeat block will run a specified number of times (10 times in the example below)

If then else block: This is a conditional block and is used to perform a certain action only if the required condition is met or else perform the alternative action defined under the else block

Wait until block: This is a pause block in Scratch programming. It can be used to pause code execution for a defined time period or until a certain condition is met

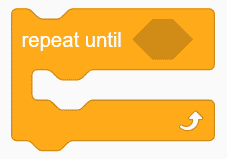
Repeat until block: This block will loop until the specified statement is true in which case the code beneath the block, if any, will be executed.
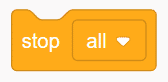
Stop block: Depending on what is chosen from the drop-down menu, this control will stop that particular option.
When I start as a clone block
This control block will be activated by the clones when clones are created.
Create clone of () block
This control block creates a clone of the sprite in the argument.
Delete this clone block
This control block deletes the clone it runs in. Besides clicking on the green flag or stop sign, this block is the only way to delete clones.
6. Sensing blocks
Sensing blocks are used in Scratch programming to identify and measure how different objects (sprites & colors) within a game or story are interacting with each other or to detect certain keyboard and mouse movements. For example:
Ask & wait block: This block can be used to ask for input from the user such as the name and store this information. Later the stored information can be retrieved and displayed on the screen.

Touching color block: This block can be used to check if a sprite is touching the specified color. This is very useful in game development where actions can be defined if a collision occurs between two sprites

Distance to block: This block is used to calculate and report the distance in pixels between objects (sprites).

7. Operator Blocks
Operator blocks are used to:
Perform Arithmetic functions such as addition, subtraction, multiplication & division

Perform value comparison

Perform string operations such as joining two strings, calculating the length of a string, or identifying characters within a string

8. Variable Blocks
Variable blocks are used to make variables and set, change and report values of variables. Variables are temporary stores of value in a program. Let’s look at the key variable blocks.
Set to block: This is used to set the initial value of a variable. This can be a numeric value or string.

Change by block: This block is used to change the value of a variable by a specified value.

Show variable block: This block can be used to show the variable on the stage.

Hide variable block: This is the opposite of the show variable. It is used to hide the variable value from the stage.

9. My Blocks
This feature is used to create new custom blocks (called procedures) which can be created using a combination of standard Scratch blocks. The custom procedures can be saved in Scratch and used directly in a script. This saves the time and effort of duplicating blocks of code if the same sequence of actions is to be performed multiple times within a script.
Scratch Projects
Scratch project is the generic term used to denote any creation such as a game, story or animation created in Scratch. Lets look at Scratch projects in detail:
What is a Scratch Project
Any creation, such as a story, a game, or an animation, is a Project in Scratch. There are over 100 million user-created projects in Scratch. The process of making Scratch projects is called “Scratching”. Projects are made using the Scratch Editor through the use of Scratch components such as sprites, backdrops and code blocks. Projects can also be saved and shared once you set up your account in Scratch.
Starting A Scratch Project
You can start a scratch project simply by clicking on “Create” in the nav bar of the Scratch home page. This will immediately take you to the Scratch editor where you can start coding your project. You can choose the default Cat sprite in the editor or replace it with another sprite to get started.
Downloading A Scratch Project
You can also save a Scratch project offline on your devices such as a laptop or a desktop computer. Click on the “Save to My Computer” button in the file menu on the scratch editor. This will download the project on your device in the default downloads folder. You can change the folder manually to a folder name and location that you want. The scratch project will be saved as a .sb3 file.
Compressing A Scratch Project
All assets in a Scratch project must be under 10 MB and the maximum allowable overall project size (size of the JSON project file) is 50 MB. If you exceed the project size limit, you will not be able to save the project. You can use the following techniques to identify ways to compress your Scratch project:
1. Remove unnecessary sprites and scripts
2. Delete unused backdrop and costumes
3. Compress sound
Compressing projects is essential to saving the project. Read our guide with steps to Compress a scratch project for detailed instructions.
Saving and Sharing Your Scratch Projects
Scratch online editor auto-saves the work that you do. It is however always a good practice to manually save the project to prevent any loss of work. You will need to be logged in to Scratch to save a project. The easiest way to save a project is to save it online by clicking on “Save Now” located in the top right corner of the scratch online editor.
Further Scratch allows Scratchers to share their saved project with other Scratchers. A key prerequisite is that the projects must be made in Scratch only and not on any Scratch modifications.
The steps to share a project are as follows
- Step 1: Go to the My Stuff page from the Scratch editor by clicking on the <> icon.
- Step 2: The My Stuff page will open with a list of projects. Select and click on the required project to be shared.
- Step 3: Add instructions for other users on how to experience your project (game/story/animation).
- Step 4: Include notes and credits about how you created your project, as well as if you borrowed ideas, scripts, or artwork from other users. It is always good practice to credit users whose work you have built upon.
- Step 5: Click on the “share” button on the orange bar above the project.
Voila!!! Your project is now available for the world to experience. A unique link is also auto-generated for the shared project, which you can copy and share with your friends. Scratch also generates an embed code that you can insert into your website to list the project on your website. Read our detailed step-by-step guide on how to save and share a project on Scratch here.
Note: Projects cannot be shared from the offline editor. A shared project is viewable to all Scratchers, even if they are not signed in. A shared project can be used by anyone to remix the project.
Creating A Thumbnail for Your Scratch Project
A thumbnail for a Scratch project is the display icon for the project on the Scratch website. Thumbnails are used to give a preview of the actual project. Scratchers use thumbnails to identify the idea behind a project. The last screen of a project which is usually the blank screen becomes the default thumbnail of the projects. You can create a custom thumbnail using the costumes tab in the Scratch editor. Read our detailed step-by-step guide to creating a thumbnail for your scratch projects including creating animated thumbnails here.
Unsharing & Delete Your Scratch Project
The steps to delete a Scratch project are as follows:
- Step 1: Go to the My Stuff page from the Scratch editor by clicking on the <> icon
- Step 2: My Stuff page will open with a list of projects
- Step 3: Scroll down until you see the project/projects you want to Delete
- Step 4: If your project is shared it must be first unshared before deleting. Click on the “unshare” button next to the project then click “delete”
- Step 5: As with other software to permanently delete the project, go to “trash” and click on the “Empty Trash” button. You will be prompted to verify your account password to permanently delete the projects.
Note: You cannot recover the projects you have permanently deleted. Scratch recommends using Contact Us with an explanation if you want to recover a permanently deleted project as the Scratch Team can still recover it.
Creating Your First Scratch Project
Now that we have a good understanding of Scratch, and its various components such as Sprites, Backdrops, and Code Blocks, let us create our first Scratch Project:
- Step 1: Open the Scratch editor. You will see an empty code area and a default cat sprite in the code area.
Step 2: Chose a sprite for your project. When Scratch opens the default sprite is the Cat sprite. Delete the Cat sprite and select another sprite from the sprite library. We will select a fish sprite.
Step 3: Add a backdrop to your project. Go to the backdrop selector and select the “underwater 2” backdrop.

Step 4: Add code to your project. Select the fish sprite and Drag the “when green flag clicked block” to the code area. This is the control event that will trigger the execution of the code. Now add code to the fish sprite to move forward 100 steps. Drag the “move steps” block from the motion blocks and set it to 100 steps.
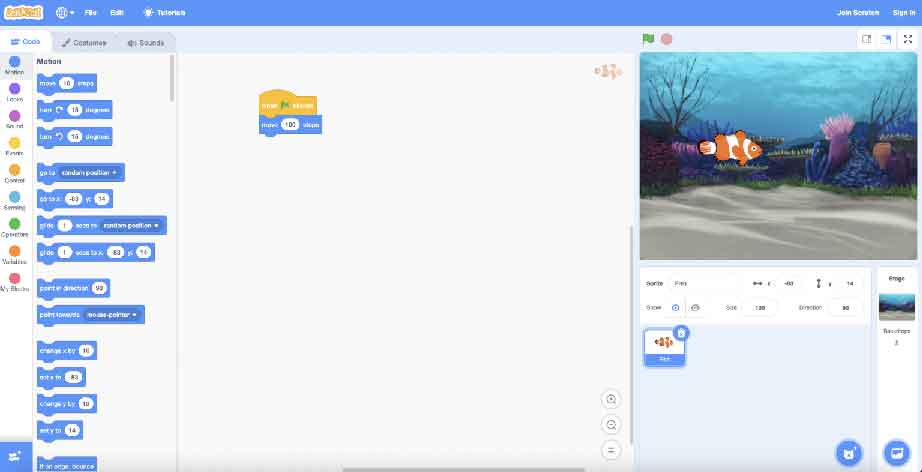
Step 5: Now Add sound to your project. Drag the “start sound” block from the sound blocks and set it to “ocean wave”. In Scratch, every sprite comes with its predefined list of sounds. For fish sprite, these include “ocean wave” and “bubbles”. You can also add custom sounds to a sprite.

Step 6: Save your project. If you are signed in online the project will get saved online else it will prompt you to save on your computer.
Did you know?
Projects can be shared publicly so that other Scratchers can also enjoy the experience. You can provide instructions to other Scratches on how to experience the project and also provide notes and credits in case you are using or remixing the work of any other Scratcher.
Scratch Games
Before we begin exploring the world of Scratch games, let’s first understand what is in fact a Scratch game. Scratch game is just a game that is created on Scratch’s block-based visual coding platform. Building games is one of the most popular ways to learn scratch programming. Scratch games are very popular with millions of players and creators as the platform is one of the easiest ways to build a game. What makes it even more attractive is that Scratchers can pick up an existing game created by another Scratcher and “remix” the game to create different variations or altogether a completely new game.
Steps for game development in Scratch
- Planning: This is where you decide on the core concept of the game, for example, you might decide to build a maze game where the objective is to solve a maze or make a pong game where the objective is to play pong between two players. It is very important to identify the audience for your game and decide on the difficulty level.
- Pre-Production: This is one of the most critical phases. It is time to put your creativity to the test. This is where you storyboard your game. You will need to choose your characters, think of the environment in which the characters will be, and plan how the characters interact with each other. In Scratch, Sprites are used to create characters and backdrops are used to set up the environment.
- Production: This is where you actually get down to coding your game in the Scratch Editor. You will select your sprites, and backdrops, add code, define their interactions, and add sounds and effects. You will set up a scoring system and for more advanced games set up the logic of progressing to the higher levels.
- Testing: Once you have set up your game, you will test that everything is going as per plan. Test out if your sprite/backdrop interactions are happening as per plan and if your scoring system is working as planned. The process of testing and fixing issues is called game development. It’s always a good idea to get the game tested with a few of your friends. New users are often able to identify issues overlooked by the game developer. And you want your game to be top-notch, don’t you?
- Launch: You have fixed your major bugs. It’s now time to polish out all minor glitches and refine your game. For example, you might want to make sure that you are selecting the right sounds. Once all this is set, it’s time to launch. Press publish on Scratch Editor and it’s time to go!
Scratch can be used to make a range of projects such as games, stories, and animation. A typical process of game development goes through the following 5 phases:
Note: Depending on the complexity of the game there might be more stages such as Pre-Launch and Post Production.
Recommended Reading: Games on Scratch
Play and Make 10 Most Popular Games on Scratch
We have curated some of the most popular games on Scratch. Check out the games and the related tutorials for step-by-step instructions on how to build the games. Wiingy also provides online instructor-led tutorials that can help you build these and many more games in Scratch. Check out our Scratch coding for kids course and book a call with our academic advisor if you want to know more about these programs.
Note: You will need to open the link on a laptop/desktop to play the game.
7. Rock Blaster Game in Scratch
10. Knife Throwing Game in Scratch
Benefits of Scratch Programming Language
Scratch is a widely-used programming language and is very often used as an introductory programming language for children.Importance of Scratch programming is explained below:
- Scratch programming offers simple visuals that are designed with kids in mind. The Scratch interface allows children to use drag-and-drop functionality for coding, which is not available in complex text-based programming.
- Scratch enables students to learn algorithms and logic building. Several research studies have shown that kids introduced to Scratch find it easier to understand advanced programming concepts in later years.
- It is an all-in-one development environment for coding, art, and sound that can be used to create games, stories, and animations.
- No compiler is required. Even incomplete erroneous code can be executed without causing any syntax errors.
- Scratch has a very large user community that is of great help to learners.
Limitations of Scratch Programming
The disadvantages or limitations of Scratch programming are:
- It does not offer a progression to text-based programming languages.
- Scratch programmers suffer from code smells, dead code, and duplication.
- As programmers become more experienced, they require code compilation, version control, and the ability to manage and reuse code, which is missing in Scratch.
- Scratch programming does not allow the creation of 3D experiences which are becoming increasingly common.
- As programmers become more experienced, they require code compilation, version control, and the ability to manage and reuse code, which is missing in Scratch.
Users of Scratch
The graph below depicts the age-wise distribution of Scratch users in April 2021:

Overall Scratch users are between 4 to 60+. The age group with the most registrations is 12, followed closely by 11 and then 13. So, if you are wondering if Scratch is right for you, go for it as Scratch is loved by users of all ages.
Minimum System Requirements for Scratch Programming
Scratch is designed to run on most web browsers across desktops, laptops, and tablets. You can view projects on mobile phones, but currently, you are not able to create or edit projects on phones.
Below is the list of officially supported browsers as mentioned on the Scratch website
Desktop Requirements for Installing Scratch Programming
- Chrome (63+)
- Edge (15+)
- Firefox (57+)
- Safari (11+)
- Internet Explorer is NOT supported.
Tablet Requirements for Installing Scratch Programming
- Mobile Chrome (63+)
- Mobile Safari (11+)
Coding with ScratchJr
ScrtachJr can be defined as the kid’s version of Scratch. Scratchjr is specially designed for kids between the ages of 5 and 7 as the Scratch programming can be a little advanced to young minds. Kids can program their interactive stories, animations, and games and design projects to express their creativity. This coding platform can be the best introductory point to coding for young kids.
It was developed by a collaborative effort of a team including, Marina Umaschi Bers at Tufts University, Mitchel Resnick at MIT Media Labs, Paula Bonta and Brian Silverman at the Playful Invention Company. This app is a free app available to download for iOS, Android, and Chromebook.
Looking to learn Scratch coding? Explore Wiingy’s Online Scratch Coding Classes For Kids to learn from top Scratch coding experts.
FAQs on Scratch Programming
The frequently asked questions on Scratch Programming are explained below:
What is scratch programming?
Scratch is a block-based visual programming language that allows its users to create different kinds of projects, likes, games, animations, or stories. It helps users, especially children to understand the basics of coding and game development.
Can I download scratch programming?
Yes, the scratch application can be downloaded onto your desktop or laptop. It cannot be downloaded onto your phone though. For downloading onto your computer, go to scratch.mit.edu/download. Here you can see downloading options for different OS. Choose your OS and click on the links to download the application. After downloading you have to install the application. For this, go to your downloads and click on your scratch app download to run the application. Give all the required permission for the app to operate and for your app to be installed.
What is the importance of scratch programming?
Learning scratch programming can nurture creativity in your child, develop their math skills through practical applications, enhance their logical and analytical thinking skills, and Will definitely help them learn how to code.
Is scratch real coding?
Coding can be classified into two types. Block-based coding such as Scratch or Code.org and Text-based coding such as Python, C, and C++. Scratch programming language is a block-based coding language that uses a simple visual interface that is easy to learn. Children can create different types of projects on this, like games, animations, or stories. Scratch is very much real coding and is the world’s largest coding community for children.
What is the recommended age for scratch programming?
Scratch programming is recommended for children above the age of 8. It is primarily designed for children but people of all ages enjoy it.
How to save your project/Game in scratch programming?
You Will need to sign up and log in from scratch to save your project online. Alternatively, you can save a copy of your scratch project locally on your computer. Just go to the file menu and select “download to your computer”
What is “my stuff” in scratch?
My stuff is the personal repository section on the scratch website where one can create, share, edit, unshare and delete projects and studios. My stuff section can only be viewed if one is signed in.
What are the system requirements to download Scratch?
The downloadable version of Scratch is called the Scratch app and requires
1. Windows 10+
2. macOS 10.13+
3. ChromeOS
4. Android 6.0+
How to unshare a shared Scratch project?
The steps to unshare a Scratch project are as follows:
1. Go to my stuff Page from the scratch editor by clicking on the <> icon.
2. The my stuff Page Will open with a list of projects.
3. Scroll down until you see the project/Projects you want to unshare.
4. Click on the “unshare” button next to the project that you want to unshare.
Note: The project is only unshared, not deleted, and can be shared again in the future.
What are the benefits of signing into a scratch account?
Scratch’s basic features, such as opening the editor, watching a tutorial, and creating a project, can be done without signing in to scratch. However, signing into a scratch account allows the user to access multiple features within Scratch. Signed-up users can:
1. Share their projects on the scratch website
2. Use other features such as commenting, following, loving, and favoriting other shared projects.
3. Remix projects
4. Participate in the scratch forums
5. Personalize the user profile
Can scratch be used offline?
Scratch has an online downloadable version called the scratch app. The downloadable version is available for Windows and Mac for use on laptops and desktops.
What can one make using Scratch programming?
Using Scratch code you can create interactive stories, games, and animations.
When was Scratch launched?
Scratch was launched on Jan 8, 2007.
What is the vision & mission of Scratch?
Vision to spread creative, caring, collaborative, equitable approaches to coding and learning around the world. Mission Providing young people with digital tools and opportunities to imagine, create, share, and learn.
Who are the primary users of Scratch?
Scratch programming is designed especially for ages 8 to 16 but is used by people of all ages. Millions of people are creating Scratch projects in a wide variety of settings, including homes, schools, museums, libraries, and community centers.
How large is the Scratch community?
As per Scratch’s annual report, 2020 15 million new users registered on Scratch in 2020 up 3.8% from 201980 million projects were created on Scratch in 2020 up 37% from 201929 million people were creating projects in 2020 up 44% from 2019Scratch is translated into 64 languages, 3 more languages added from 2019.
Who are Scratchers?
Scratch users popularly known as Scratchers and use Scratch to make animations, art, music, games, and stories.
Does Scratch provide free tutorials?
Scratch has over 25 free tutorials across these categories to help users get started and make their creations.
What is the age limit for Scratch?
Scratch has users as young as 4 years and several thousand users over 60 years of age. So there is really no age limit to get started with Scratch.