How to Make a Snap the Dot Game on micro:bit? | Games on micro:bit
- Pallabi Mohanty |
- August 20, 2024
Updated By
Reviewed By

In this tutorial, we will create a simple Snap the Dot game on micro:bit. Snap the dot game on micro:bit is a game of skill. In this game, the player has to press the button [B] exactly when the LED dot sprite reaches the Micro: Bit screen’s center [2, 2]. The LED sprite will move from right to left at the center row of the Micro:bit display, and if you press button [B] exactly when it reaches the center [2, 2], then the correct symbol will display, and also the score will increase by one otherwise you will lose a life. You can use the button [A] to increase [game complexity], and the LED sprite movement speed.
Looking to learn Robotics? Explore Wiingy’s Online Micro:bit Classes For Kids to learn from top micro:bit experts.
Requirements for making a Snap the Dot game on micro:bit
The list of things required for making a snap the dot game on micro:bit is as follows:
- micro:bit or MakeCode simulator
- MakeCode or Python Editor
How to make a Snap the Dot game on micro:bit?
There are a total of seven steps involved in making this game. The step is given below:
There are five steps involved in making this game:
- Create a LED sprite [dot]
- Move the LED sprite [dot]
- Program the button B [test if the sprite is in the center or not]
- Add game life & game over
- Add Game complexity
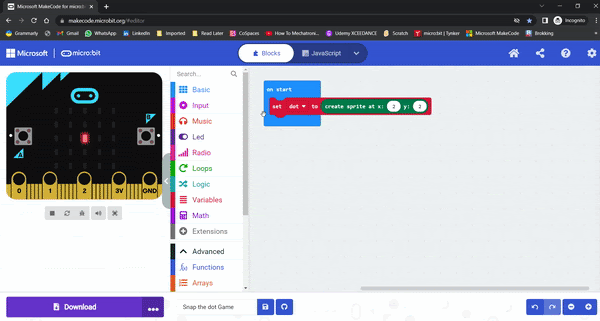
Step 1: Create a LED sprite [dot]
First, start making a LED sprite. For this, we will create a variable called the “dot”. The coding involved for this is shown below.
- Create a new variable called the “dot”. Drag the “set dot to” block into the “on start” block on the workspace.
- Pull out the “create sprite” block and put it in “set dot to” replacing the 0. A sprite is a single pixel that can move on the screen. It has an x and y position along with a direction of motion.
- Set the position value x=2 and y=2 as shown below.
- Click on the “restart” button of the simulator.
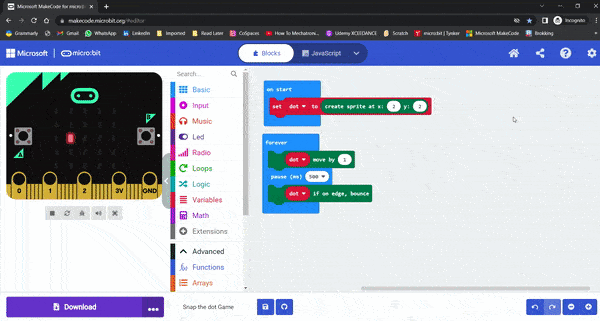
Step 2: Move the LED sprite [dot]
In the second step, we need to move the sprite (dot). As the game states, the dot starts from the center of the micro:bit display. The dot needs to move to the edge of the display and bounce back and then we need to put a forever loop in it. The detailed steps are given below.
- The sprite starts in the center facing right. Put the “move” block into the “forever” to make it move. Notice how it moves to the right but does not bounce back.
- Grab the “if on edge, bounce” block to make the sprite bounce on the side of the screen. Also, add a pause block to slow down the sprite.
- Click on the “restart” button of the simulator.
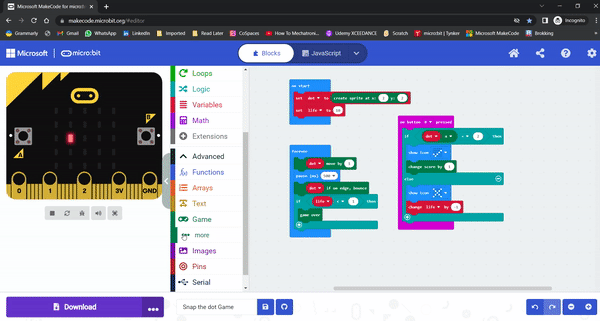
Step 3: Program the button B [test if the sprite is in the center or not]
Now, test if the sprite is in the center or not by pressing button B.
- When button B is pressed, we test if the sprite is in the center or not.
- Use the “on button pressed” block to handle the B button. Put in the “if” block and test if x is equal to 2 as shown below.
- If x is equal to 2 then from the basics drop the show icon block and select the icon [correct] and also increase the score by one as shown below.
Step 4: Add game life and game-over feature
Now, we need to add game life and a game-over condition.
- If x is not equal to 2 then from the basic blocks add icon [corss]
- Let’s add game life to enhance the game.
- Create a variable to keep track of game life.
- Set the game life to 10; you can set any
- Change the game life by one negative number if x is not equal to two.
- To make the game end, add a conditional statement to check if the game life is less than one, then if the game life is less than one, make the game over.
- Drop the coding blocks as shown below.
- Click on the “restart” button of the simulator.
- You can see, on button B press you can spot the LED sprite [dot] if it is in the center then your score increases by one otherwise you will lose your life.
- If life is less than one then the game gets over.
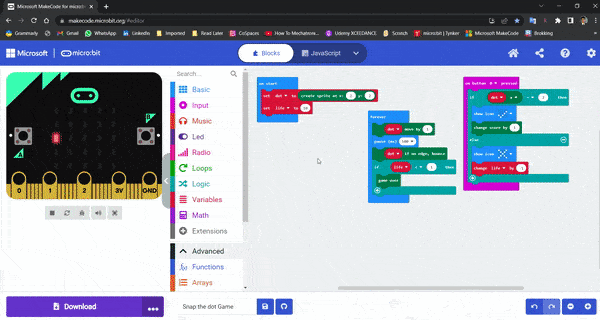
Step 5: Add complexity to the game
Now that your game is complete you can now add complexity to the game, for example increasing the speed of LED movement.
- To enhance the game more, let’s control the speed of LED sprite movement.
- Create a variable with the name speed to keep track of speed.
- On button A, press to increase the LED sprite speed [right to the left movement]; to do this, we have to decrease the delay of sprite movement.
- Decreasing the speed of the LED sprite [dot] will increase the game’s complexity.
- Drop the “on button A presses” block as shown below
- Put the “change speed by” block into the “on button A pressed” block and change the speed by -100.
- Write a conditional statement to check whether the speed is less than 100 then show the score and set the speed 500.
- If you click more than four times on button A, then again, the speed will be slow as in the beginning.
- Click on the “restart” button of the simulator.
Congratulations! You have now created your own Snap the Dot game on the micro:bit!
If you have a micro:bit connected, click “Download” to transfer your code and watch the Snap the Dot game on your device!
More micro:bit projects
- Coin Game
- Apple Catching Game
- Space Invaders Game
- Flappy Bird Game
- Flashing Heart Project
- Beating Heart Project
- Name Badge Project
- Emoji Project
- Animated Animals Project
Looking to learn Robotics? Explore Wiingy’s Online Micro:bit Classes For Kids to learn from top micro:bit experts.
FAQs on Snap the Dot game on micro:bit
Is micro:bit snap the dot game easy or difficult?
Snap the dot games on micro:bit is an easy beginner-friendly game that you can make. There are only 5 steps involved in making the game.
What is the crashy bird game on micro:bit?
The crashy bird game of micro:bit is similar to the flappy bird game in micro:bit. The objective of this game is to directly fly a bird that is moving to the right, through a set of obstacles. If the bird touches an obstacle, it is game over.
What are Microsoft MakeCode projects?
MakeCode is a programming language. In micro:bit, one can create projects using the MakeCode coding language. It is a simple block-based programming language that uses a drag-and-drop interface. The projects created on micro:bit using Microsoft MakeCode language are called Microsoft MakeCode projects.
What is Microsoft MakeCode?
Microsoft MakeCode is a simple visual coding language. It has a drag-and-drop interface, which means the codes are in the shape of blocks and can be dragged and dropped onto the editor in order to create and run a script.
What are some of the cool micro:bit projects I can make?
You can make many cool and easy micro:bit projects like flashing heart, beating heart, apple catching game, coin game, flappy bird game, snap the dot game, space invaders game, and many more.
We hope that the above guide has helped you with creating your own snap the dot game on micro:bit. If you have any questions related to this post, ping us through the comment box below and we will get back to you! To continue your learning on micro:bit, read our guide on micro:bit projects to create different types of projects on micro:bit.