How to Make micro:bit Apple Catching Game? | BBC micro:bit MakeCode Tutorial
- Sachin Upadhayay |
- August 20, 2024
Updated By
Reviewed By

In this article, let us discuss how to make a micro:bit apple-catching game using the MakeCode framework. With the help of our article, you will be able to create a simple micro:bit Apple catching game. The instructions are very simple and easy to understand for any beginner. Let’s dive into the blog and create a game from scratch!
How to make a micro:bit Apple catching game?
In this tutorial, we are creating a game where objects fall from the sky and the users are supposed to catch them. Every time a user catches the objects, they will be rewarded with 1 point.
In the following figure, we see an LED sprite [apple] falling and another LED sprite [basket] catching it.
![LED sprite [apple] falling](https://cdn.wiingy.com/blog/wp-content/uploads/2022/08/image1-1.gif)
Now let us understand the detailed steps involved in creating this catch the egg/apple game on micro:bit.
What are the steps involved to create the Apple catching game?
The step-by-step process involved in creating the micro:bit catching game is as follows:
- Set up conditions
- Move the basket LED sprite
- Create the Apple LED sprite
- Make the apple fall down from top
- Catch the Apple
- Add a scoreboard
- Add sounds and countdown
Create new game
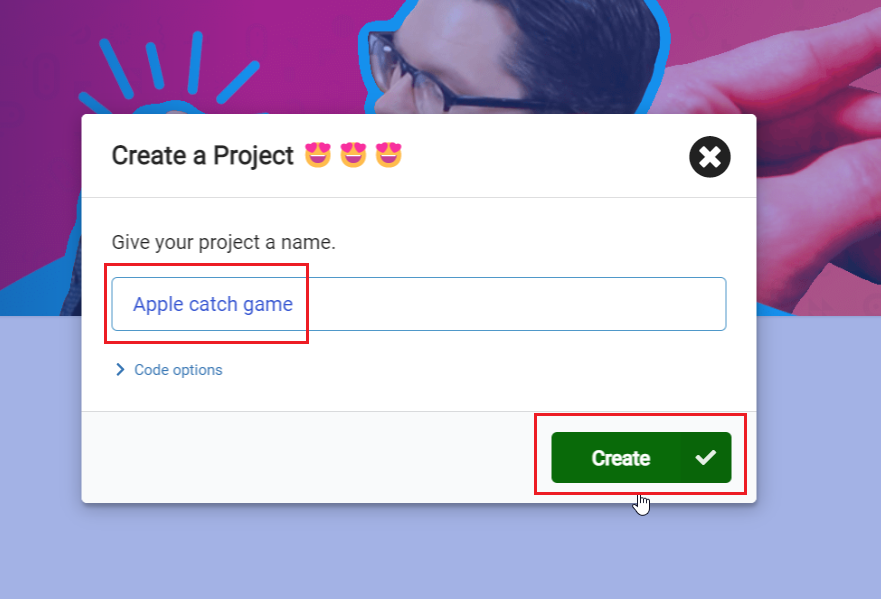
The first step towards creating a micro:bit apple catching game is to login to the website. The steps to do this are explained below.
- Step 1: Visit the official website of Microsoft MakeCode for micro:bit. – makecode.microbit.org.
- Step 2: Click on the “New Project“.
- Step 3: Name your project and click on “Create“.
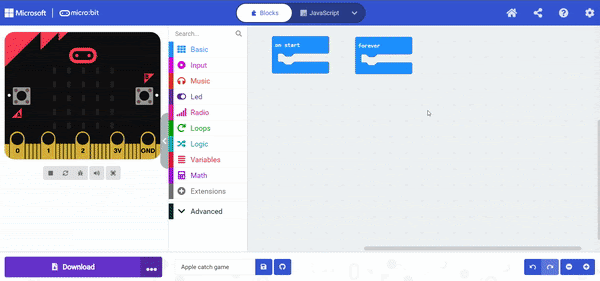
Step 1: Set up conditions
- Open the MakeCode user Interface.
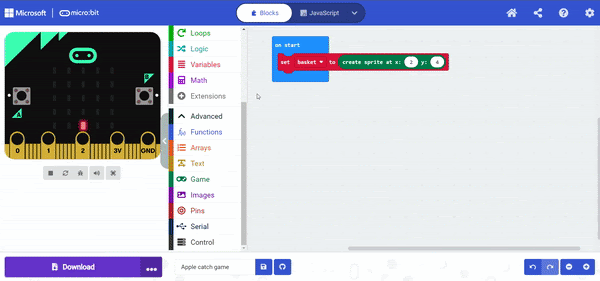
- Create a “basket” LED sprite to collect the “apple” LED sprite.
- Create a variable to store the basket LED sprite.
- Click on “Variables”, and click on “Make a Variable.”
- Name your variable “basket.”
- From the “Variables”, drag & drop the “set basket to” block and drop it to the “on start” block.
- Click on “Game” and drag & drop “create sprite at x y” and set the condition (2, 4).
The micro:bit’s display is made up of 25 light emitting diodes or LEDs arranged in a grid/matrix. You can use these LEDs to show words, numbers and images. |  |
| 5×5 LED Micro:bit matrix Coordinates | ||
 |  |  |
| (0, 0) | (3, 3) | (2, 2) |
- Click on
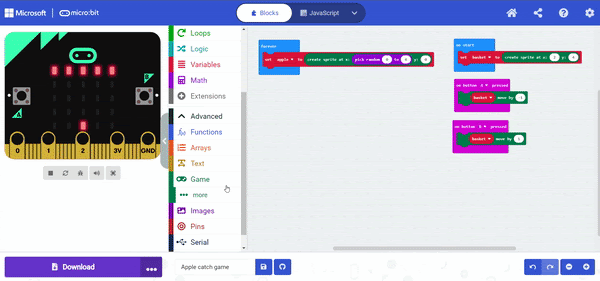
Step 2: Move the LED basket sprite
Now in the next step, we have to move the LED basket sprite. The detailed steps on how to do this are explained below. Here we have to control LED basked sprite via the micro:bit buttons A and B.
- Move the basket left if you click on button A and on button B, then move it in the right direction.
- Click on the “Input” and drag & drop “on button A pressed” block.
- Click on the “game” and “sprite move by block” as shown below.
- And click on the dropdown and select “basket”, and set the value to negative 1 as shown below.
- Click on
and then
A.
- Click on the “Input” and drag & drop “on button B pressed” block.
- Click on the “Game” and drag & drop the “sprite move by” block, and click on the dropdown menu and select “basket” sprite.
- Set the value to positive.
- Click on buttons A and B as shown below.
- You can control the basket sprite using left and right microbit buttons.
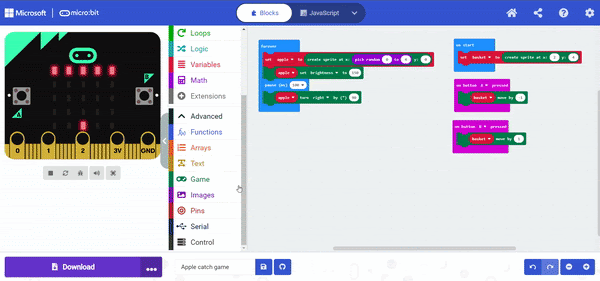
Step 3: Create an Apple LED sprite
In this step, we are creating an Apple LED sprite. The detailed steps on how to do this are given below:
- Create an apple sprite at a random position on the top row of the LED matrix.
- Create a variable to store the apple LED sprite.
- Click on “Variables” and click on “Make a Variables”.
- Name your variable apple.
- Click on the “Game” and drag & drop the “create sprite at x y” block as shown below.
- Make the x position of the sprite random.
- Click on the “Math” and drag & drop the “pick random” block to the x position as shown below.
- Set the y value to zero.
- Click on “stop the simulator”.
- Apple LED spirited create at the first row of LEDs matrix.

- Change the apple LED sprite brightness to differentiate it from the basket LED sprite.
- And change the LED direction so that it can move downwards.
- Click on the “Game” and drag & drop the “sprite set brightness to” block and set its value to 150.
- Drag and drop the “pause ms(100)” block.
- Click on the “Game” and drag & drop the “sprite turn right by” block.
- Set the degree value to 90 at the bottom.
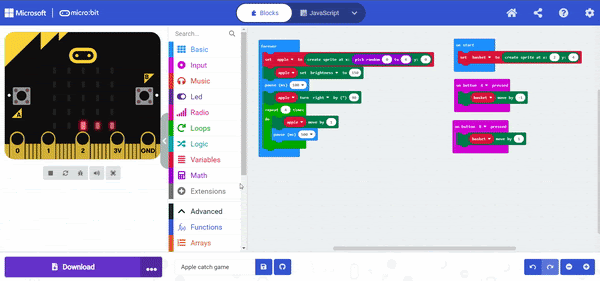
Step 4: Make the Apple sprite fall from the top
Now we have to move the apple sprite from top to bottom, from row zero to four. The detailed steps on how to do this on a micro:bit are given below:
- Click on “Game” and drag & drop the “sprite move by” block, then click on the dropdown and select “Apple Sprite.”
- Add a delay, then drag and drop the “pause” block as shown below.
- Move the apple sprite from top to bottom, so move the sprite four times.
- Click on the “Loops” and drag and drop the “repeat times” block as shown below.
- Click on “restart the simulator”.
- Apple LED sprite is coming from top to bottom but it is stuck at the bottom. And it should disappear once it reaches the edge of the LED display.
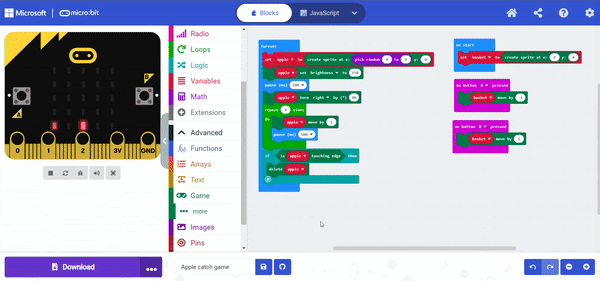
Step 5: Catch the Apple with the basket sprite
We have to display that the Apple LED sprite is coming from top to bottom, but it is stuck at the bottom and is being caught in the basket. For this, we should make it disappear once it reaches the edge of the LED display. The detailed steps on how to do this are explained below.
- Add a conditional statement to detect whether the apple LED sprite touches the bottom edge. Delete the apple sprite once it reaches the bottom edge.
- Click on “Logic” and drag & drop the “if-then” block as shown below.
- Click on “Game” and drag & drop the “delete sprite” block.
- Click on the dropdown and select “apple”.
- The apple sprite disappears if it reaches the edge of the LED display.
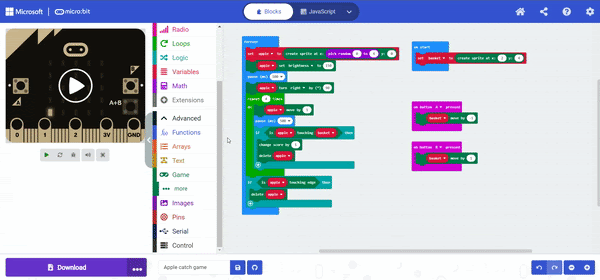
Step 6: Count the Score
Here, we will have to detect the collision between the object and the basket. For doing the same, we are using a conditional statement which detects whether the apple touches the basket or not. The detailed steps on how to do this in micro:bit are explained below.
- Click on “Logic” and drag & drop the “if-then” block as shown below.
- Drag and drop the “is apple touching basket” block to the “if-then” block after clicking on “Game.”
- Drag and drop the “basket” to the “is apple touching basket” block after clicking on “Variables.”
- Drag and drop the “change score by” block and set its value by 1 as shown below.
- Drag & drop the “delete sprite” block from the “Game” and select the Apple LED sprite.
- Click on “restart the simulator”.
You can see that if an apple touches the basket sprite, a change score animation comes and scores increase by one.
Step 7: Add sound and countdown
In this step, we have to set the score to zero when the game starts. Also, we will be adding a countdown to set the game over the condition. The detailed steps on how to do this in micro:bit is explained below:
- Click on the “Game” and drag & drop the “set score 0” block to the “on start” block as shown below.
- Click on the “Game” and drag & drop the “start countdown (ms)” block to the “on start” block.
- And set its value to 10000 ms here.
- To enhance the game, let’s add sound to it when the basket LED sprite touches the apple LED sprite.
- Click on “Music” and drag and drop the “play tone for” block.
- Click on it and select any tone and its beat as shown below.
- Click on “restart the simulator”.
- Using buttons A and B, you can control the basket LED sprite.
- Now, You can see an LED sprite apple falling and another LED sprite basket catching it. And after each successful catch, you will get a score.
- After 10 seconds, the game is over, and your score is displayed on the Microbit screen.
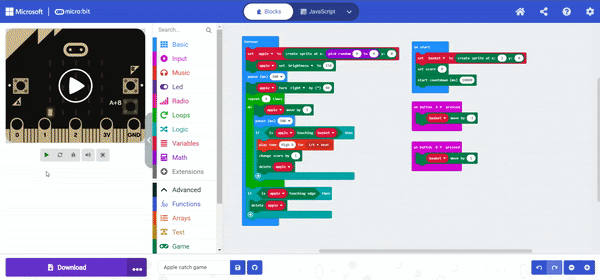
micro:bit Apple catching game code
The code for micro:bit apple catching game is given below. This code can also be used for egg catching game, just replace the Apple sprite with an Egg sprite.

More micro:bit projects
- Coin Game
- Name Badge Project
- Space Invaders Game
- Flappy Bird Game
- Flashing Heart Project
- Beating Heart Project
- Snap the Dot Game
- Emoji Project
- Animated Animals Project
Looking to learn Robotics? Explore Wiingy’s Online Micro:bit Classes For Kids to learn from top micro:bit experts.
FAQs on Apple catching game on micro:bit
What are games in micro:bit?
Many fun and interesting projects can be created in micro:Bit using simple extensions and blocks. One of the types of projects is games in micro:bit. You can create different types of games on micro:bit using any programming language you want. Games like, coin games, and flappy birds are all beginner-friendly.
What is Microsoft MakeCode?
Microsoft MakeCode is a simple visual coding language. It has a drag-and-drop interface, which means the codes are in the shape of blocks and can be dragged and dropped onto the editor in order to create and run a script.
What are the steps involved in making a catching game in micro:bit?
The steps involved in creating a catching game in micro:bit is listed below:
- Setting up Conditions
- Move the Basket Led Sprite
- Create the Apple Led Sprite
- Go to the Top & Fall Down
- Catch the Apple
- Adding Score
- Adding Sounds & Countdown
What are some of the beginner-friendly micro:bit projects I can make?
You can make many beginner-friendly micro:bit projects like flashing heart, beating heart, apple catching game, coin game, flappy bird game, snap the dot game, space invaders game, and many more.
What are Microsoft MakeCode projects?
MakeCode is a programming language. In micro:bit, one can create projects using the MakeCode coding language. It is a simple block-based programming language that uses a drag-and-drop interface. The projects created on micro:bit using Microsoft MakeCode language are called Microsoft MakeCode projects.
How to make space invaders on micro:bit?
To make a space invaders game on micro:bit follow the below steps:
- Create and move the ship sprite
- Create an enemy sprite at a random position
- Move the enemy sprite
- Create a bullet sprite on button a+b
- Move the bullet sprite down
- Keep score
- Add game over
How to create a sprite in micro:bit?
To create a sprite in micro:bit follow the below-mentioned steps:
- Click on “Variables” and click on the “Make a Variables..”.
- Name your variable sprite.
- Click on the “Game” and drag & drop the “create sprite at x y” block as shown below.
- Make the x position of the sprite random.
- Click on the “Math” and drag & drop the “pick random” block to the x position as shown below.
- Set the y value to zero.
- Click on show
- Sprite is created at the first row of LEDs matrix.
We hope this article on “how to make catching game in micro:bit” was helpful to you. If you have any questions related to this page, ping us through the comment section below and we will get back to you as soon as possible. For further learning, read our micro:bit projects guide to creating different types of projects on micro:bit.