How to Make a Game in Scratch? [Scratch Game Tutorial For Beginners!]
- Aditi |
- May 30, 2024
Updated By
Reviewed By

Creating games on Scratch is both fun and educational as it allows users to explore their creativity and also helps them in learning about the basics of coding and game development. If you are new to Scratch, this game tutorial is the right fit for you. With this tutorial, you will learn how to make a game in Scratch in a few simple steps.
Looking to learn Scratch coding? Explore Wiingy’s Online Scratch Coding Classes For Kids to learn from top Scratch coding experts.
Components of Scratch editor
Now, before creating a game, there are certain components that a user should know and keep in mind about the Scratch editor.
1. User interface
The user interface of Scratch is completely user-friendly and extremely easy for kids to use. On the left side, all the coding blocks are available having a rolling menu. In the middle, the coding area is present where the user can simply drag the blocks that he must have selected from the coding area. On the upper right side, the stage area is present where the user can run his code, and just below that, there is an area where the user can manage the sprites and backdrops used in the program.
2. Code blocks
Scratch has many code blocks having different functions for different conditions. Each block is different in color, making it easy for users to differentiate between different blocks. There are in total 9 blocks, Motion blocks, Looks blocks, Sound blocks, Events blocks, Control blocks, Sensing blocks, Operators blocks, Variables blocks, and My Blocks. The user can also create his own blocks using “My Blocks”.
3. Visual and block-based coding
Scratch has the concept of block-based coding. On combining and putting together different blocks, the user can create an entire program or any game, where each block will be responsible for different actions of the program.
4. Sprites
Sprites are like objects or in-game characters in Scratch. Every new project in Scratch comes with some pre-loaded in-game characters and if the user wants to add more characters as per the requirement of the project, he can add from the sprite library that contains a wide range of characters and objects ranging from fiction characters to fantasy characters. It is also possible to design new sprites instead of choosing from the library.
5. Games creation
Scratch helps kids in creating games in a very short span of time in a fun way. Kids can create simple as well as super advanced games using Scratch.
Along with the above-mentioned components, every user must know about the following points in order to create any game in Scratch.
- Step 1: Have a starting plan. For creating any game in Scratch, the user must have a starting plan and everything related to the game should be done as per the plan. The plan must include the visual theme of the game, the core mechanism of the game, and in the end, how to bring all the components of the game together.
- Step 2: Idea about the main character of the game. After having the starting plan, the next important thing is to have an idea about the main character of the game. The user must have an idea of how the main character of his game should look and later, the user must create a sprite as per the idea.
- Step 3: Idea about the backdrop of the game. After the creation of the main character of the game, the user must focus on creating or selecting the perfect backdrop for the game.
- Step 4: Clarity about the objective of the game. The user should be crystal clear about the objective of the game. After the creation or selection of the main character and backdrop of the game, the user must start coding as per the objective of the game.
- Step 5: Idea about adding more features to the game. After deciding the main character, backdrop, and objective of the game, the user must have an idea about all the additional features that can e added at the end of the game.
If every user follows all the five above-mentioned steps for creating a game in Scratch, the final game will surely turn out to be the perfect and most interesting game.
How to make a game in Scratch?
Now, let’s see how to create a simple and basic Ball-Paddle game in Scratch.
- Step 1: As a first step of creating a Ball-Paddle game, you need to add three sprites, a paddle, a ball, and a line. Make sure to delete the pre-loaded cat sprite.
- Step 2: Go to the sprite icon in the bottom-right corner of the Scratch interface that says “Choose a Sprite” and then click on the first option from the bottom.
- Step 3: Clicking the “Choose a Sprite” option opens the sprite library as shown below. Now, search for a paddle, a ball, and a line.
- Step 4: After searching and selecting the three sprites, they will automatically be added to the coding area, as shown below.
Code for Paddle
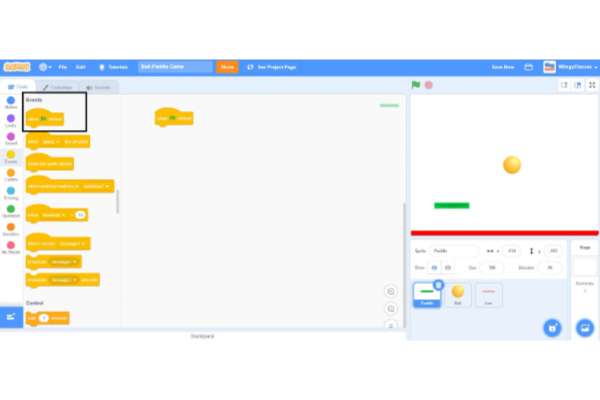
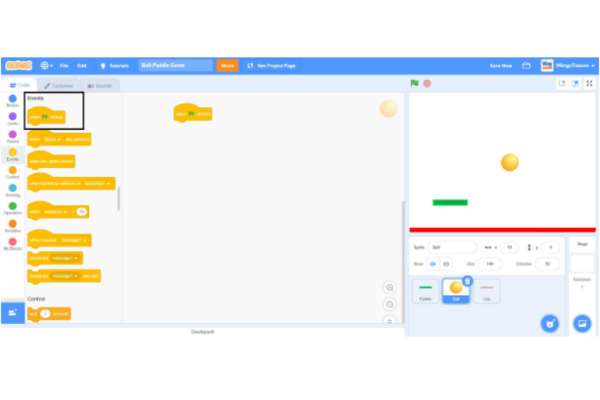
- Step 1: Now, start the coding with the coding of the paddle. While coding for the paddle, make sure that the box having the name “Paddle” is selected in the Sprite Pane. Go to the “Events” block on the block palette, select the “when green flag clicked” block, and drag to the coding area.
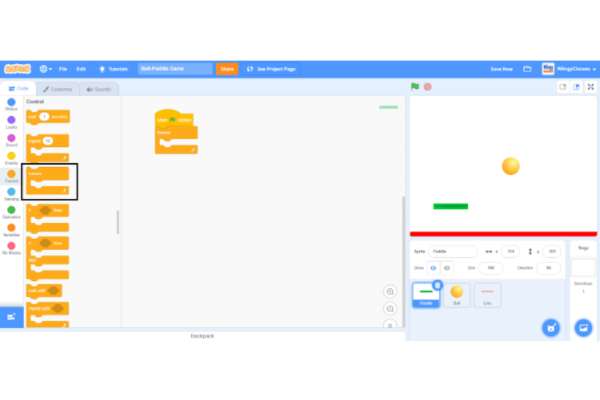
- Step 2: Go to the “Control” block on the block palette, select the “forever” block, drag to the coding area, and place it under the “when green flag clicked” block.
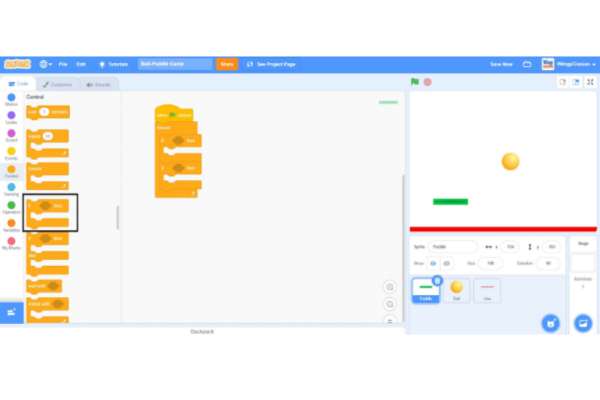
- Step 3: From the “Control” block on the block palette, select two “if ( ) then ( )” blocks, drag to the coding area, and place them in the “forever” block. The two “if ( ) then” blocks help in giving direction to the program using the left and right arrow keys.
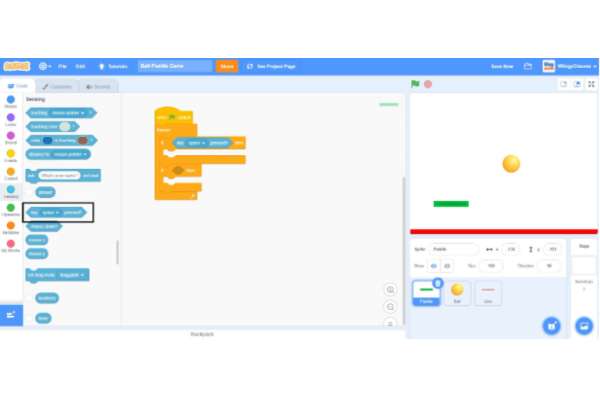
Step 4: Go to the “Sensing” block on the block palette, select the “key ( ) pressed?” block, drag to the coding area, and place it in the if condition of the first “if ( ) then ( )” block.
- Step 5: From the “Motion” block on the block palette, select the “move ( ) steps” block, drag to the coding area, and place it in the then condition of the first “if ( ) then ( )” block. In the “move ( ) steps” block, the step count is “10”, by default, so leave it like that.
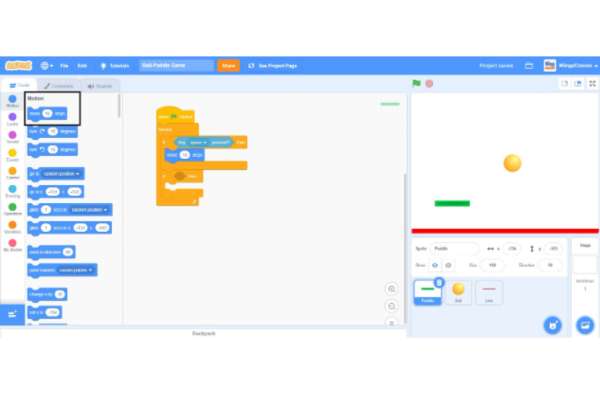
- Step 6: From the “Sensing” block on the block palette, select the “key ( ) pressed?” block, drag to the coding area, and place it in the if condition of the second “if ( ) then ( )” block.
- Step 7: Go to the “Motion” block on the block palette, select the “move ( ) steps” block, drag to the coding area, and place it in the then condition of the second “if ( ) then ( )” block.
- Step 8: In the “move ( ) steps” block, enter the step count as “-10”.
Code for Ball
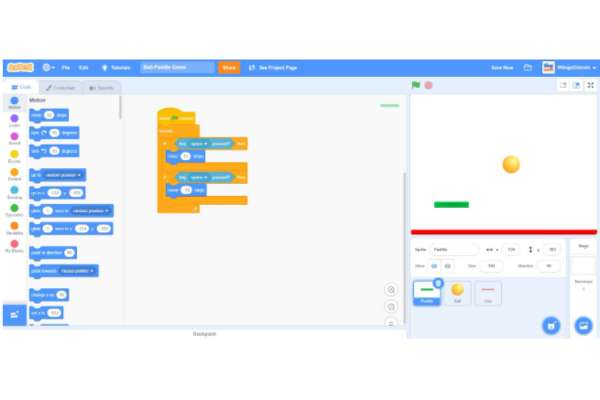
- Step 1: Now, while coding for the ball, make sure that the box having the name “Ball” is selected in the Sprite Pane. Go to the “Events” block on the block palette, select the “when green flag clicked” block, and drag to the coding area.
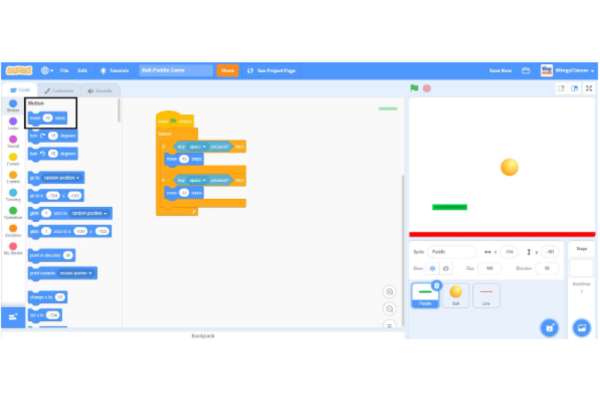
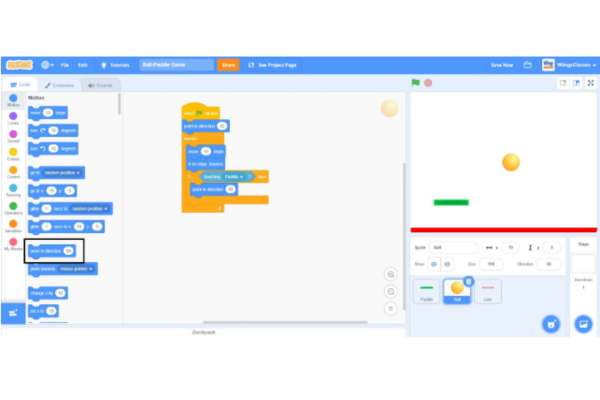
- Step 2: Go to the “Motion” block on the block palette, select the “point in direction ( )” block, drag to the coding area, and place it under the “when green flag clicked” block.

- Step 3: In the “point in direction ( )” block, enter the value as “45”.
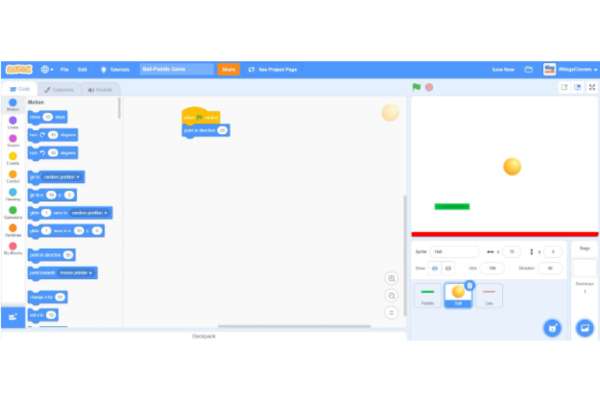
- Step 4: Go to the “Control” block on the block palette, select the “forever” block, drag to the coding area, and place it under the “point in direction ( )” block.
- Step 5: From the “Motion” block on the block palette, select the “move ( ) steps” block, drag to the coding area, and place it in the “forever” block. In the “move ( ) steps” block, leave the steps count as “10”.
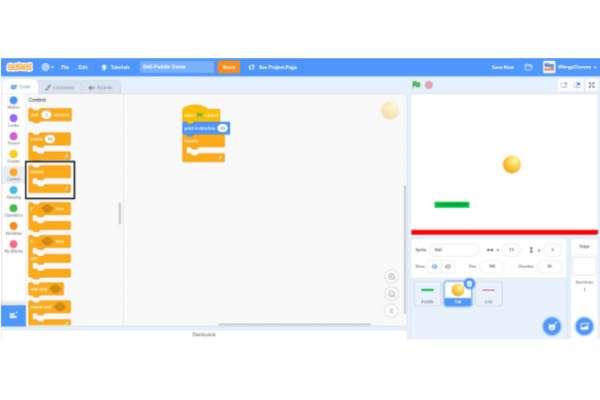
- Step 6: Again from the “Motion” block on the block palette, select the “if on edge, bounce” block, drag to the coding area, and place it under the “move ( ) steps” block inside the “forever” block.
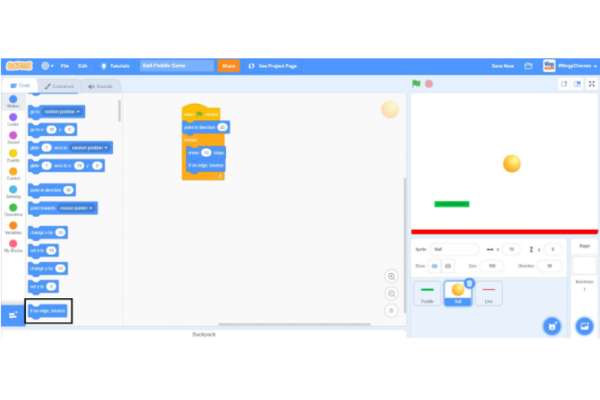
- Step 7: Go to the “Control” block on the block palette, select the “if ( ) then ( )” block, drag to the coding area, and place it under the “if on edge, bounce” block inside the “forever” block.
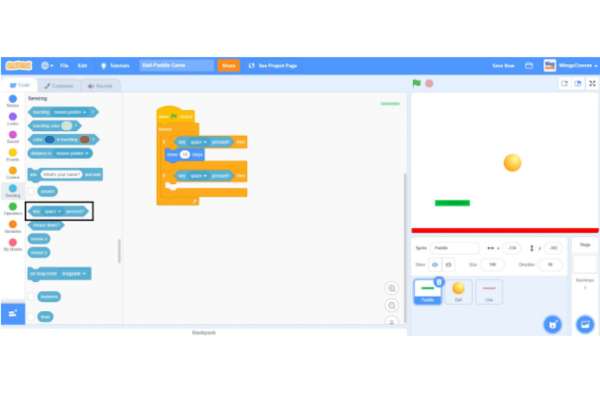
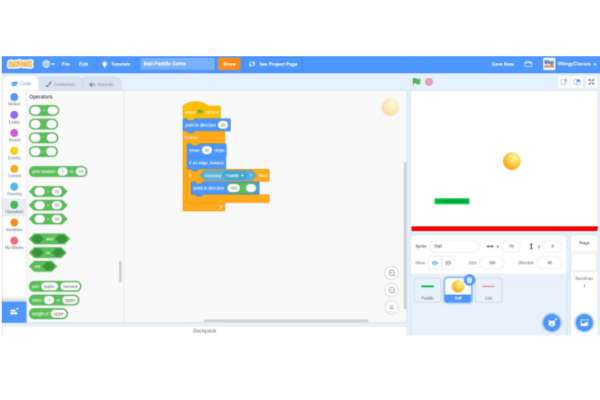
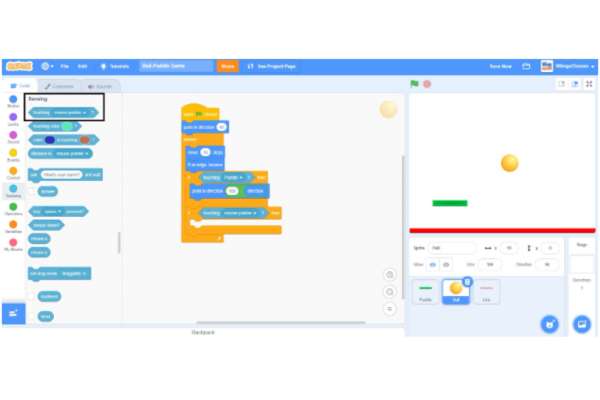
- Step 8: Go to the “Sensing” block on the block palette, select the “touching ( )?” block, drag to the coding area, and place it in the if condition of the “if ( ) then ( )” block.
- Step 9: In the “touching ( )?” block, select the value “Paddle” from the drop-down menu.
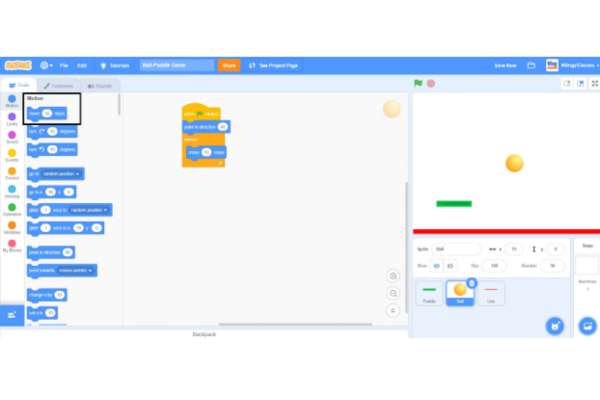
- Step 10: Go to the “Motion” block on the block palette, select the “point in direction ( )” block, drag to the coding area, and place it in the then condition of the “if ( ) then ( )” block.
- Step 11: Go to the “Operators” block on the block palette, select the “( ) – ( )” block, drag it to the coding area, and place it in the value part of the “point in direction ( )” block.
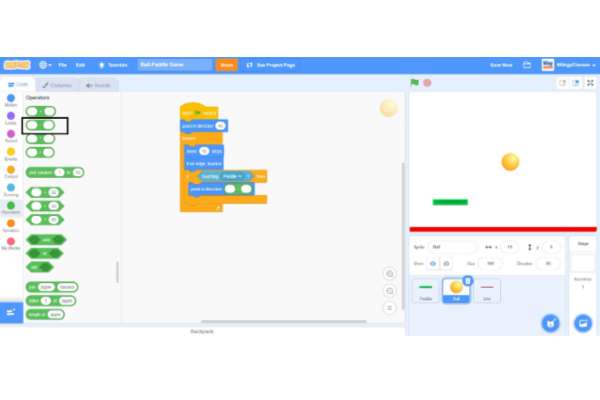
- Step 12: In the “( ) – ( )” block, enter the first value as “180”.
- Step 13: Go to the “Motion” block on the block palette, select the “direction” block, drag it to the coding area, and place it in the second value part of the “( ) – ( )” block.
- Step 14: A game is nothing without a win/lose condition. So, in this game, we will set the condition as if the paddle misses the ball and the ball touches the bottom of the stage, then the game will stop.
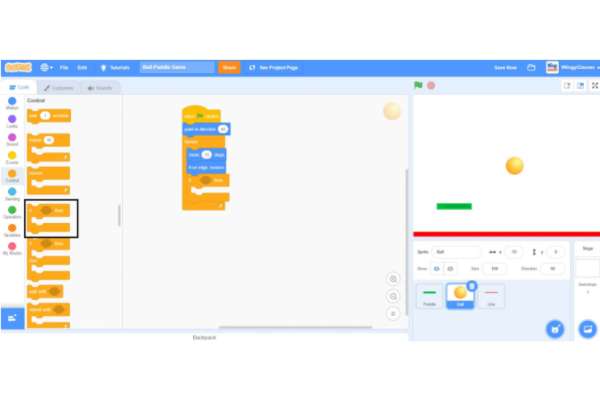
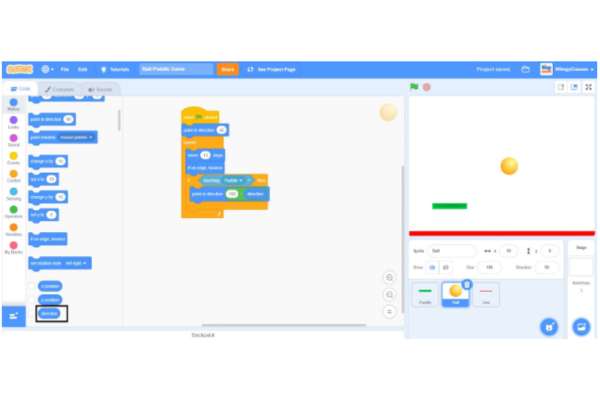
For this, go to the “Control” block on the block palette, select another “if ( ) then ( )” block, drag to the coding area, and place it under the first “if ( ) then ( )” block inside the “forever” block.

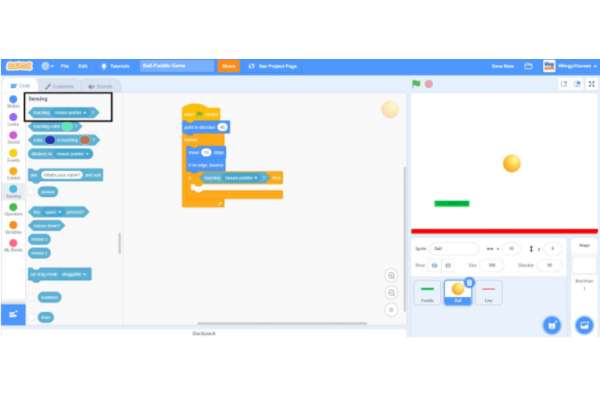
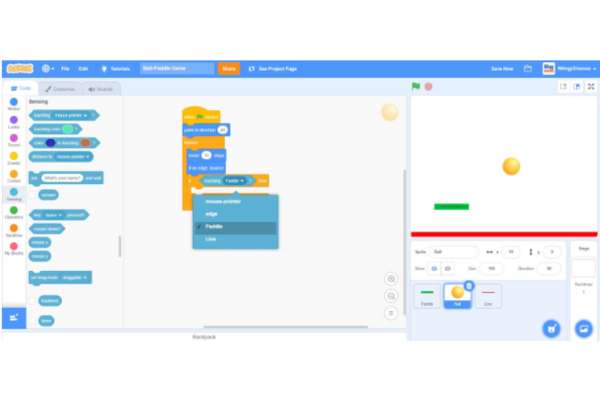
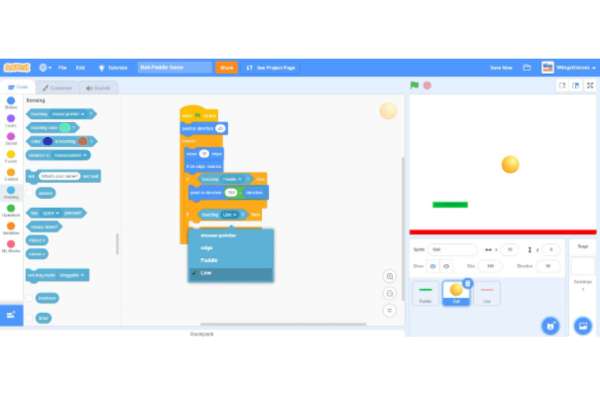
- Step 15: Go to the “Sensing” block on the block palette, select the “touching ( )?” block, drag to the coding area, and place it in the if condition of the second “if ( ) then ( )” block.
- Step 16: In the “touching ( )?” block, set the value as “Line” from the drop-down menu.
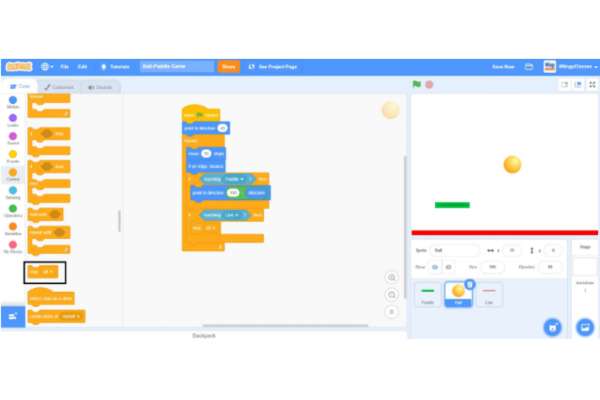
- Step 17: Go to the “Control” block on the block palette, select the “stop (all)” block, drag to the coding area, and place it in the then condition of the second “if ( ) then ( )” block.
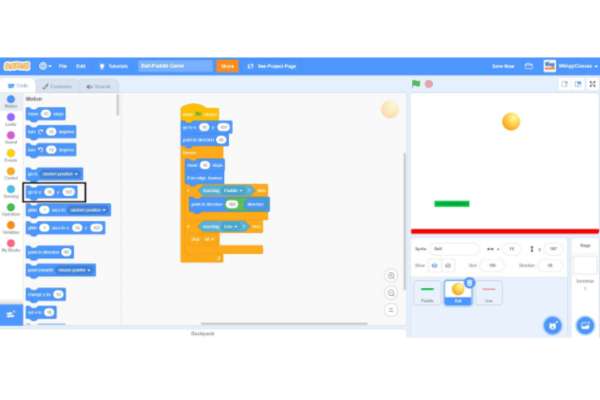
- Step 18: After adding the loss condition, one problem will occur, that is, when a player starts the game, all will, by default, be in the losing condition. So, to overcome this problem, we need to set the starting position of all in the ball’s code.
For that, drag the all at the top-center of the stage area and then go to the “Motion” block on the block palette, select the “go to x: ( ) y: ( ) ” block, drag to the coding area, and place it under the top “when green flag clicked” block and above the “point in direction ( )” block.
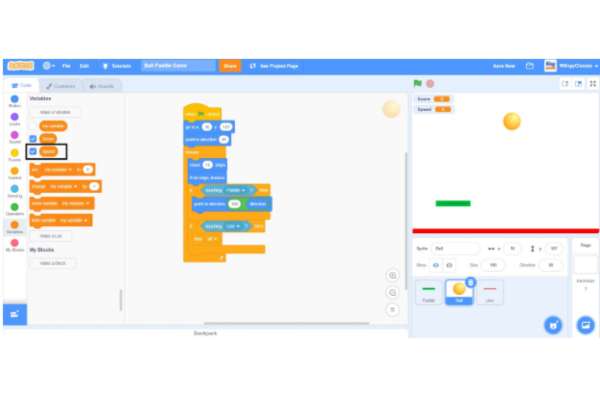
Making Variables
Variables act like the heart of any code. In this game, we will use the variables to keep and display the scores.
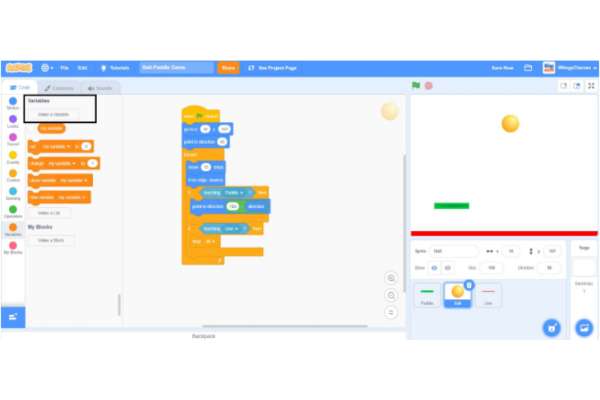
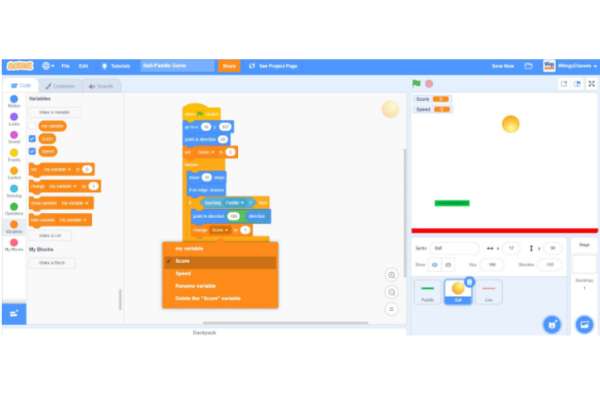
- Step 1: Go to the “Variables” block on the block palette and click on the “Make a Variable” option.
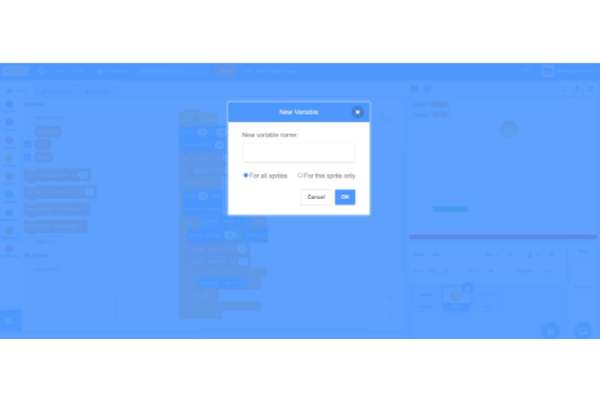
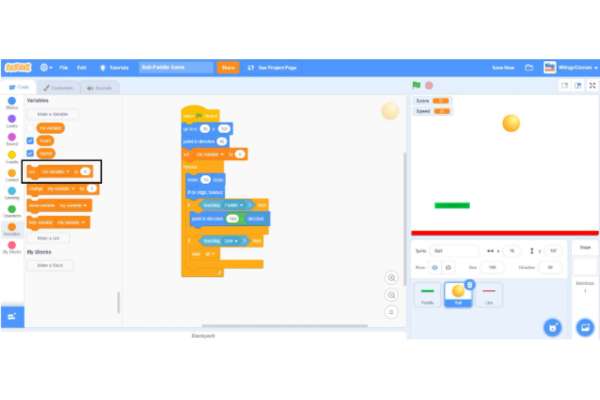
- Step 2: Once you click on the “Make a Variable” option, the following screen will be shown.
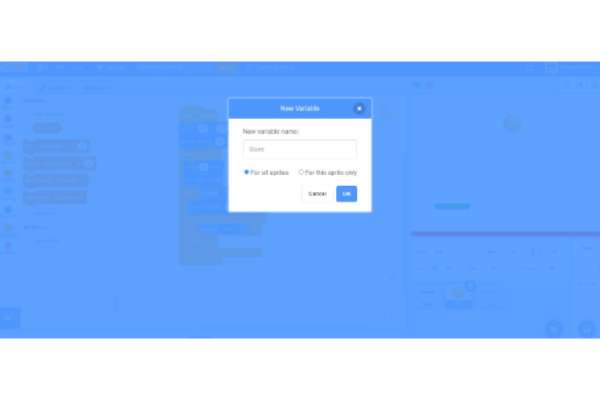
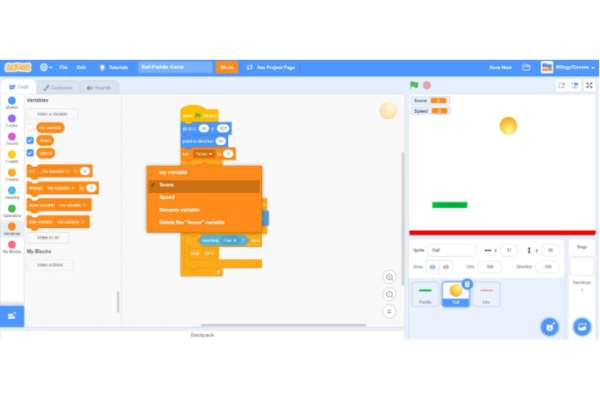
- Step 3: Now, name the variable “Score” and click on the “OK” option available at the bottom-left corner. Make sure to select the “For all sprites” option.
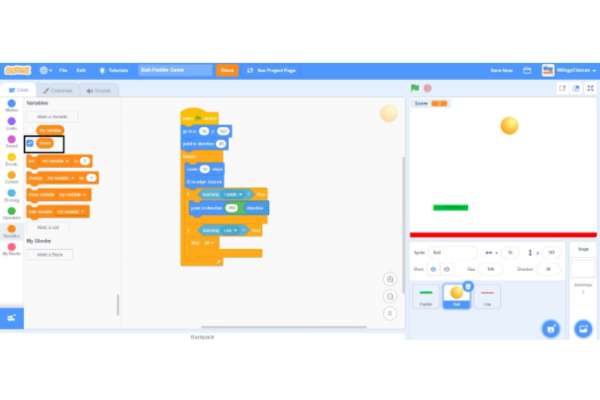
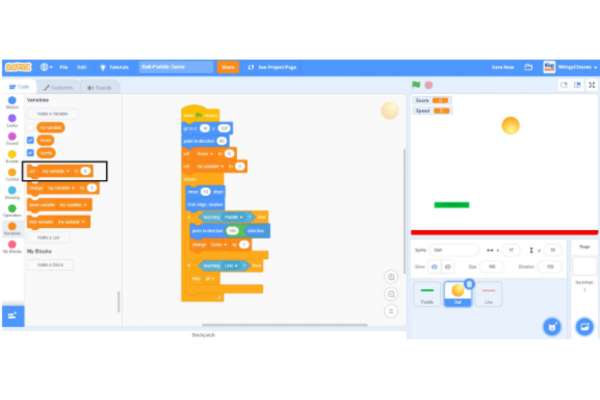
- Step 4: The score variable will now be shown in the stage area as shown below.
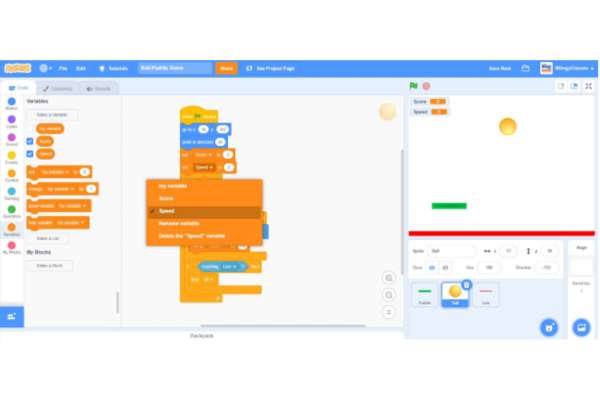
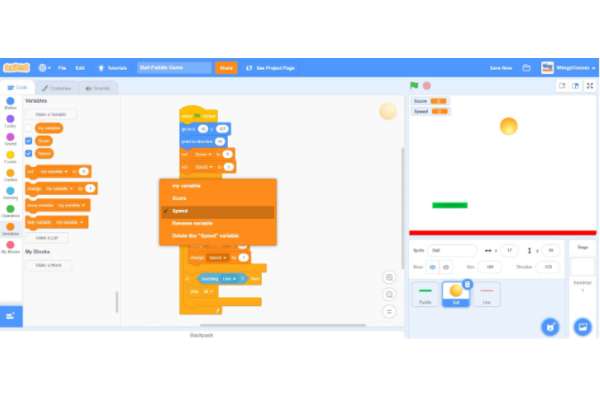
- Step 5: Follow the above steps and create another variable named “Speed”.
- Step 6: From the “Variables” block on the block palette, select the “set ( ) to 0” block, drag to the coding area, and place it under the “point in direction ( )” block and above the “forever” block in the ball’s code.
- Step 7: In the “set ( ) to 0” block, set the value as “Score” from the drop-down menu.
- Step 8: From the “Variables” block on the block palette, select the “change ( ) by 1” block, drag to the coding area, and place it under the “point in direction ( )” block in the then condition of the first “if ( ) then ( )” block inside the “forever” block in the ball’s code.
- Step 9: In the “change ( ) by 1” block, set the value as “Score” from the drop-down menu.
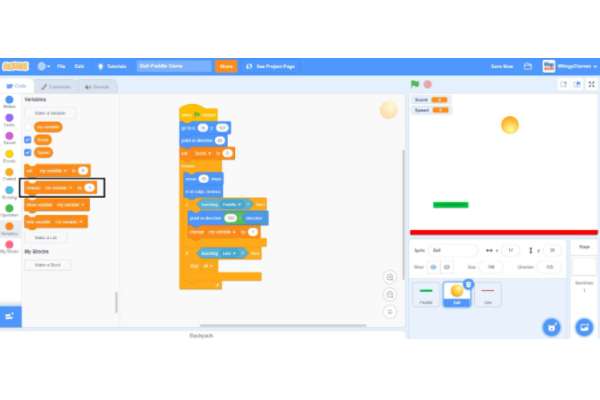
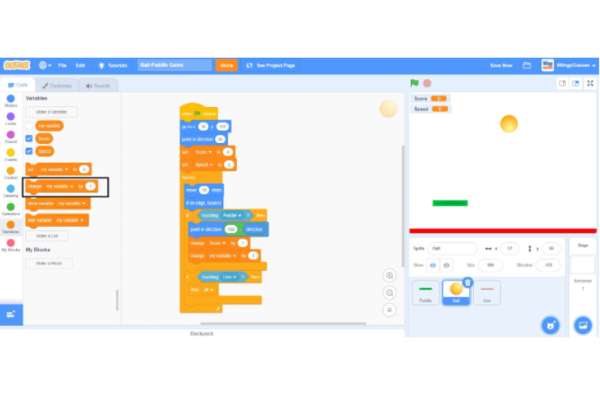
- Step 10: From the “Variables” block on the block palette, select the “set ( ) to 0” block, drag to the coding area, and place it under the “set (score) to 0” block and above the “forever” block in the ball’s code.
- Step 11: In the “set ( ) to 0” block, set the value as “Speed” from the drop-down menu and change the number from 0 to 5.
- Step 12: From the “Variables” block on the block palette, select the “change ( ) by 1” block, drag to the coding area, and place it under the “change (score) by 1” block in the then condition of the first “if ( ) then ( )” block inside the “forever” block in the ball’s code.
- Step 13: In the “change ( ) by 1” block, set the value as “Speed” from the drop-down menu.
- Step 14: After following all the above steps, your game is finally ready. Just run and enjoy the game.
Congratulations, your game is ready now!
Free game code!
Conclusion
Creating a game in Scratch may seem intimidating and hard, especially for a beginner who is not fully aware of all the features and functions of all the elements of the Scratch editor. But by remaining consistent with your learning process and with practice you can create many interesting games. Check out our compilation of some of the most popular Scratch Games for Kids along with step-by-step tutorials on how to build those games.
Looking to learn Scratch coding? Explore Wiingy’s Online Scratch Coding Classes For Kids to learn from top Scratch coding experts.
Frequently asked questions (FAQs)
Why is Scratch popular?
The major reason for the popularity of Scratch is it provides an amazing and effective user interface for creating games that captures and holds the interest of the users.
On which concept Scratch is based?
Scratch is based on the concept of visual and block-based coding. On combining and putting together different blocks, the user can create an entire program or any game, where each block will be responsible for different actions of the program.
How many total blocks are available in Scratch?
There are in total 9 blocks available in Scratch, Motion blocks, Looks blocks, Sound blocks, Events blocks, Control blocks, Sensing blocks, Operators blocks, Variables blocks, and My Blocks. Each block is different in color, making it easy for users to differentiate between different blocks.
Can the user create his own blocks in Scratch?
Yes, the user can create his own blocks in Scratch using “My Blocks”.
What are the things that every user should know about Scratch before creating a game using it?
There are 5 major things that every user should know about Scratch before creating a game using it, User interface, code blocks, visual and block-based coding, sprites, and the way of game creation.
We hope you understand how to create a game in Scratch.
Want to create more fun games on Scratch? Check out our compilation of some of the most popular Scratch Games for Kids such as Pac-man game on Scratch, 3D game on Scratch, Pong game on Scratch along with step-by-step instructions on how to build those games.