How To Delete Data Log On micro:bit? | micro:bit Data Logging
- Pallabi Mohanty |
- May 30, 2024
Updated By
Reviewed By

Delete Data Log On micro:bit: The micro:bit V2 device can be used as a data logger. It can record data from various sources, like temperature, sounds, etc. When data is stored in the micro:bit, it stays there even when it is disconnected from the power sources. It will be erased when the micro:bit is cleared or erased. Deleting the data log from micro:bit is a simple and easy method. Let’s understand the various methods to erase data from the micro:bit.
Looking to learn Robotics? Explore Wiingy’s Online Micro:bit Classes For Kids to learn from top micro:bit experts.
How to delete the data log on the micro:bit?
You can delete the data log on the micro:bit by using two methods:
- Fast Delete Method
- Full Delete Method
In both methods, the micro:bit will disconnect and reconnect to the computer to let the computer know that the data has been updated.
Fast delete method to delete data log on micro:bit
A “fast” delete method is the method that helps you to flash a new program to the micro:bit device via a USB cable. It is the quickest way to delete data from the micro:bit so that you can start with other new projects.
This process erases the data from the micro:bit drive, i.e., the “MY_DATA” file. Even though Fast Delete shows that the log is empty, it still stores the data inside the device.
In simpler words, a “fast” delete means when you flash a new program to your micro:bit, it invalidates the data, and when you refresh the MY_DATA page in the browser, the data will not be visible anymore.
Full delete method to delete data log on micro:bit
The full delete method will remove all the data from the “MY_DATA” log file.
However, when compared to the fast delete method, the full delete method will take a longer time and ensure that the data is deleted from the micro:bit file completely and the data will no longer exist in the file.
If you are sharing your micro:bit with multiple people, you need to delete the data log on the micro:bit completely. Flashing your micro:bit won’t solve the problem. You need to erase the data from your micro:bit completely. Hence, in those cases, you can use the full delete method.
A .hex file is attached to the post that will perform a “full delete” and the LED device on the micro:bit will show a tick or check to notify that the micro:bit has been cleared.
How to delete data log within your program?
In MakeCode, the ‘delete log’ block contains two options: the fast delete and the full delete, as shown in the image below.
- A “fast” delete method will invalidate your data and mark the MY_DATA log file as empty, but the data log remains in the file. It is the quickest method to erase the data log from your micro:bit, but it is not the cleanest as the data still remains in the file.
- A ‘full’ delete method will clean all the data from the MY_DATA log file. It is the cleanest method to erase data logs. This process will take some time, but it is more efficient as it cleans the micro:bit completely.
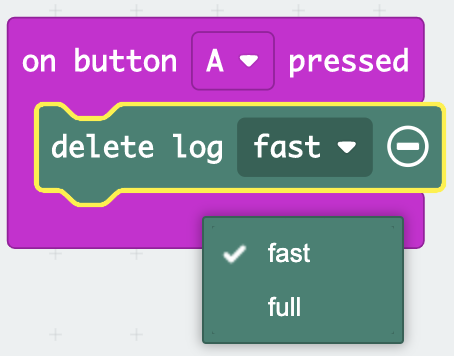
- Step 1: Drag the pressed on button A block to the editor.
- Step 2: Now drag the deleted log block and place it inside the “on button A pressed” block.
- Step 3: In the Delete block, from the drop-down menu, choose “fast” if you want to use the “fast delete” method. If not, move to step 4.
- Step 4: Choose “full” from the delete log drop-down to fully delete the log from the device.
- Step 5: Now run the program and the data log will be deleted as per the choice made.
Looking to learn Robotics? Explore Wiingy’s Online Micro:bit Classes For Kids to learn from top micro:bit experts.
FAQs on deleting the data log on the micro:bit
How to reset micro:bit?
You can reset your micro:bit device by pressing down on the reset button located on the back of the micro:bit device.
What is micro:bit data logging?
Micro:bit data logging means recording data over a period of time for various purposes. It can record various kinds of data, like the temperature of a place on a given day, how noisy a particular place was for a given period of time, etc.
How to stop micro:bit code?
If you want to stop the current program from running in your micro: bit, then just press and hold the reset button for 5 seconds. The reset button is located at the back of the micro:bit device. The micro:bit will then enter sleep mode. You can restart your micro:bit by pressing the reset button again.
What is a micro:bit memory error?
One type of memory or RAM error you might encounter is if your micro:bit runs out of RAM when you are flashing a new program. The second is when your script is running and you try to add any variables or objects or anything that exhausts the amount of available RAM.
How to delete the data log on the micro:bit project?
To delete the data log on the micro:bit, you can use two methods; “fast” delete or “full” delete. “Fast” deletion is when you flash a new program, the old program will not be visible anymore, but it is not completely deleted from the data log file. In the “full” delete method, is when you flash a delete hex file to your micro:bit. This method will delete the data log completely from the micro:bit.
What is data logging in micro:bit?
Data logging in micro:bit means recording data over a period of time for various purposes. It records environmental and physical data over a period of time, such as temperature, sunlight level for a week, etc.
What is Microsoft MakeCode?
Microsoft MakeCode is a simple visual coding language. It has a drag-and-drop interface, which means the codes are in the shape of blocks and can be dragged and dropped onto the editor in order to create and run a script.
How to import or update a saved HEX file in micro:bit?
You can import a saved HEX file in micro:bit by simply dragging the HEX file and dropping it onto the homepage. Now, to save the updated HEX file, simply download the file again to your computer.
How to upload code to micro:bit?
First, connect your micro:bit to your computer via a USB cable. You will see a new drive in your computer, “MICROBIT”. Now, drag and drop your program HEX file in to the “MICROBIT” drive. The back of your MICROBIT will flash notifying that the code transfer is now completed.
Keeping your micro:bit will keep it clean and spacious so that you don’t face issues in the middle of running a script. We hope that the above article has helped with your queries regarding deleting the data log on the micro:bit. Let us know if you have any questions related to this topic in the comment section below, and we will get back to you as soon as possible.