How To Make A Geometry Dash Game On Scratch? [Free Game Code Access!]
- Aditi |
- August 23, 2024
Updated By
Reviewed By

Geometry Dash game is one of the simplest games to play and create using Scratch. In this game, a square-shaped sprite moves along a path and jumps over the coming spikes in its way. If the square-shaped sprite hits or touches any one of the spikes, then the game will be over.
Looking to learn Scratch coding? Explore Wiingy’s Online Scratch Coding Classes For Kids to learn from top Scratch coding experts.
How to make a Geometry Dash game on Scratch 3.0?
Geometry Dash was created by Griffpatch, one of the most popular users of Scratch. This game helps the users understand the concept of variables, loops concept, and the if-then statements in Scratch.
So, to create your own geometry dash game in Scratch, you just patiently need to follow the step-by-step tutorial given below:
- Step 1: Open Scratch and start with creating a backdrop because, by default, Scratch presents a blank backdrop. So, for the geometry dash game, you need to design a plain colored backdrop with a yellow-colored path on it. To design a plain colored backdrop with a yellow-colored path on it, click on the blue circle available at the extreme right corner of the Scratch interface.
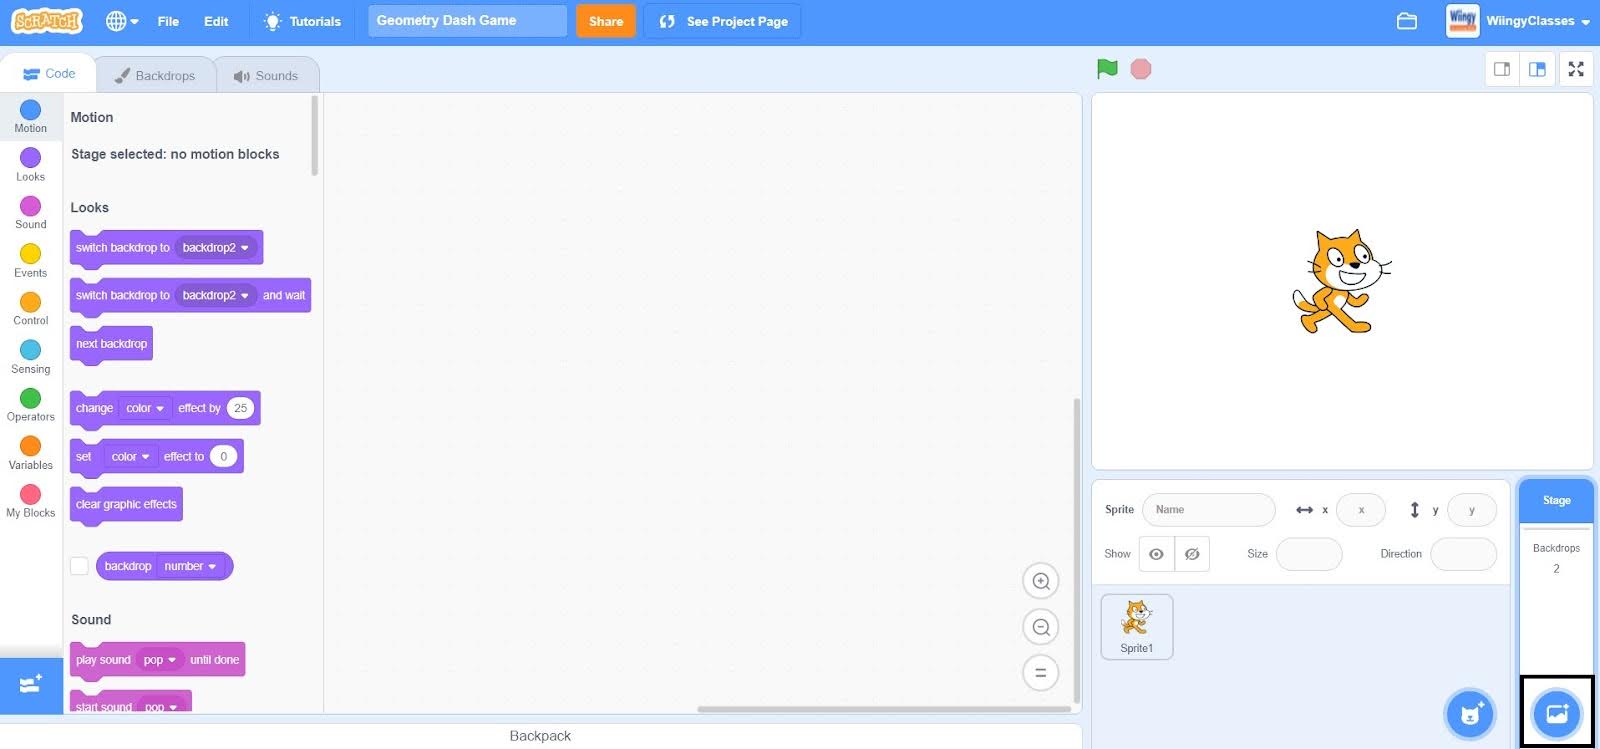
- Step 2: After clicking on the blue circle for choosing a backdrop, select the second option from below that says ‘Paint’.
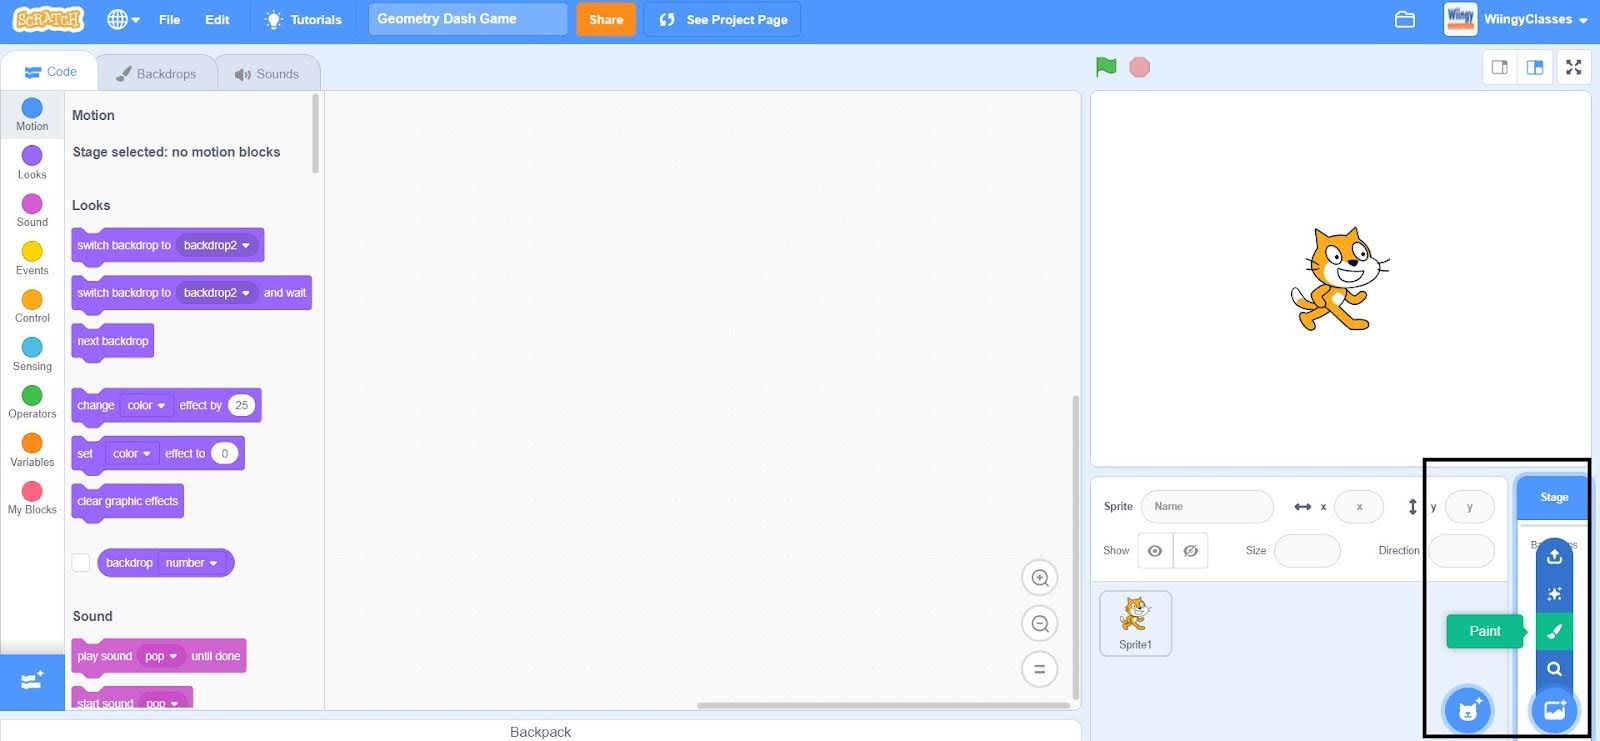
- Step 3: Once you click on the ‘Paint’ option, the following screen will appear.
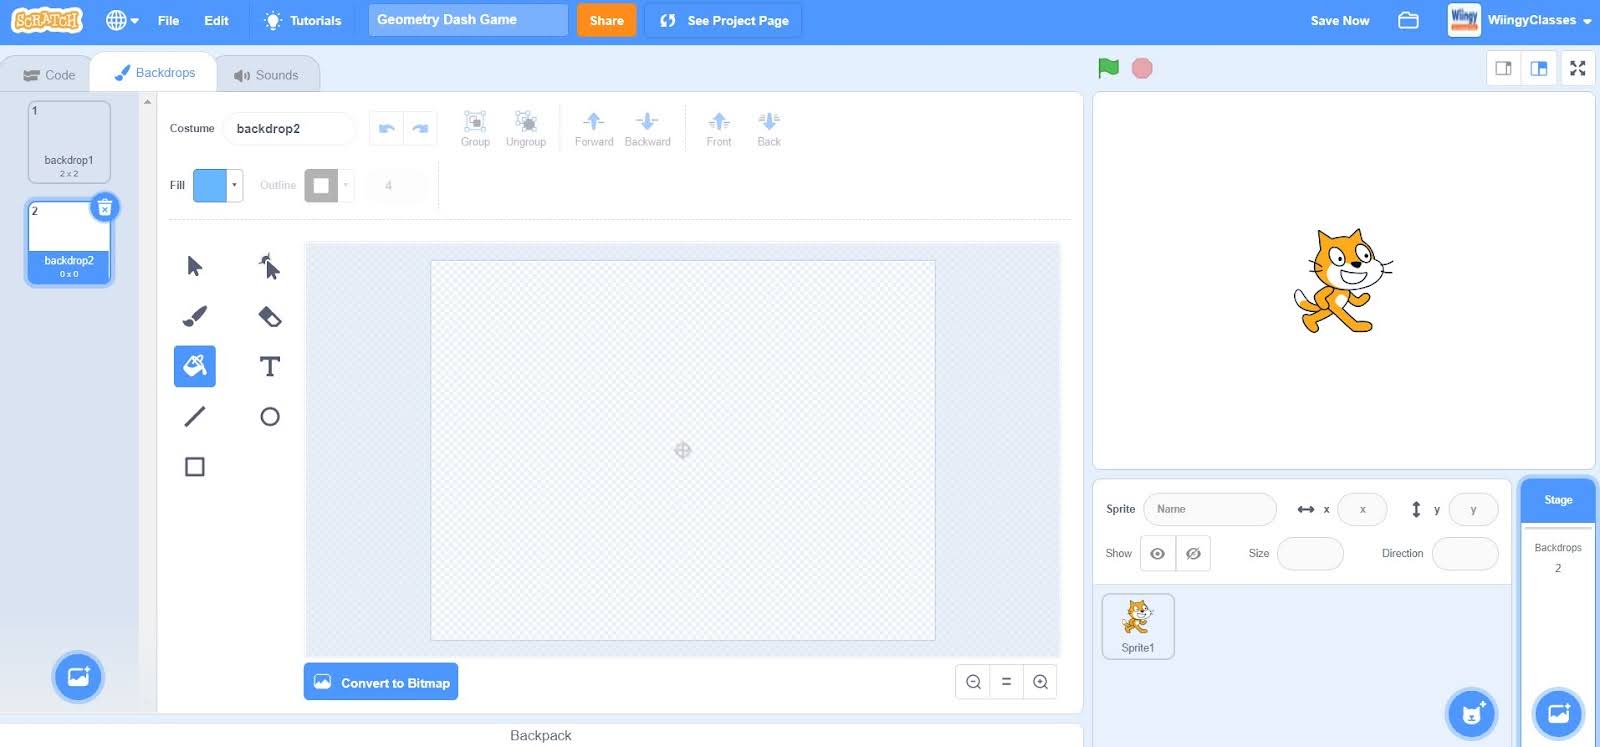
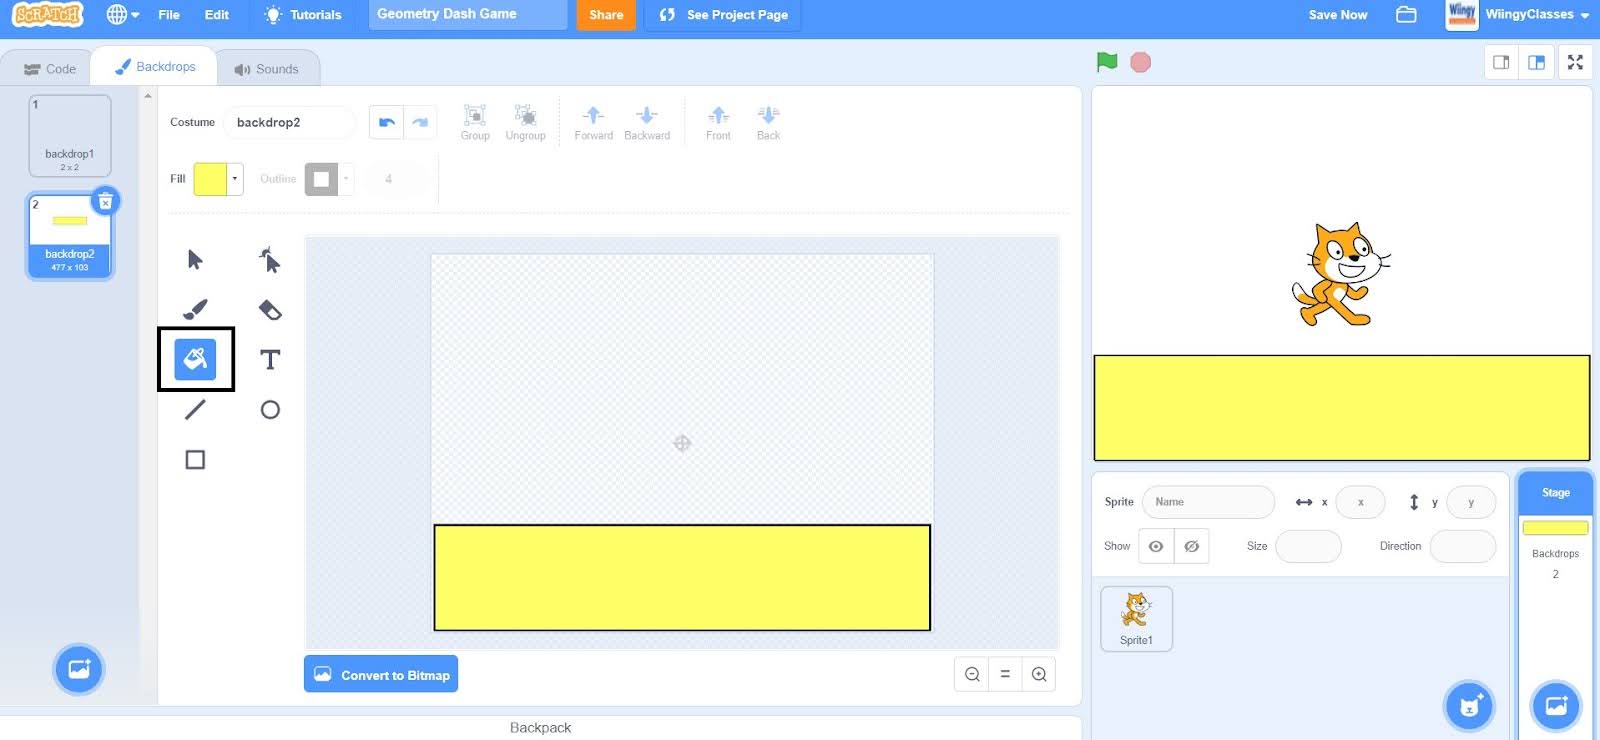
- Step 4: Now, just draw a rectangular path using the rectangle option.
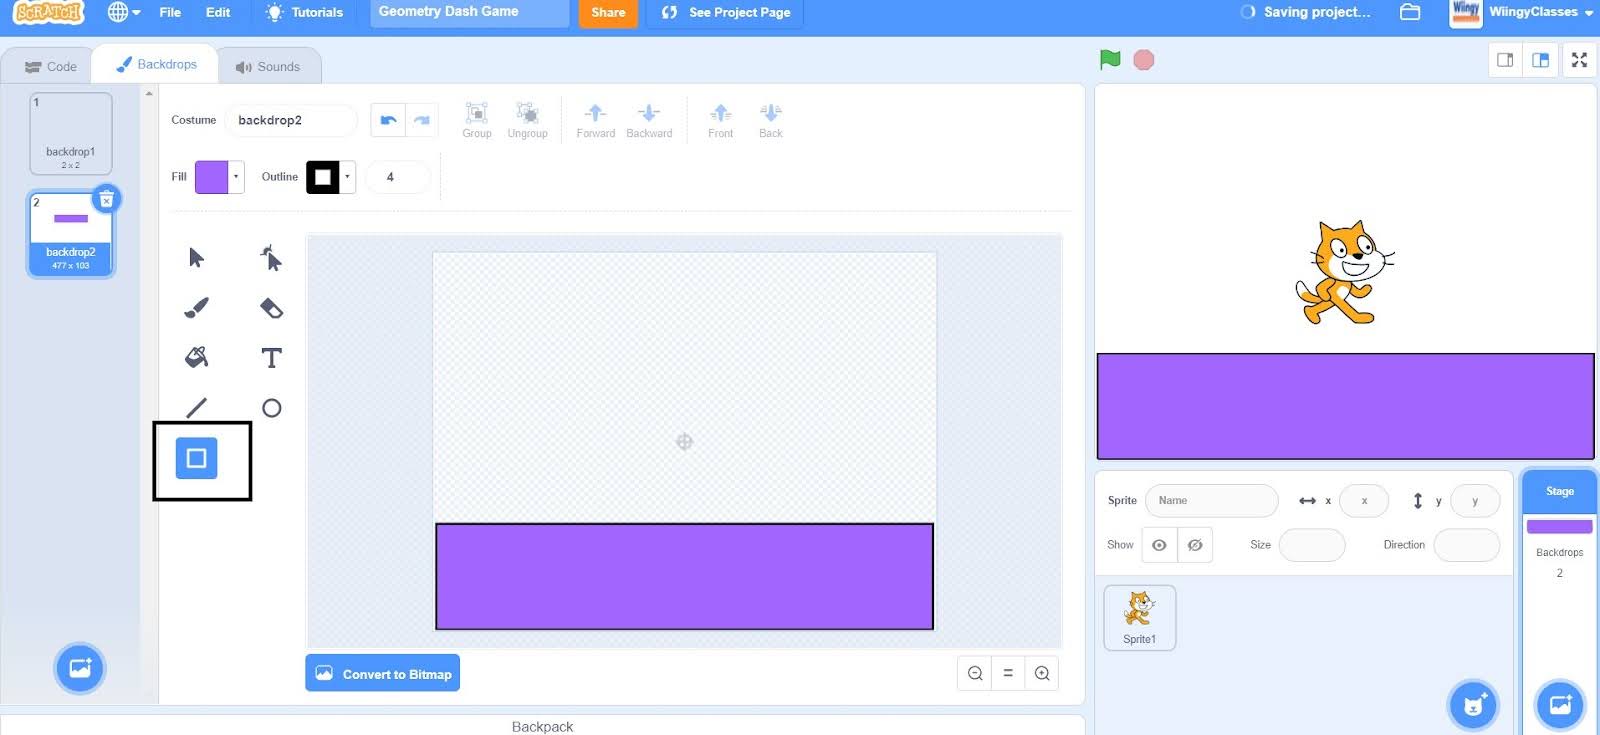
- Step 5: After drawing the rectangular path, fill your path with yellow color using the fill option.
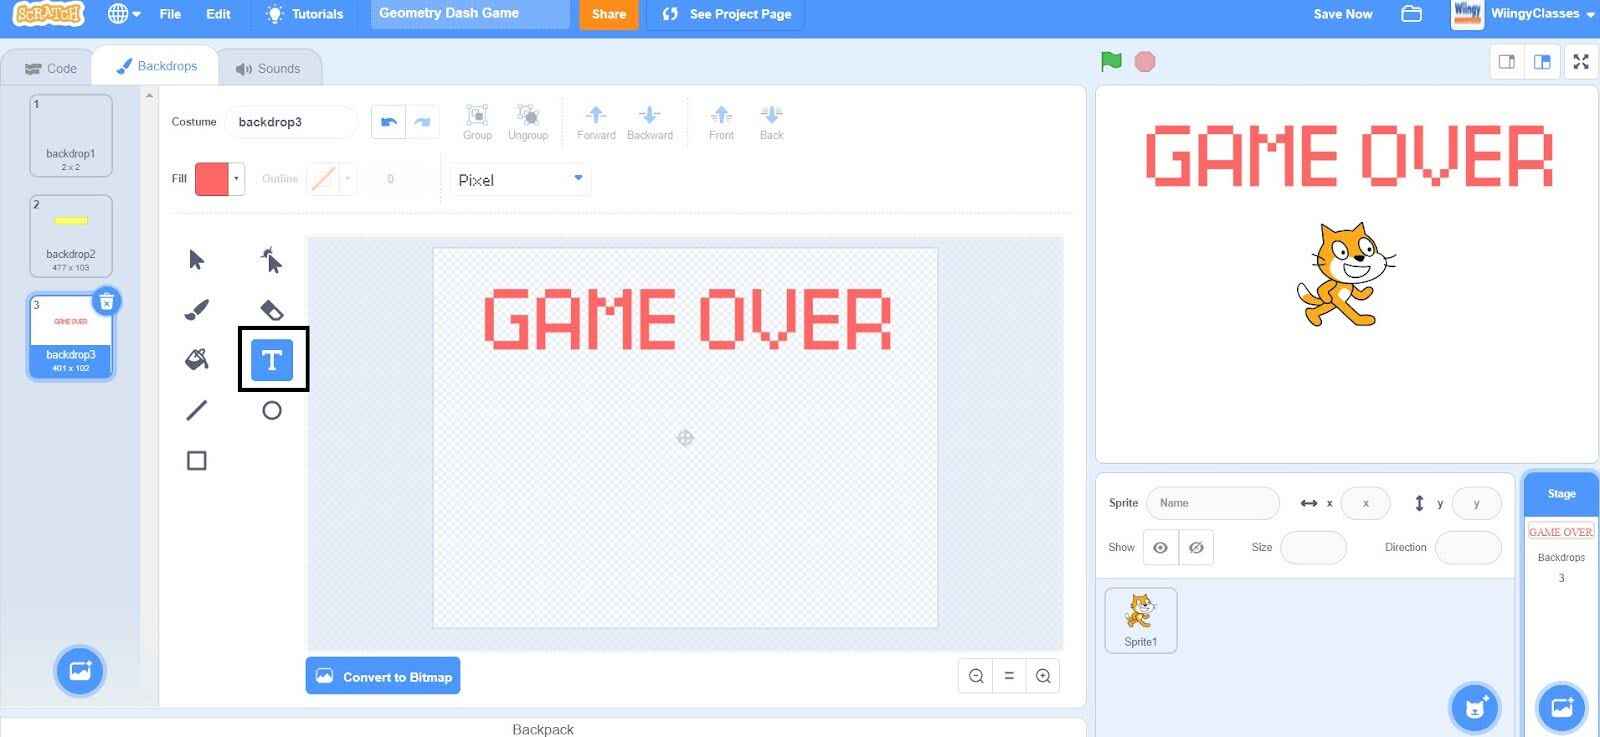
- Step 6: You need to draw another backdrop for the ending part of the game. To do that, just repeat steps 1, 2, and 3 and after repeating these steps, design the end backdrop with “GAME OVER” text on it using the text option.
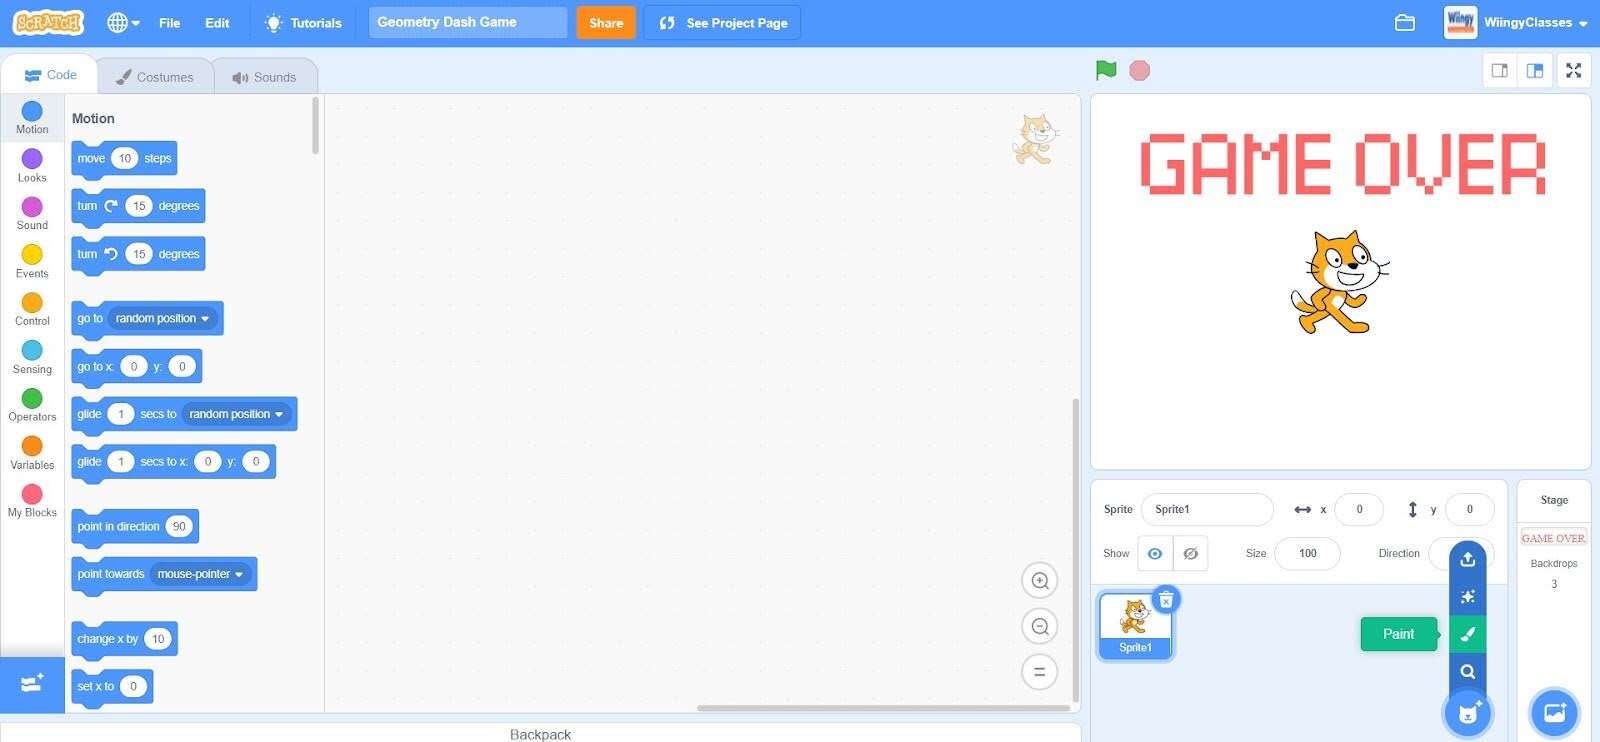
- Step 7: After drawing the backdrops, it’s time to draw the sprites that will include a square-shaped player and triangular spikes. Before drawing new sprites, make sure to delete the cat sprite. Now, to draw new sprites, click on the blue circle with the cat icon and select the second option from below that says ‘Paint’.
- Step 8: You can use your creativity and draw any type of square-shaped player sprite as per your wish.

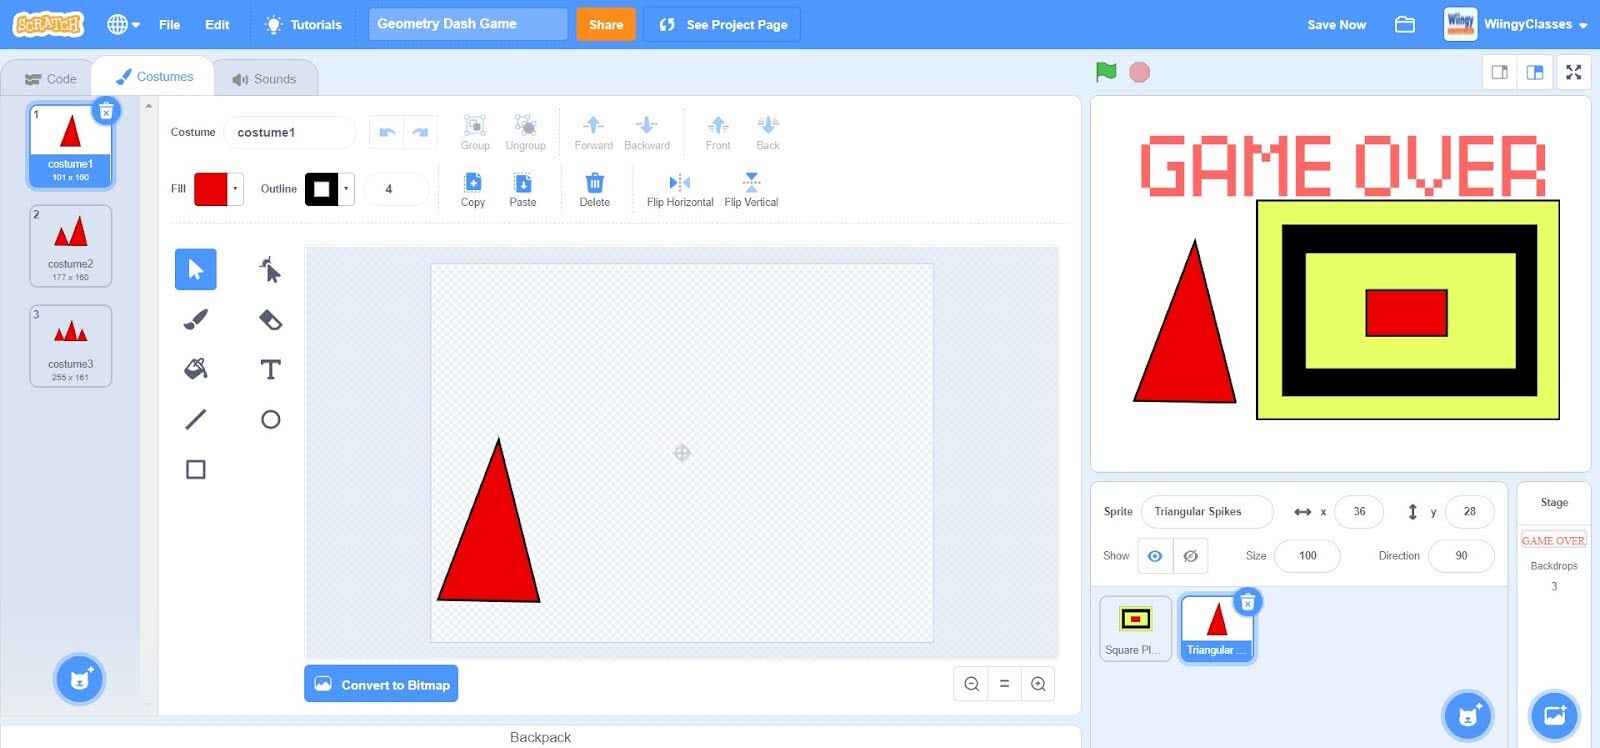
- Step 9: After drawing the square-shaped player sprite, it’s time to draw the triangle spike. Keep in mind to draw three different costumes for the triangle spike as shown below.
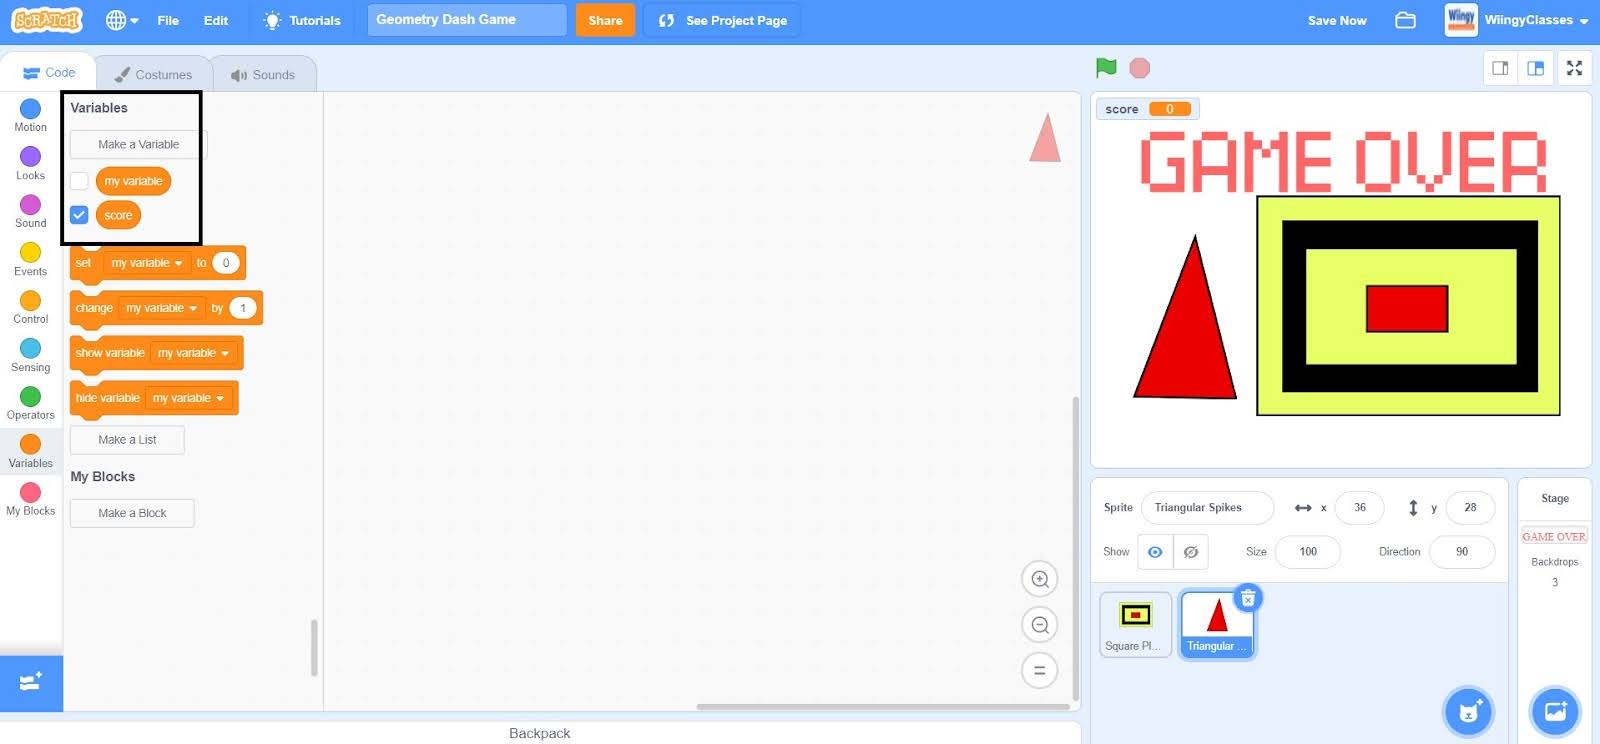
- Step 10: After drawing the backdrops and sprites, it’s time to make a variable to keep the score of the game. So, first, switch to the ‘Code’ section, then go to the “Variables” block in the block palette and create a variable named ‘score’.
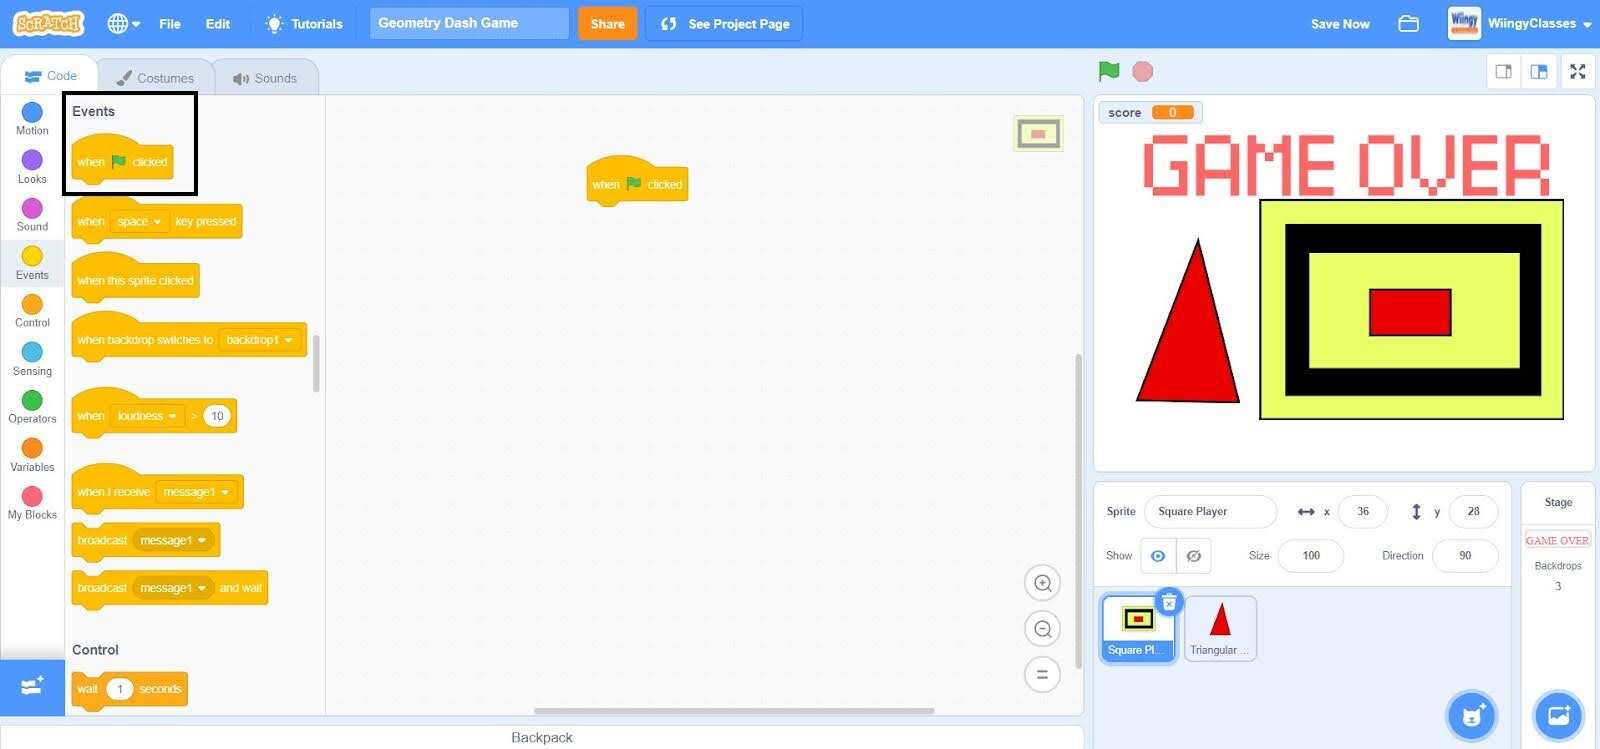
Code for the player’s position and to make the player jump
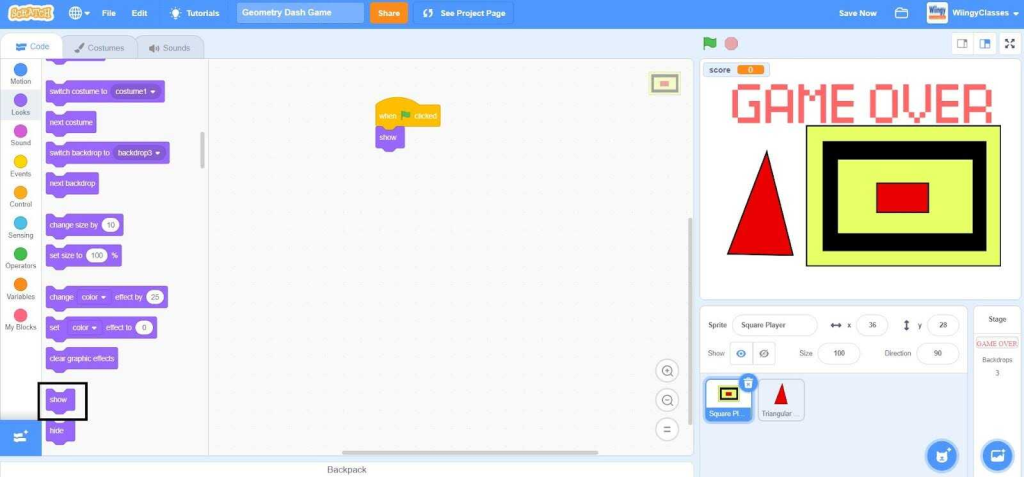
It’s time for coding by fixing the player’s (square-shaped sprite) position at the beginning and whenever the user presses the ‘space’ key, the player must jump to avoid the triangular spikes. Make sure that the square-shaped sprite is selected while coding for it.
- Step 1: Go to the “Events” block in the block palette, select the ‘when green flag clicked’ block, and drag it to the coding area.
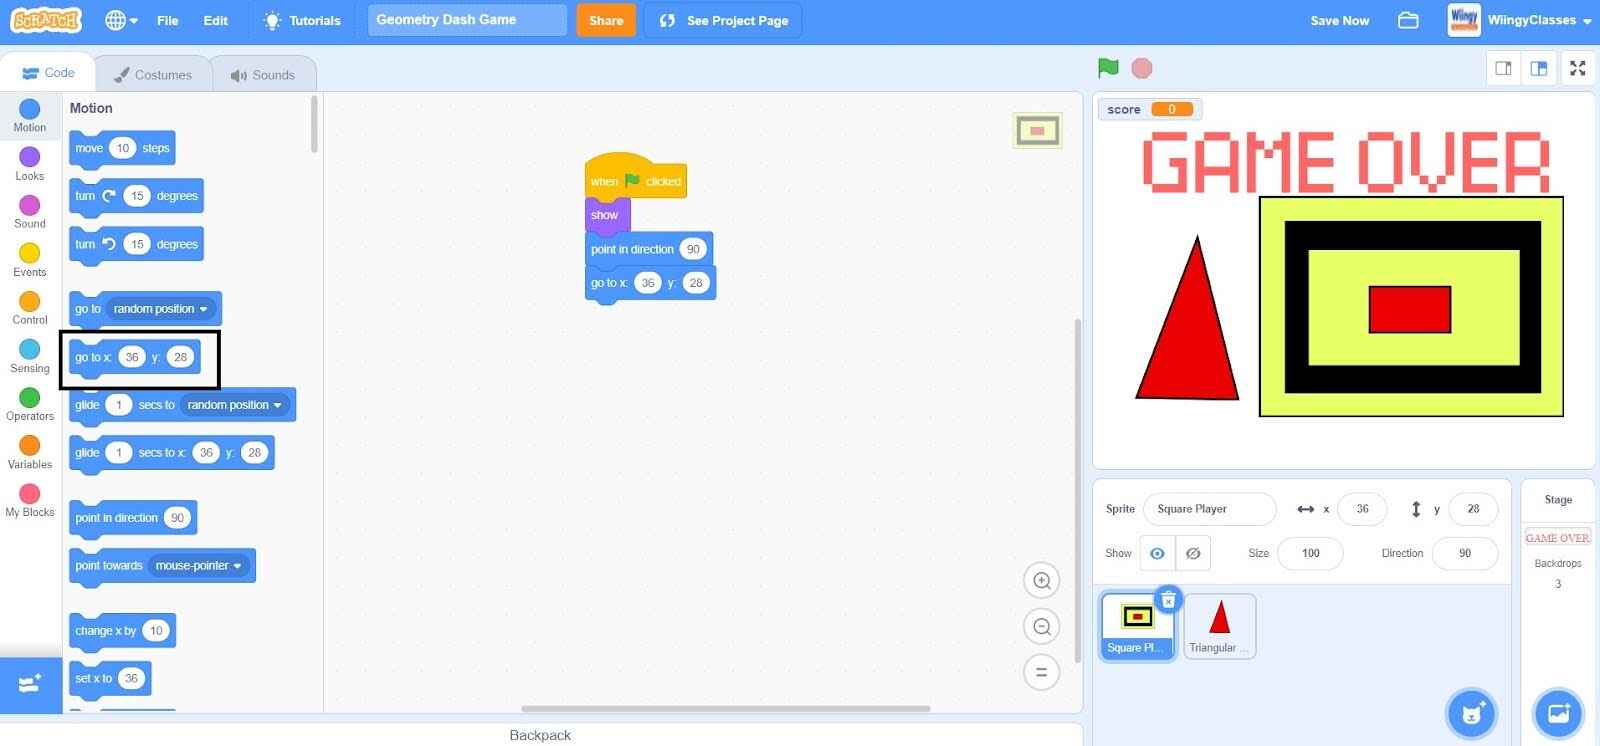
- Step 2: Go to the “Looks” block in the block palette, select the ‘show’ block, drag it to the coding area, and place it under the ‘when green flag clicked’ block.

- Step 3: Go to the “Motion” block in the block palette, select the ‘point in direction ( )’ block, drag it to the coding area, and place it under the ‘show’ block. In the ‘point in direction ( )’ block, leave the values as ‘90’.

- Step 4: From the “Motion” block in the block palette, select the ‘go to x: ( ) y: ( )’ block, drag it to the coding area, and place it under the ‘point in direction ( )’ block.
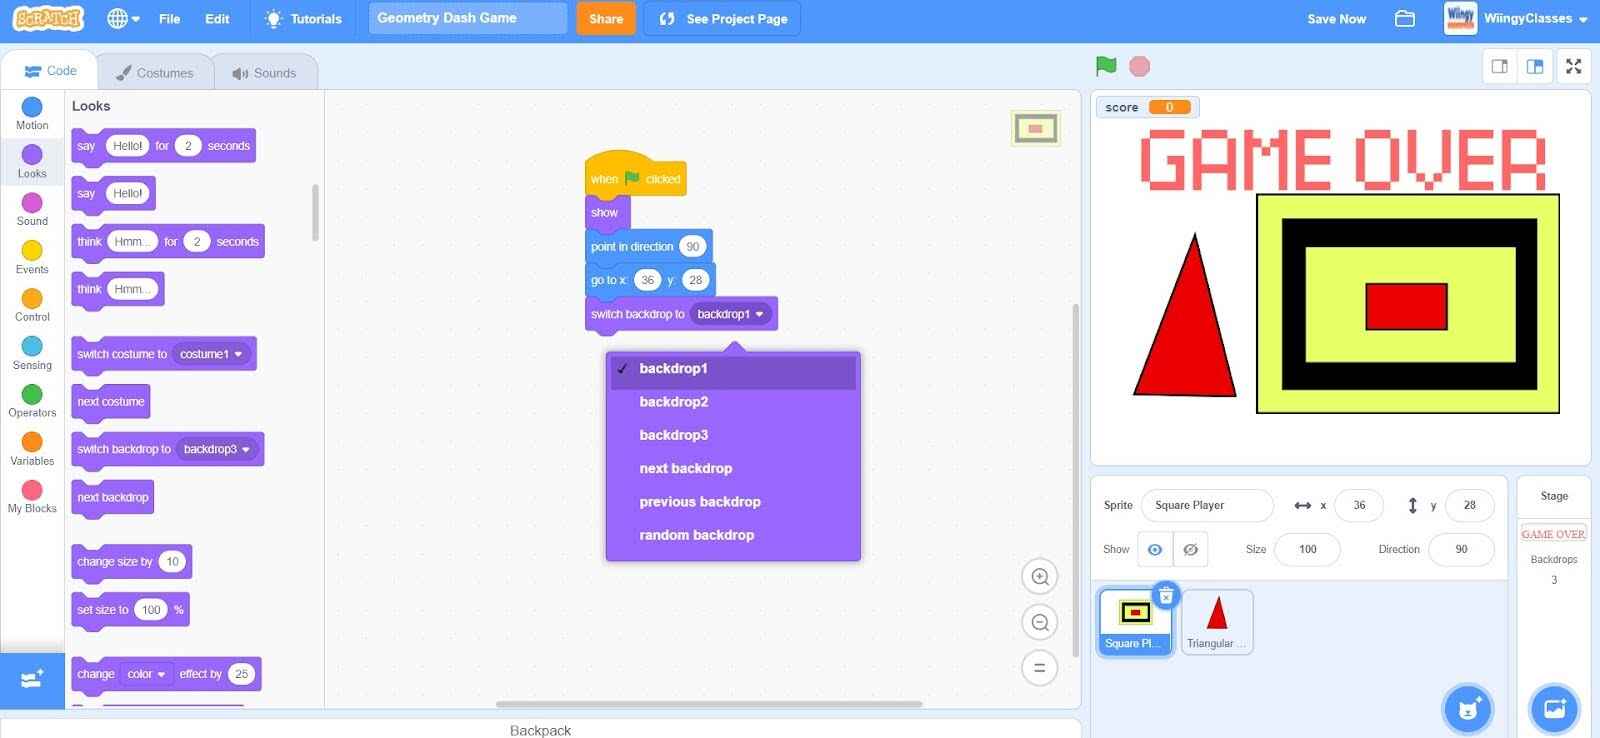
- Step 5: Go to the “Looks” block in the block palette, select the ‘switch backdrop to ( )’ block, drag it to the coding area, and place it under the ‘go to x: ( ) y: ( )’ block.
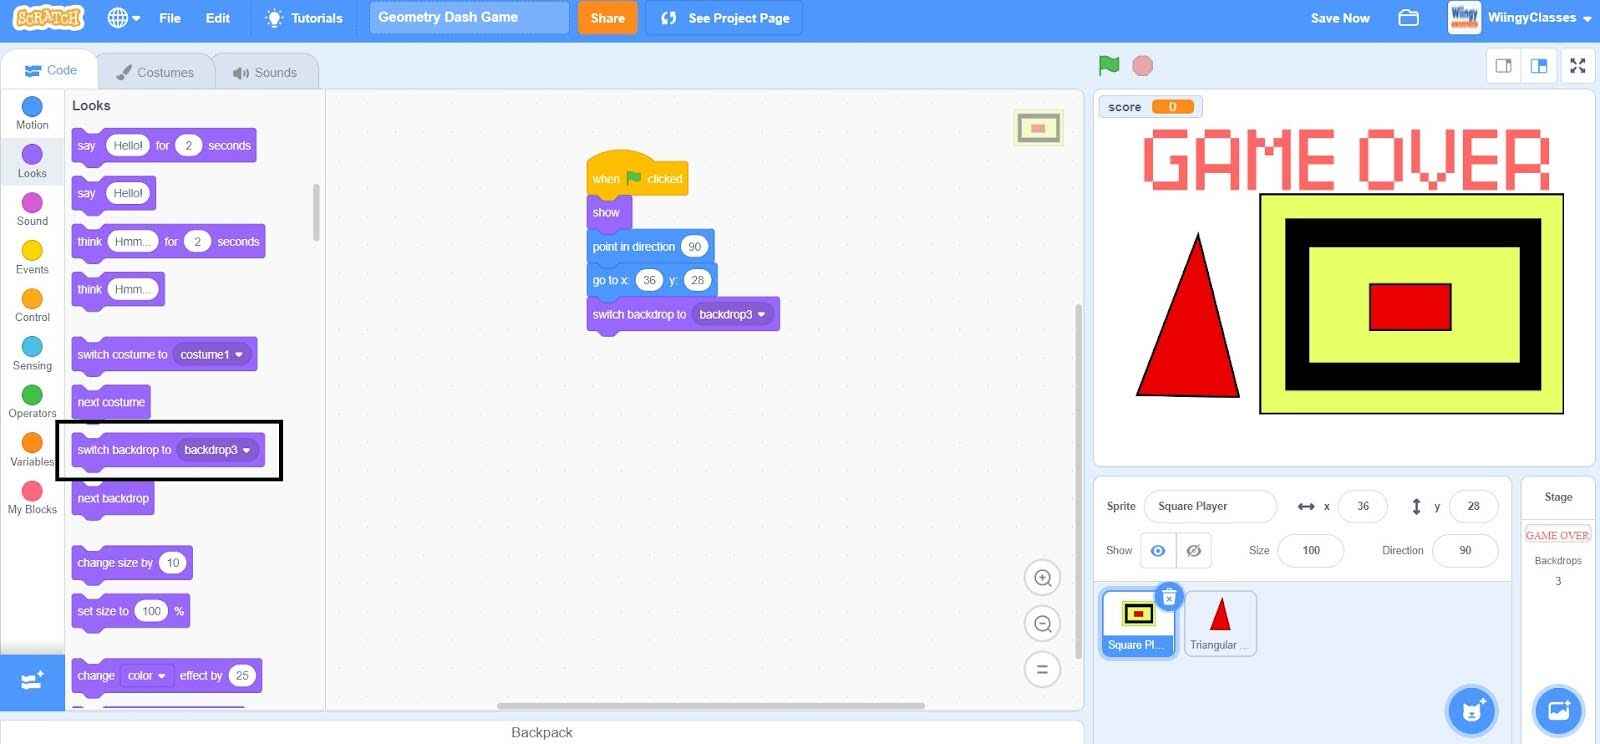
- Step 6: In the ‘switch backdrop to ( )’ block, select the vale as ‘backdrop 1’ from the drop-down menu.
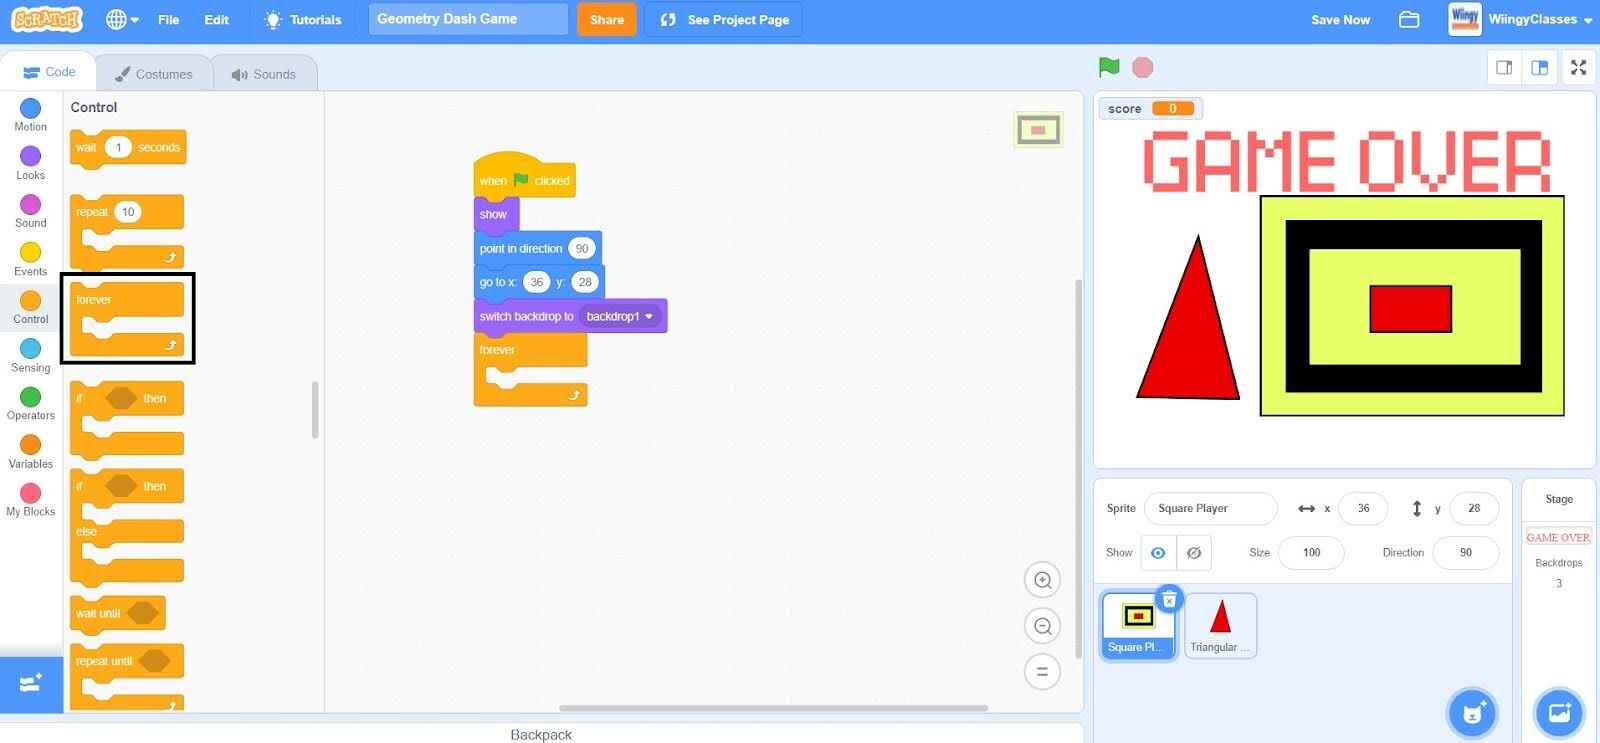
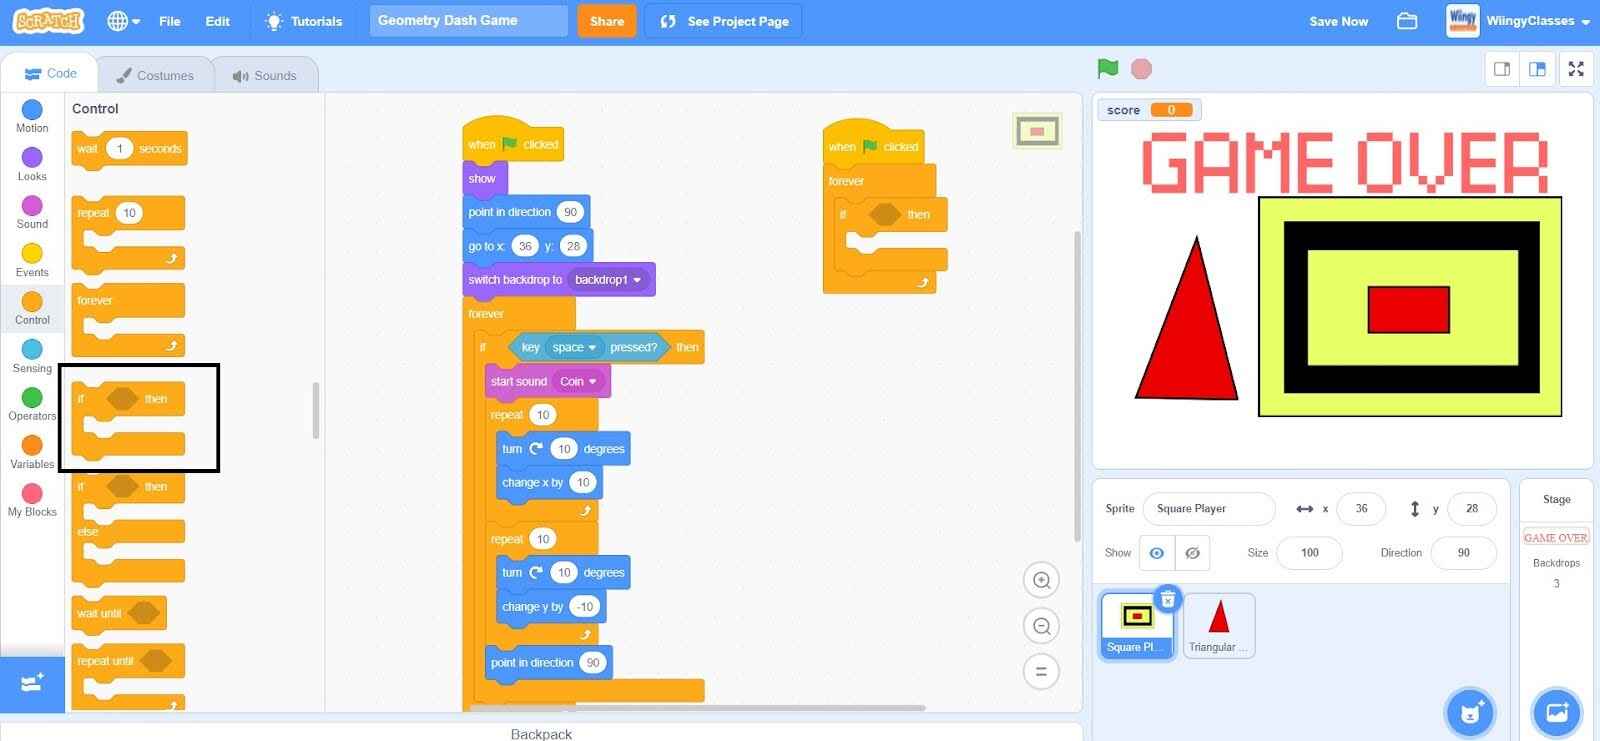
- Step 7: Go to the “Control” block in the block palette, select the ‘forever’ block, drag it to the coding area, and place it under the ‘switch backdrop to ( )’ block.
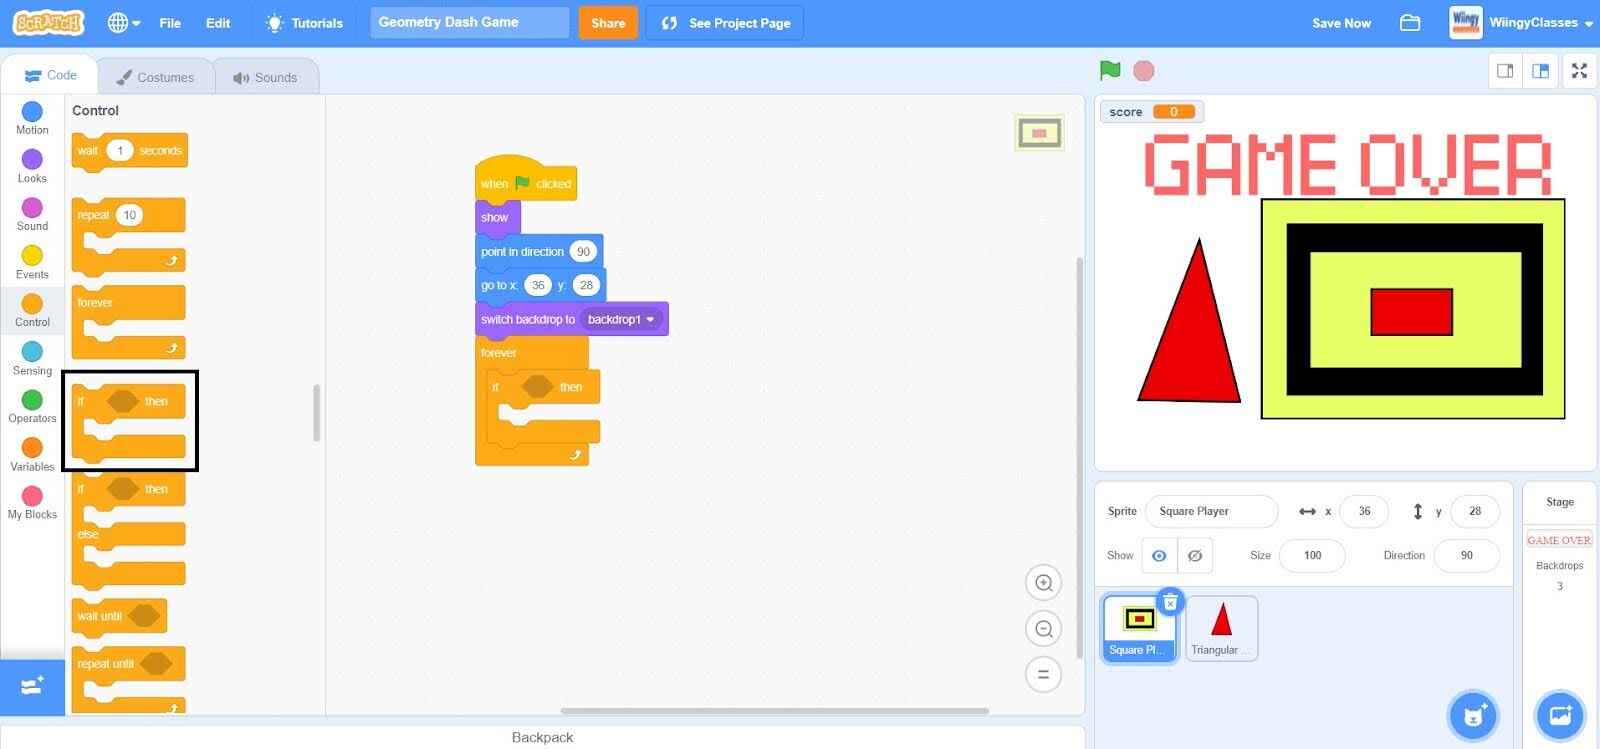
- Step 8: From the “Control” block in the block palette, select the ‘if ( ) then’ block, drag it to the coding area, and place it inside the ‘forever’ block.
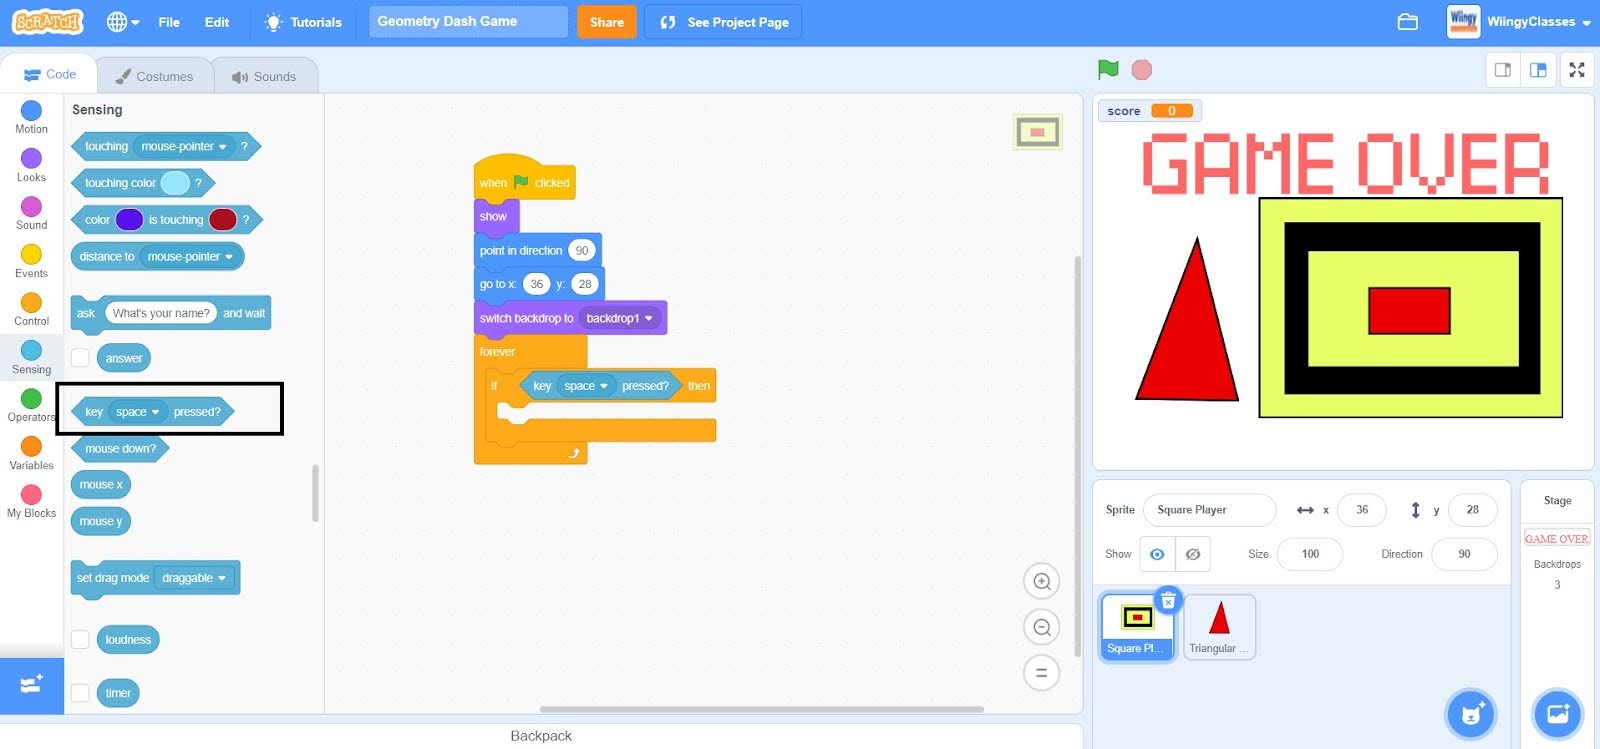
- Step 9: Go to the “Sensing” block in the block palette, select the ‘key ( ) pressed?’ block, drag it to the coding area, and place it in the if condition of the ‘if ( ) then’ block inside the ‘forever’ block.
- Step 10: Go to the “Sound” block in the block palette, select the ‘start sound ( )’ block, drag it to the coding area, and place it in the else condition of the ‘if ( ) then’ block inside the ‘forever’ block.
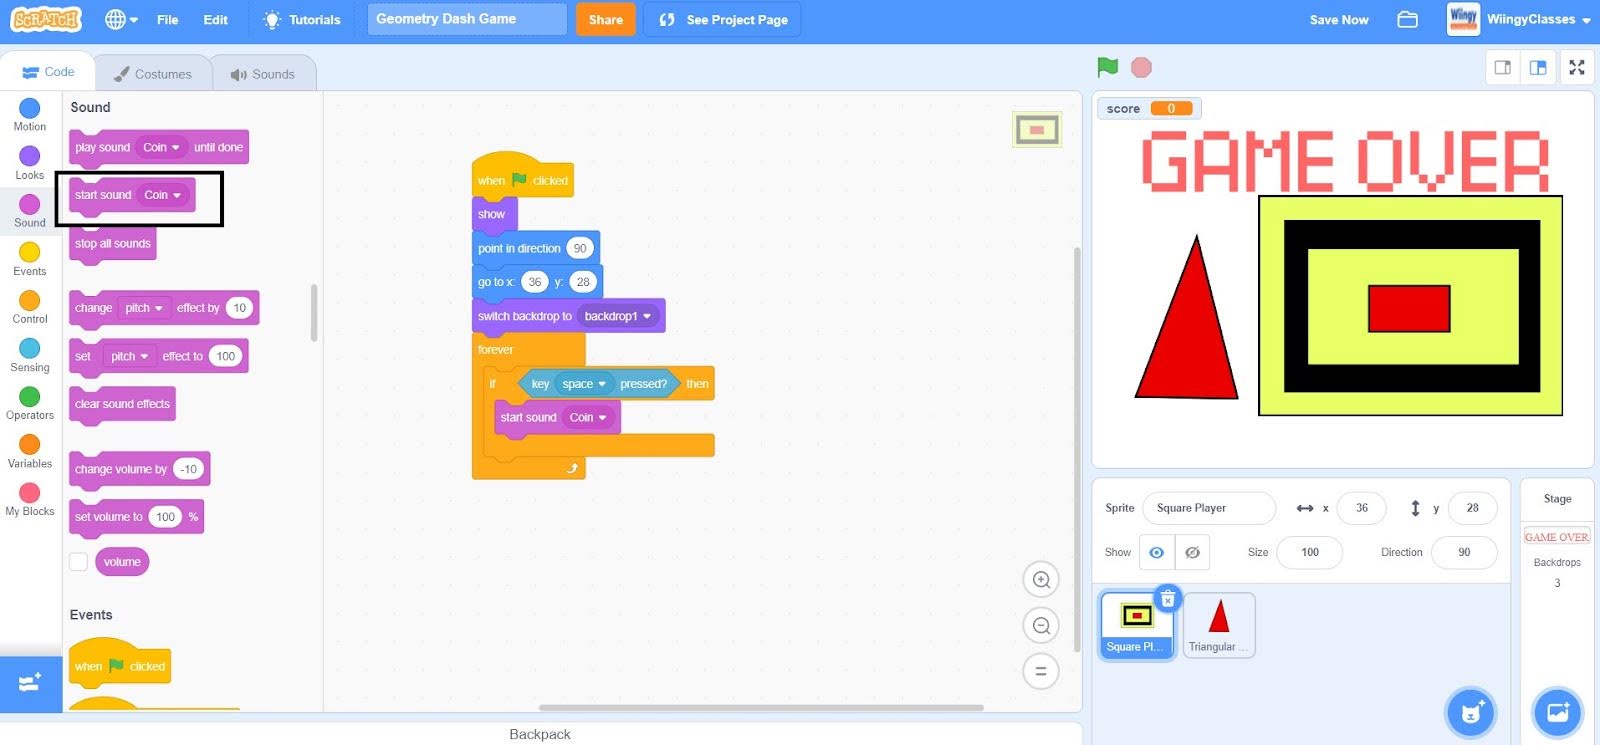
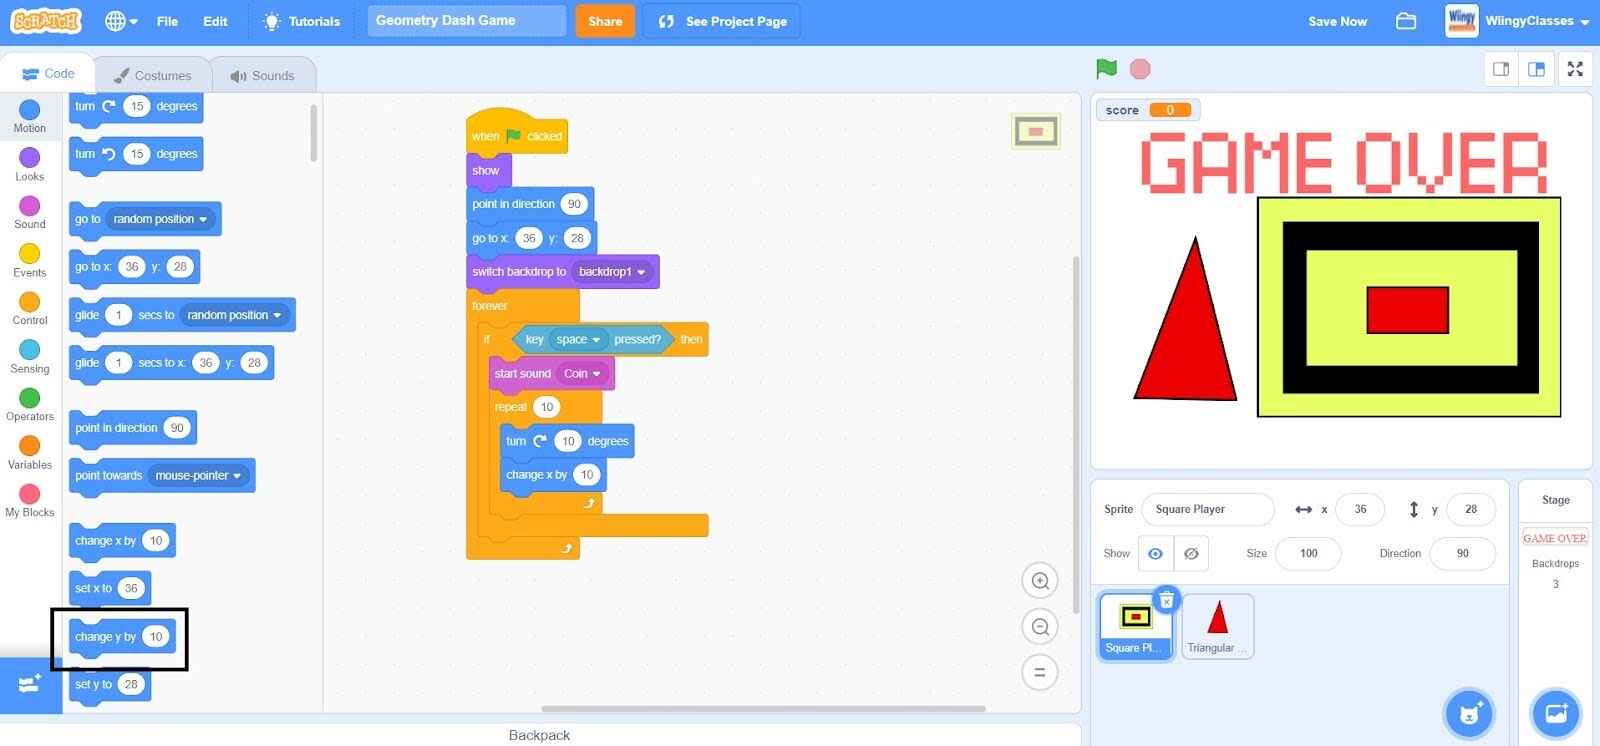
- Step 11: Go to the “Control” block in the block palette, select the ‘repeat ( )’ block, drag it to the coding area, and place it under the ‘start sound ( )’ block inside the ‘forever’ block. In the ‘repeat ( )’ block, leave the value as ‘10’ only.
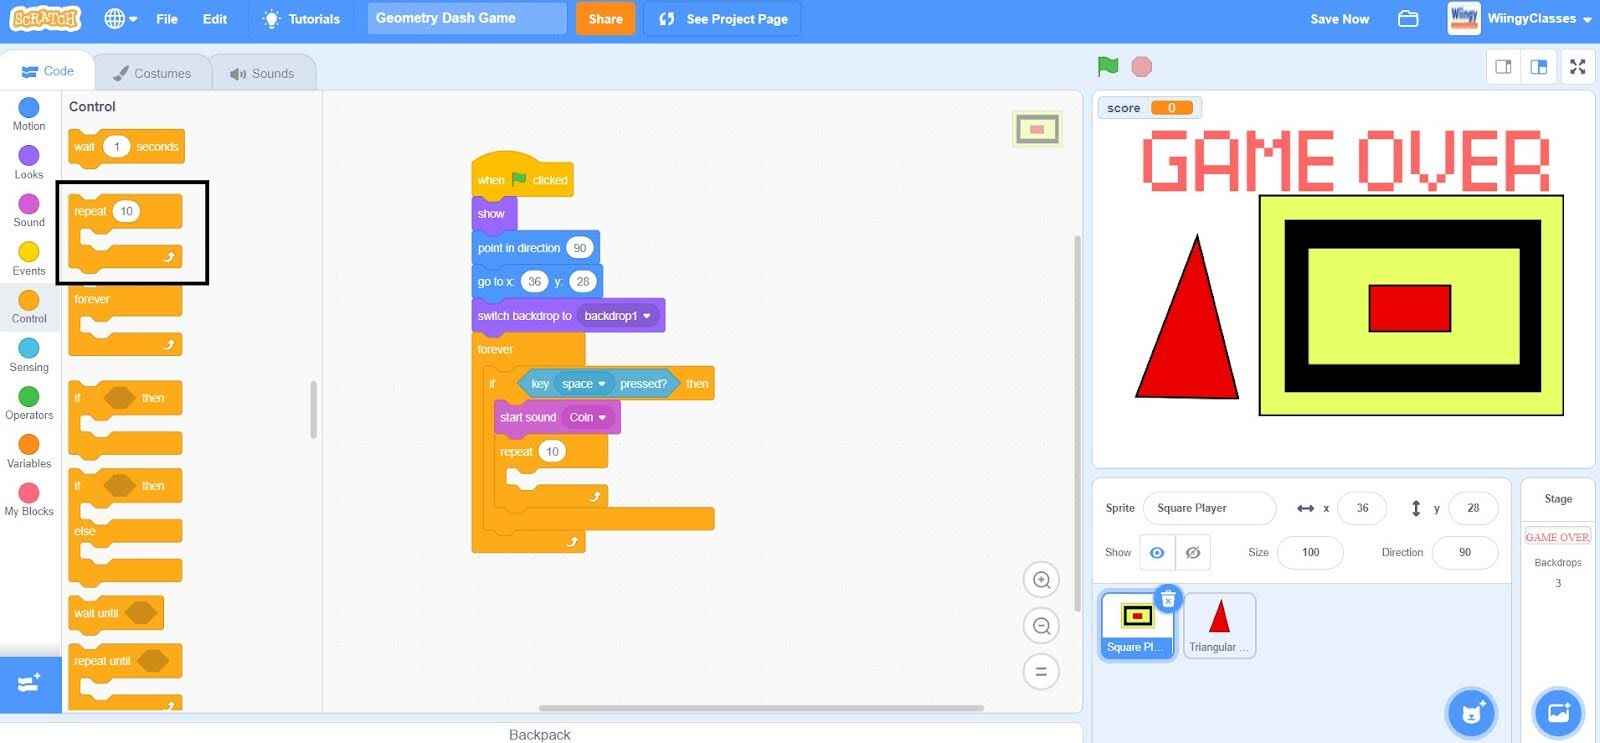
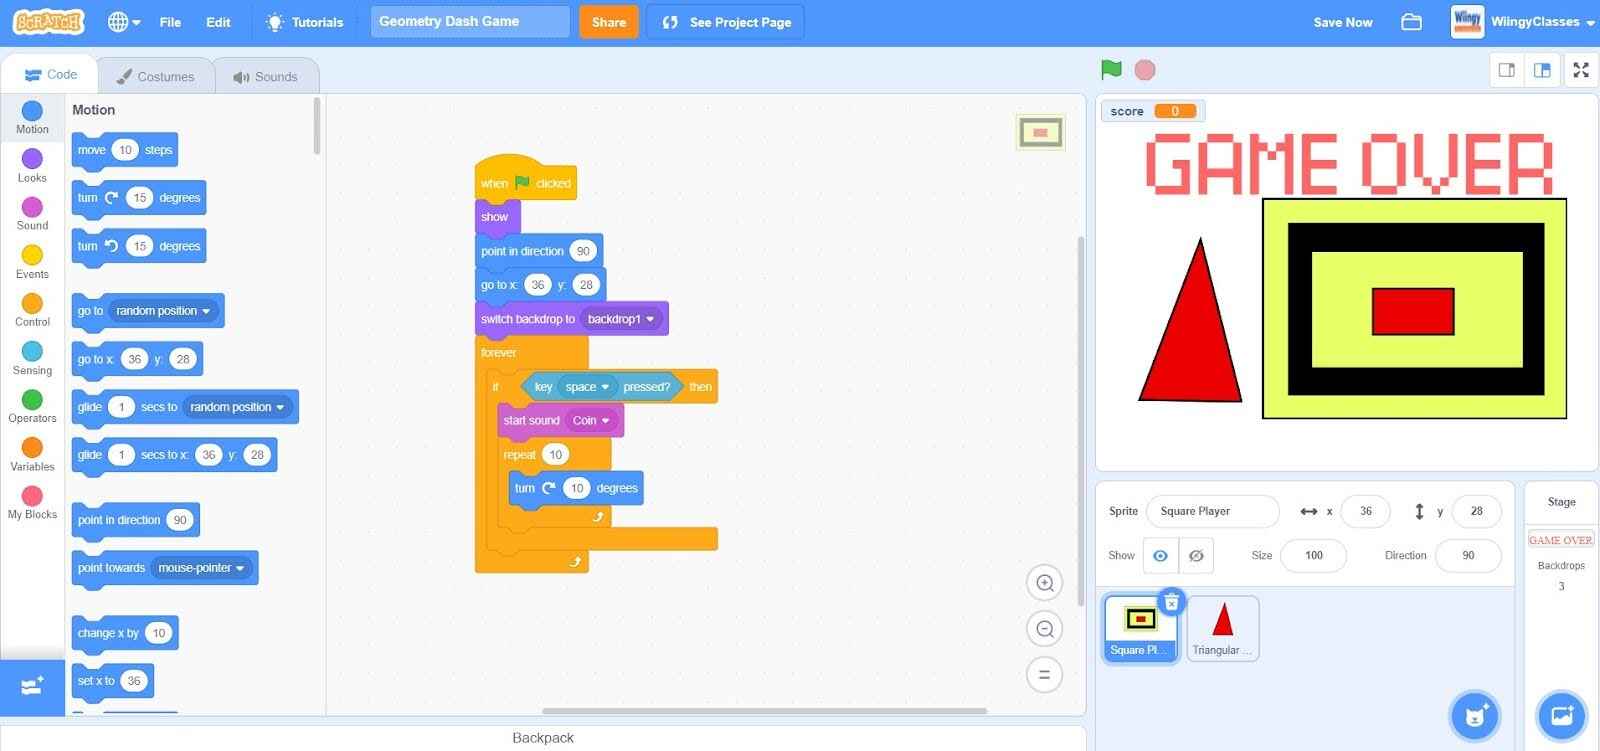
- Step 12: Go to the “Motion” block in the block palette, select the ‘turn right ( ) degrees’ block, drag it to the coding area, and place it in the ‘repeat ( )’ block inside the ‘forever’ block.
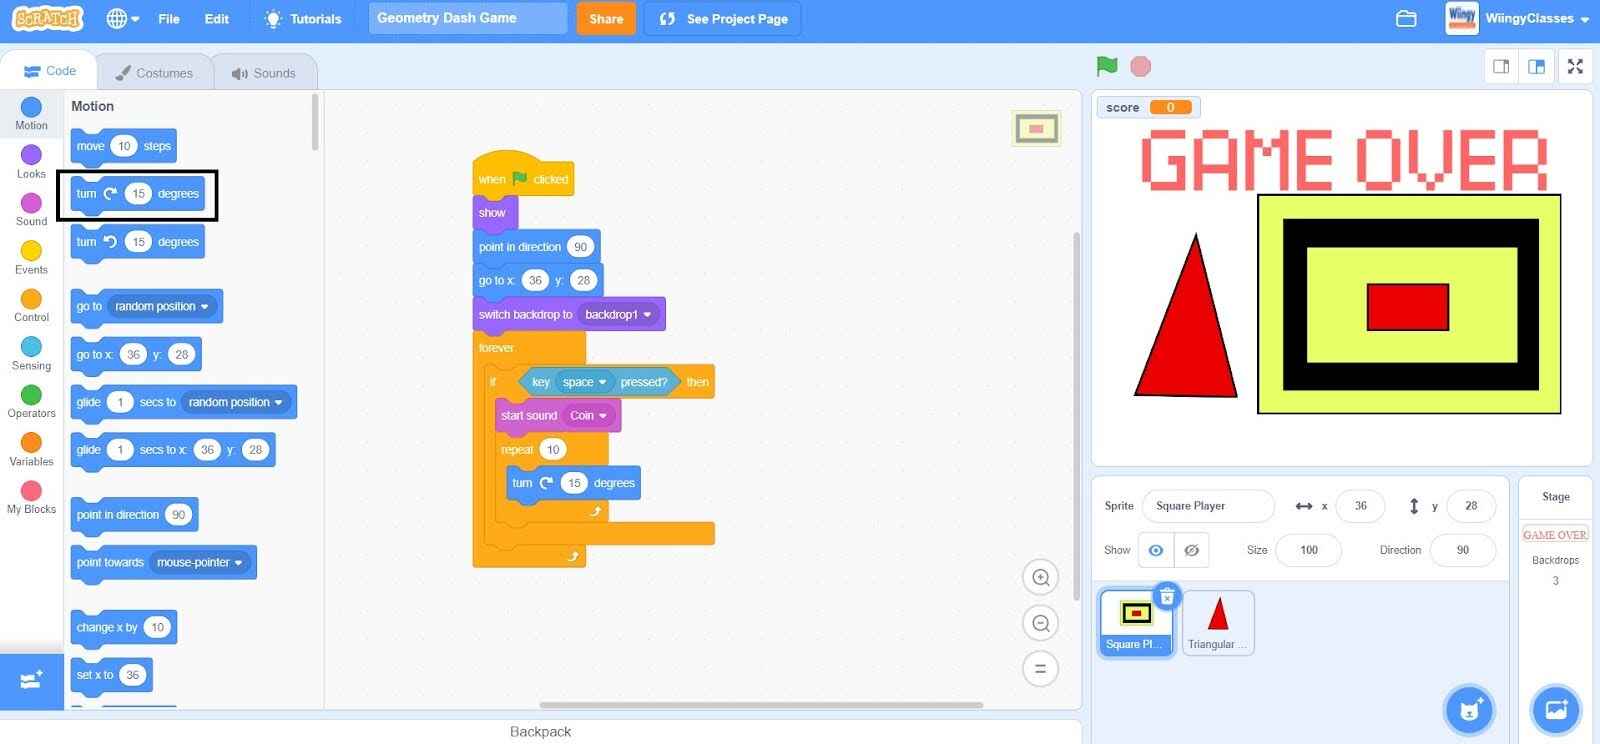
- Step 13: In the ‘turn right ( ) degrees’ block, change the value to ‘10’.
- Step 14: From the “Motion” block in the block palette, select the ‘change y by ( )’ block, drag it to the coding area, and place it under the ‘turn right ( ) degrees’ block in the ‘repeat ( )’ block inside the ‘forever’ block. In the ‘change y by ( )’ block, leave the value as ‘10’.
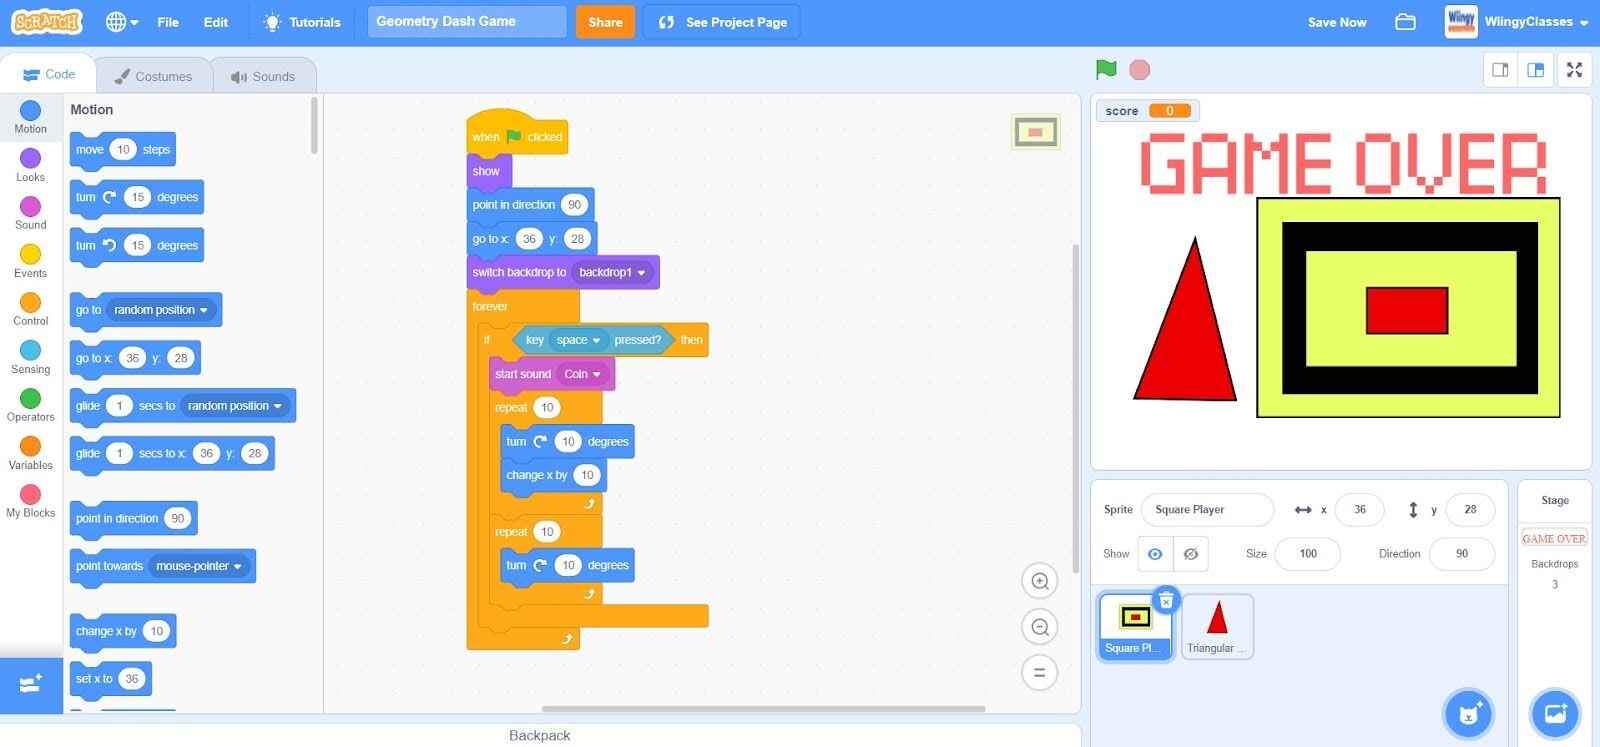
- Step 15: Go to the “Control” block in the block palette, select the ‘repeat ( )’ block, drag it to the coding area, and place it under the first ‘repeat ( )’ block inside the ‘forever’ block. In the ‘repeat ( )’ block, leave the value as ‘10’ only.

- Step 16: Go to the “Motion” block in the block palette, select the ‘turn right ( ) degrees’ block, drag it to the coding area, and place it in the second ‘repeat ( )’ block inside the ‘forever’ block.

- Step 17: In the ‘turn right ( ) degrees’ block, change the value to ‘10’.
- Step 18: From the “Motion” block in the block palette, select the ‘change y by ( )’ block, drag it to the coding area, and place it under the ‘turn right ( ) degrees’ block in the second ‘repeat ( )’ block inside the ‘forever’ block.
- Step 19: In the ‘change y by ( )’ block, change the value to ‘-10’.
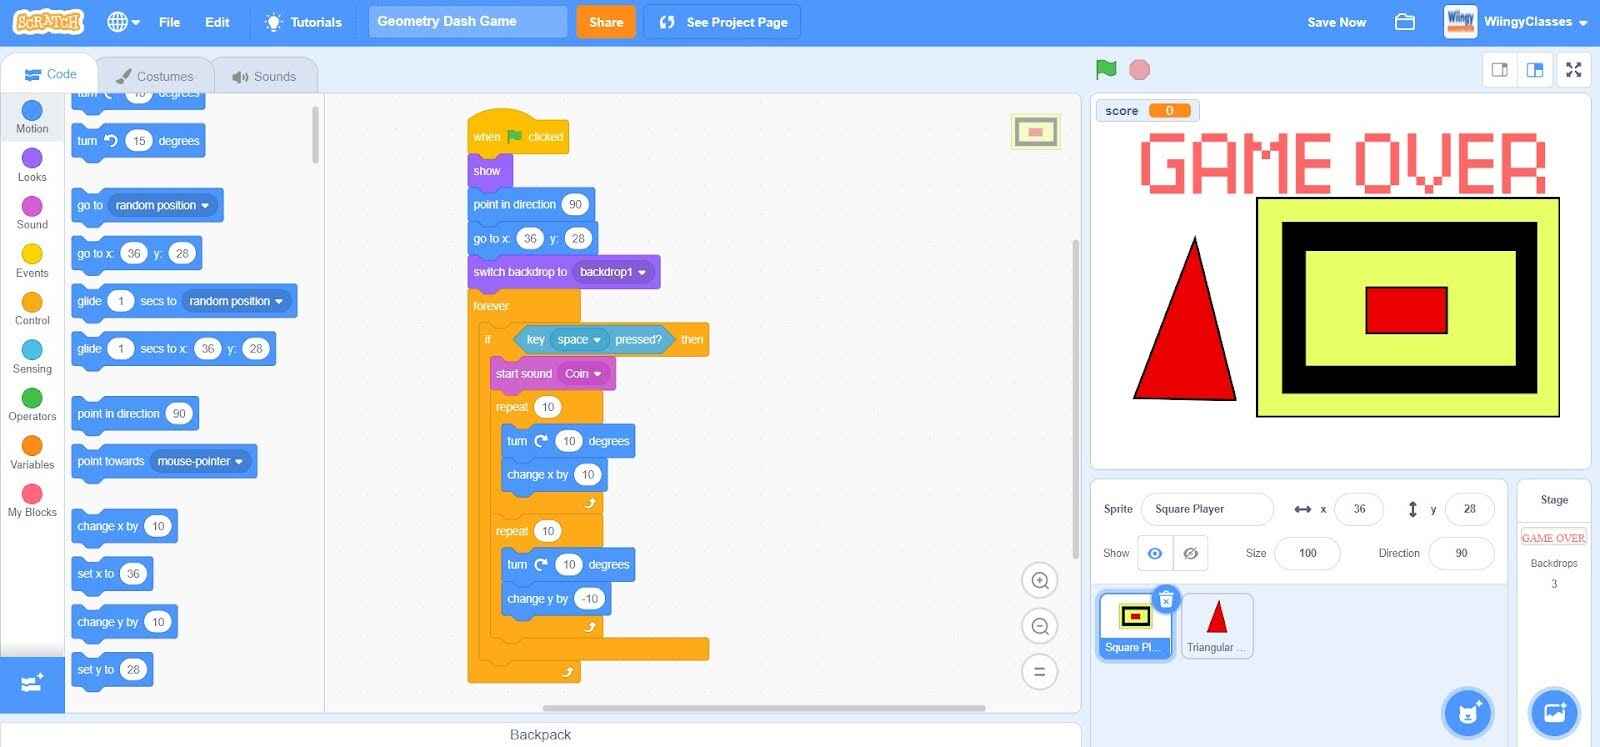
- Step 20: Again, go to the “Motion” block in the block palette, select the ‘point in direction ( )’ block, drag it to the coding area, and place it under the second ‘repeat ( )’ block inside the ‘forever’ block. In the ‘point in direction ( )’ block, leave the value as ‘90’.
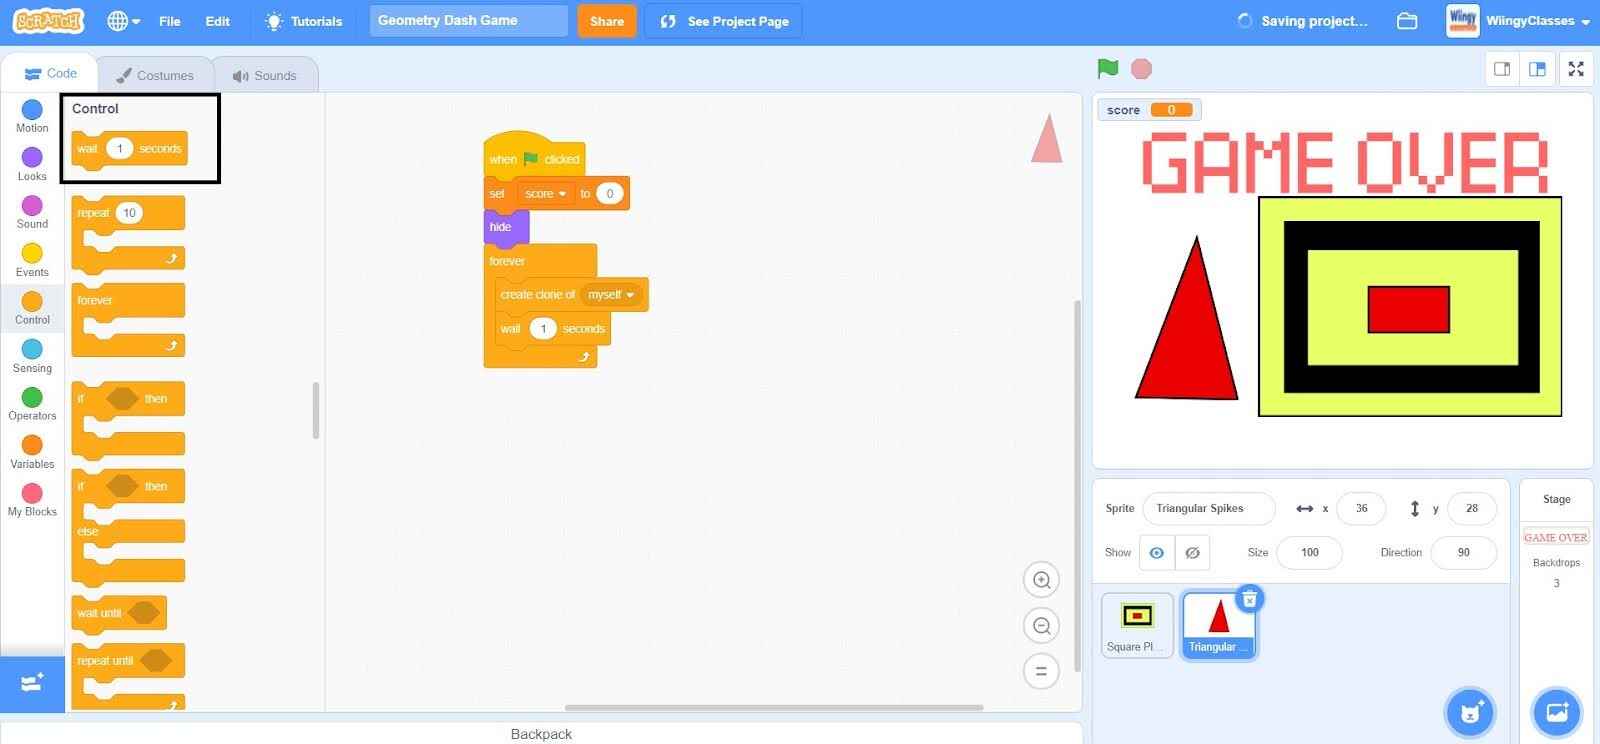
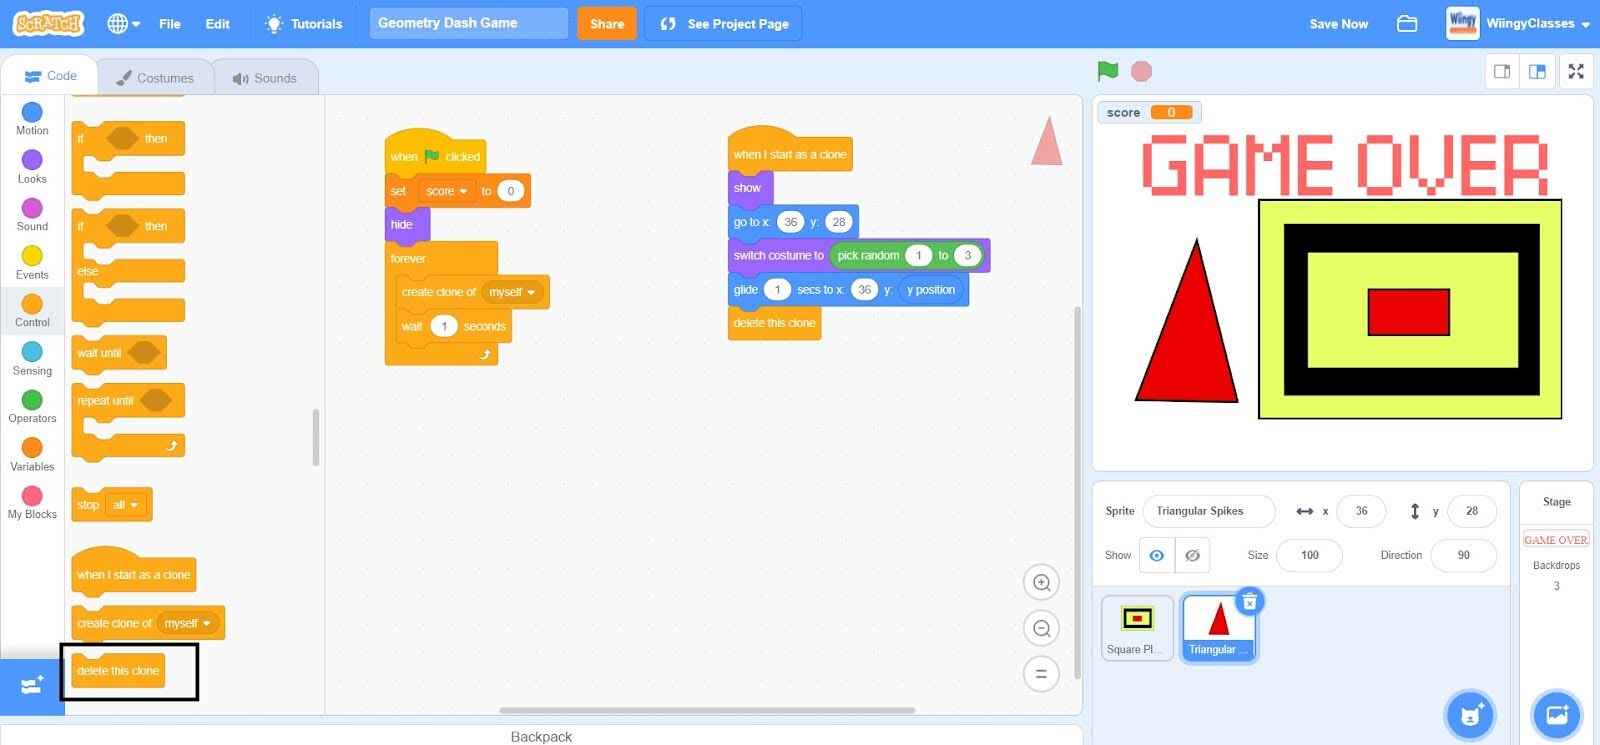
Code to reset the score position and to make multiple spikes
In order to initiate the score, we need to set the score variable to ‘0’ and create clones of the spikes sprite every second. Make sure that the triangular spikes sprite is selected while coding for it.
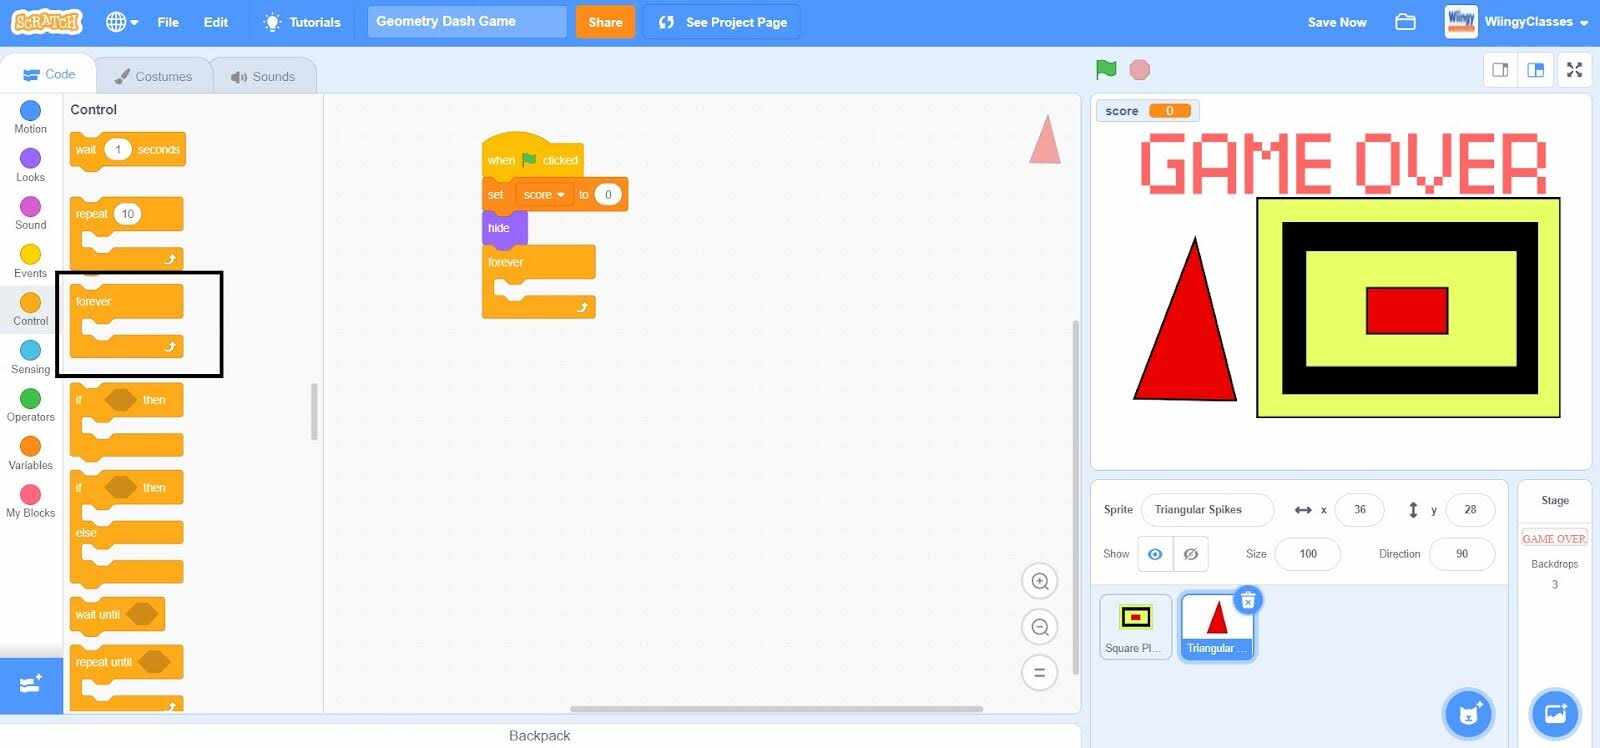
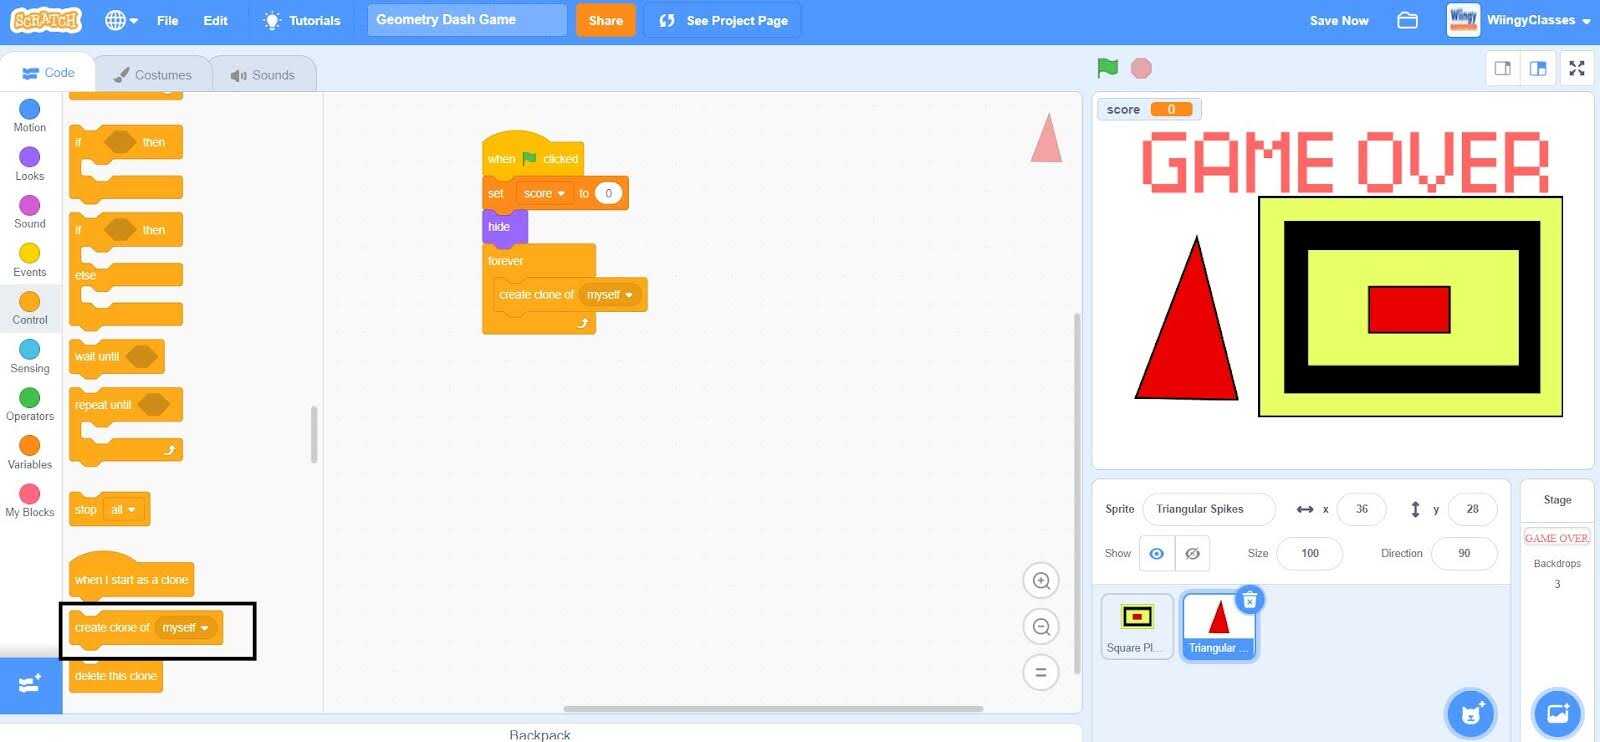
- Step 1: Go to the “Events” block in the block palette, select the ‘when green flag clicked’ block, and drag it to the coding area.
- Step 2: Go to the “Variables” block in the block palette, select the ‘set ( ) to ( )’ block, drag it to the coding area, and place it under the ‘when green flag clicked’ block.
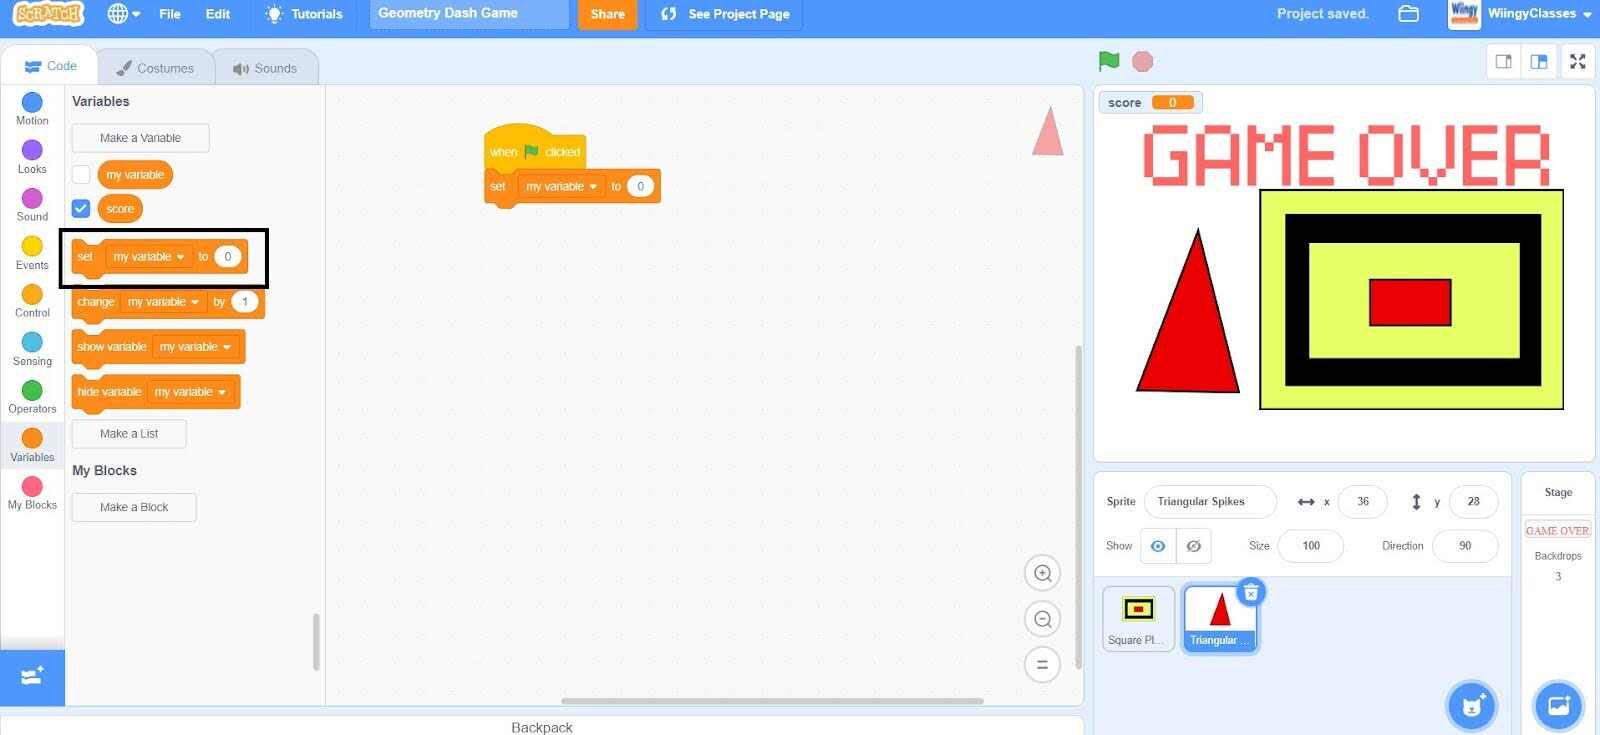
- Step 3: In the ‘set ( ) to ( )’ block, select the first value as ‘score’ from the drop-down menu and leave the second value as ‘0’.
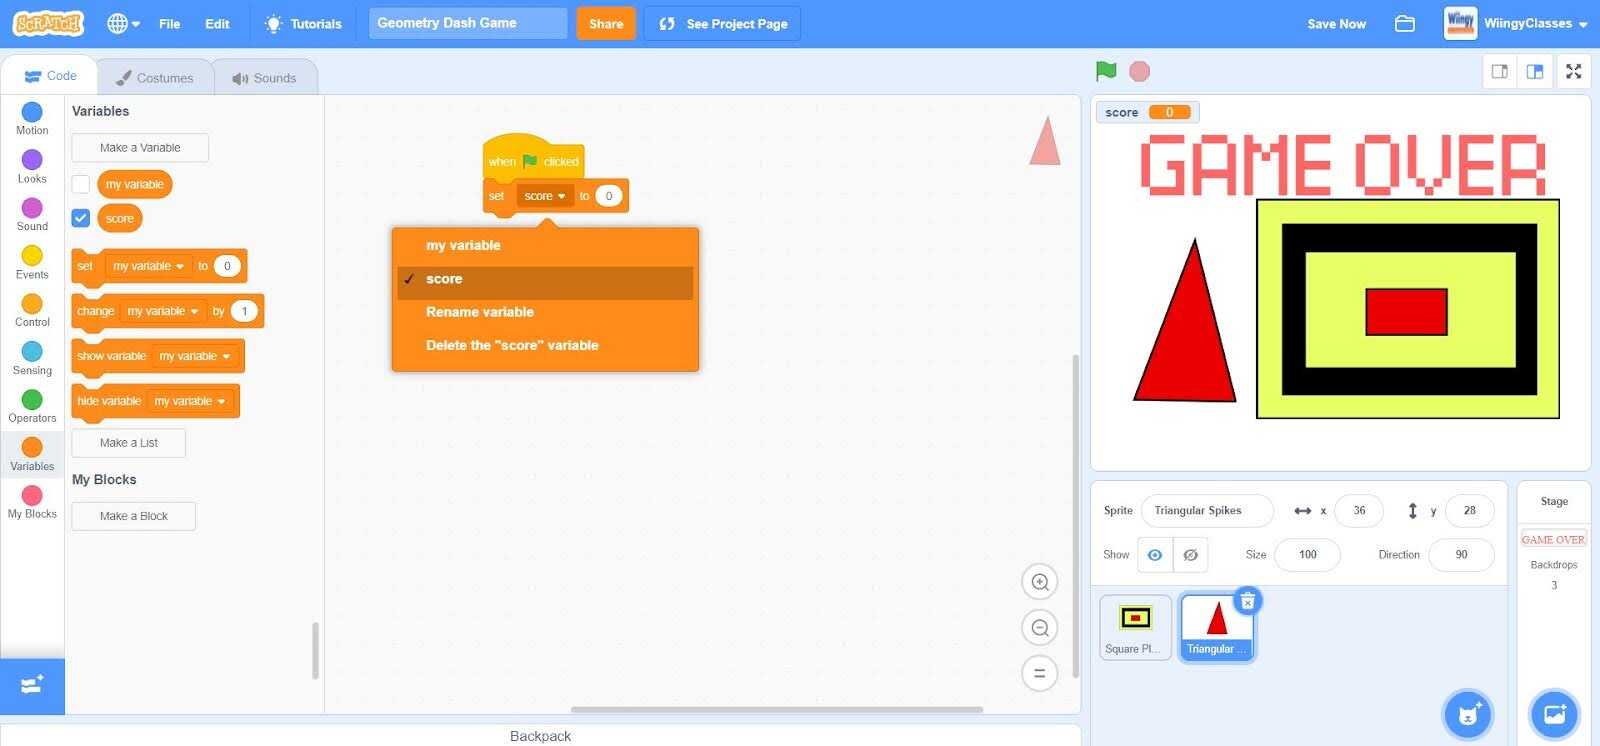
- Step 4: Go to the “Looks” block in the block palette, select the ‘hide’ block, drag it to the coding area, and place it under the ‘set ( ) to ( )’ block.
- Step 5: Go to the “Control” block in the block palette, select the ‘forever’ block, drag it to the coding area, and place it under the ‘hide’ block.
- Step 6: From the “Control” block in the block palette, select the ‘create clone of ( )’ block, drag it to the coding area, and place it inside the ‘forever’ block.
- Step 7: Again from the “Control” block in the block palette, select the ‘wait ( ) seconds’ block, drag it to the coding area, and place it under the ‘create clone of ( )’ block inside the ‘forever’ block. In the ‘wait ( ) seconds’ blocks, leave the value as ‘1’.
Code to make the spikes move on the yellow-colored pathway
Make sure that the triangular spikes sprite is selected while coding this part.
- Step 1: Go to the “Control” block in the block palette, select the ‘when I start as a clone’ block, and drag it to the coding area.
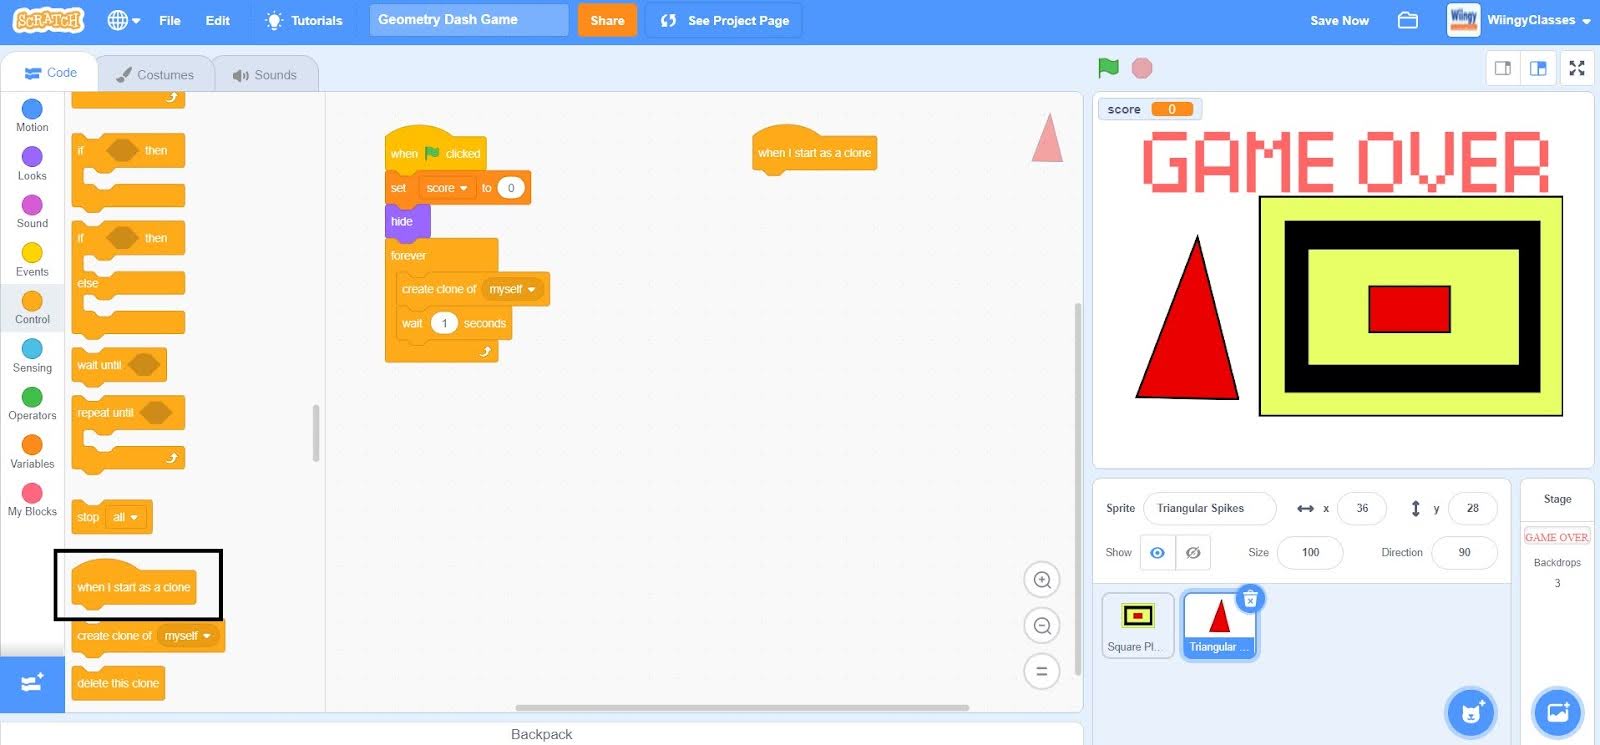
- Step 2: Go to the “Looks” block in the block palette, select the ‘show’ block, drag it to the coding area, and place it under the ‘when I start as a clone’ block.
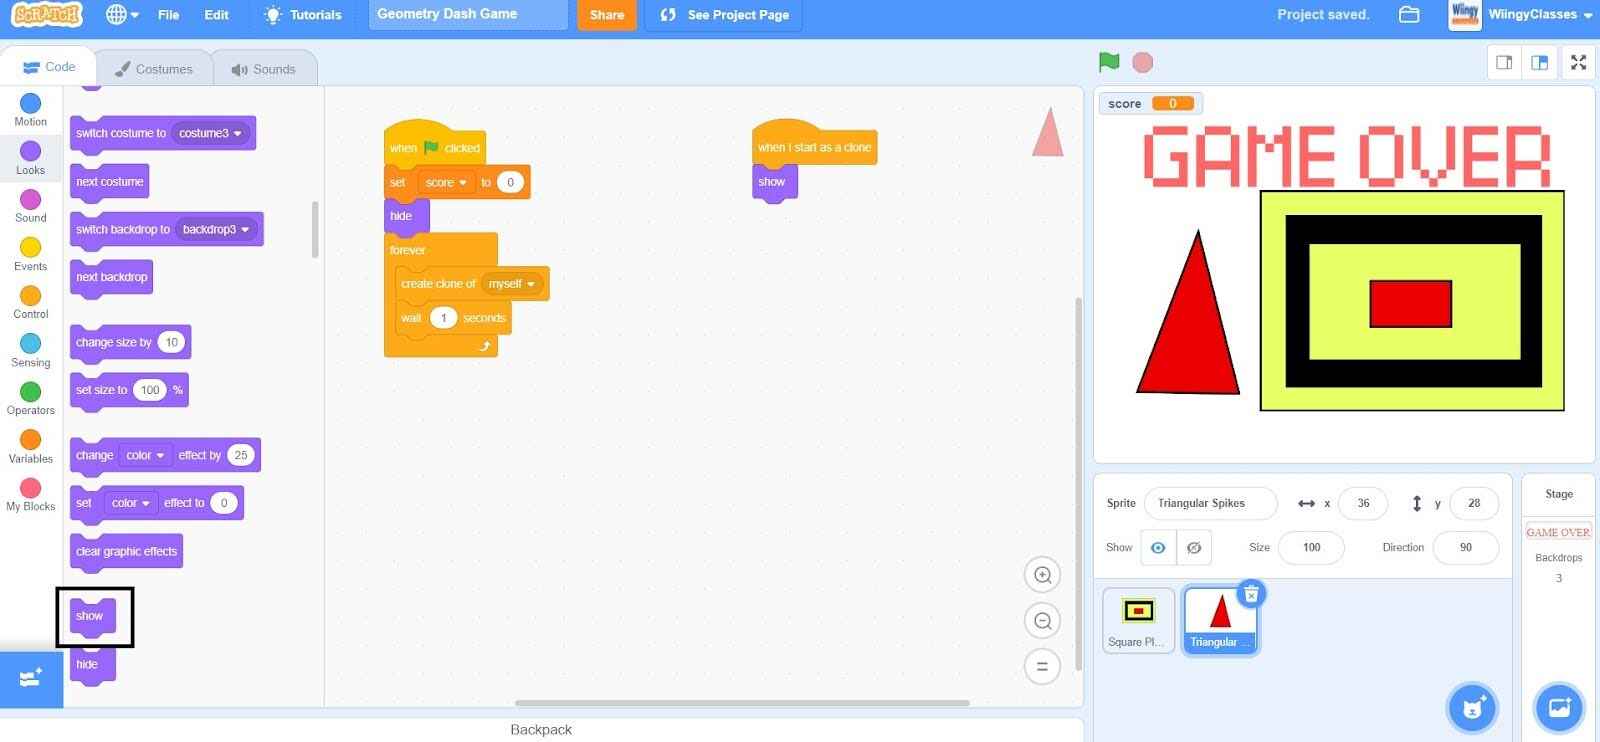
- Step 3: Go to the “Motion” block in the block palette, select the ‘go to x: ( ) y: ( )’ block, drag it to the coding area, and place it under the ‘show’ block.
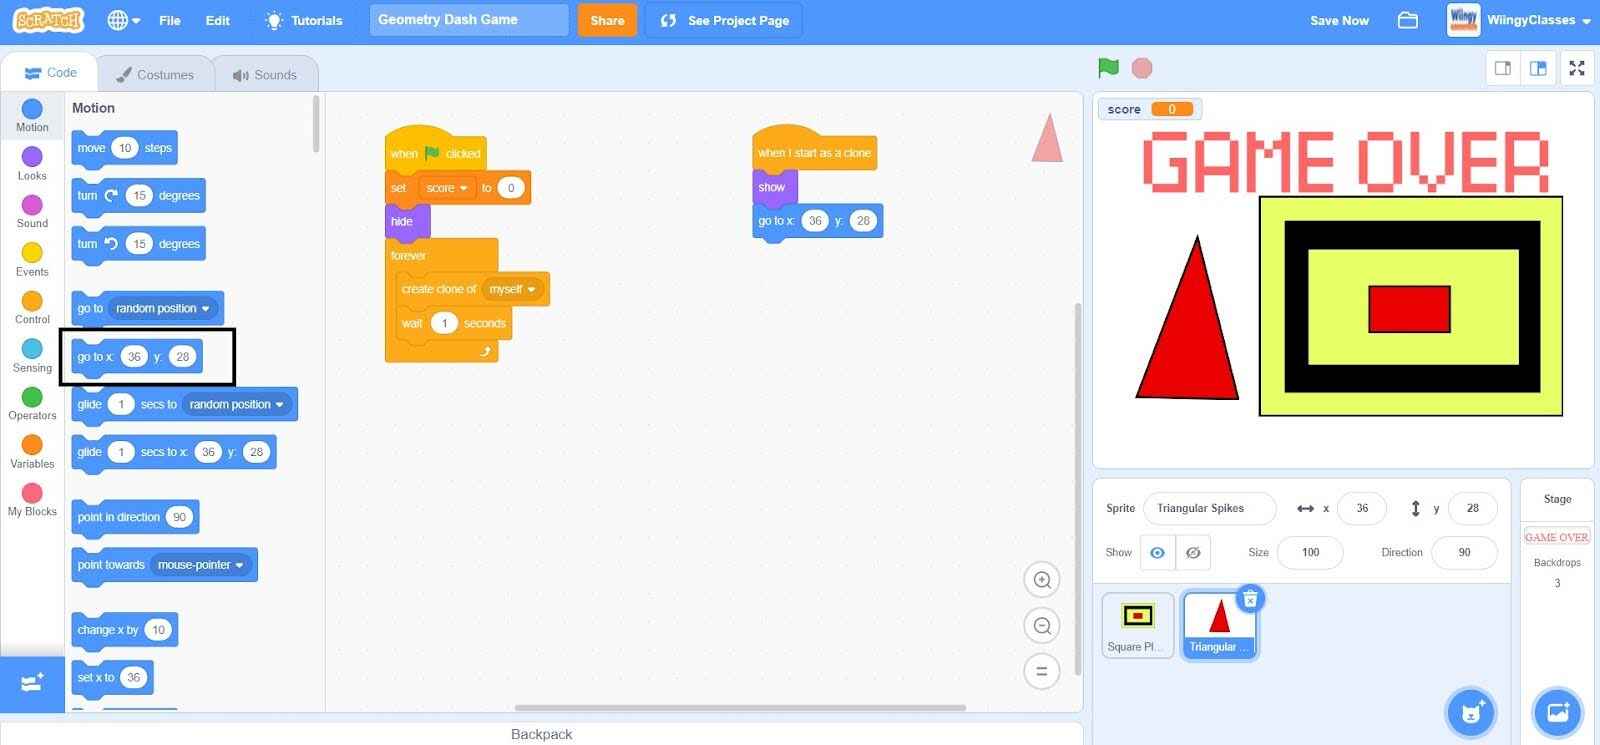
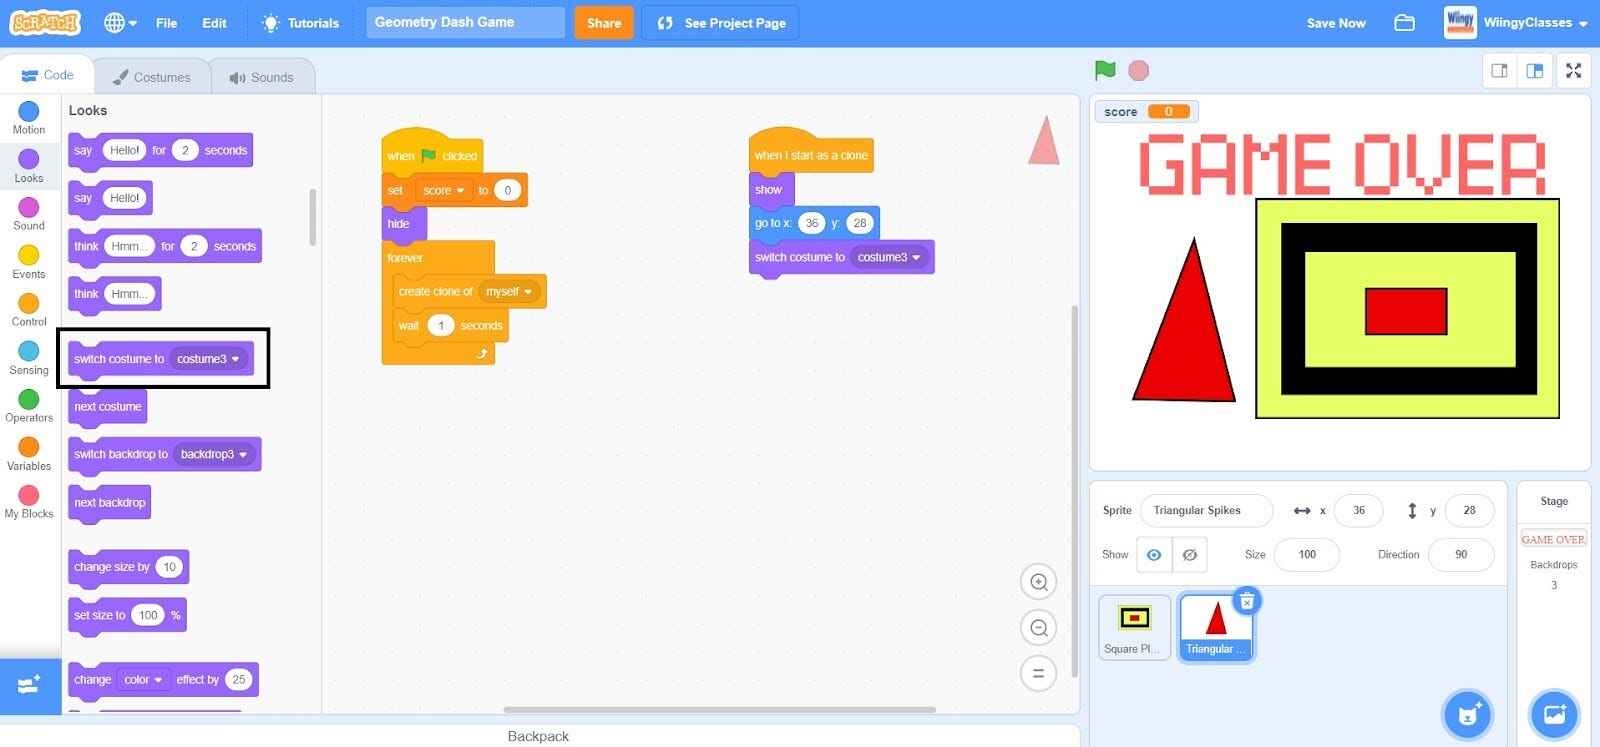
- Step 4: Go to the “Looks” block in the block palette, select the ‘switch costume to ( )’ block, drag it to the coding area, and place it under the ‘go to x: ( ) y: ( )’ block.
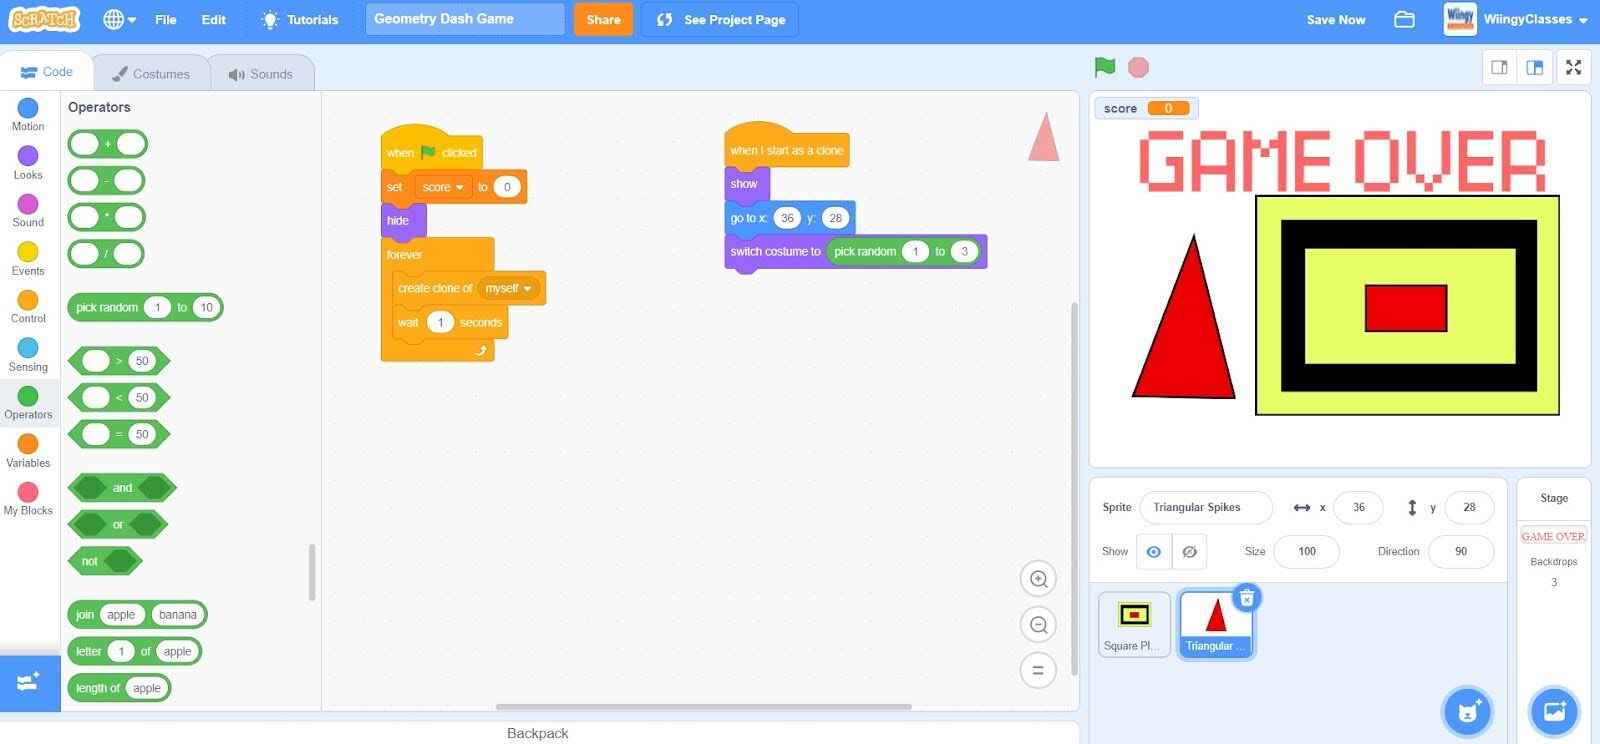
- Step 5: Go to the “Operators” block in the block palette, select the ‘pick random ( ) to ( )’ block, drag it to the coding area, and place it in the value part of the ‘switch costume to ( )’ block.
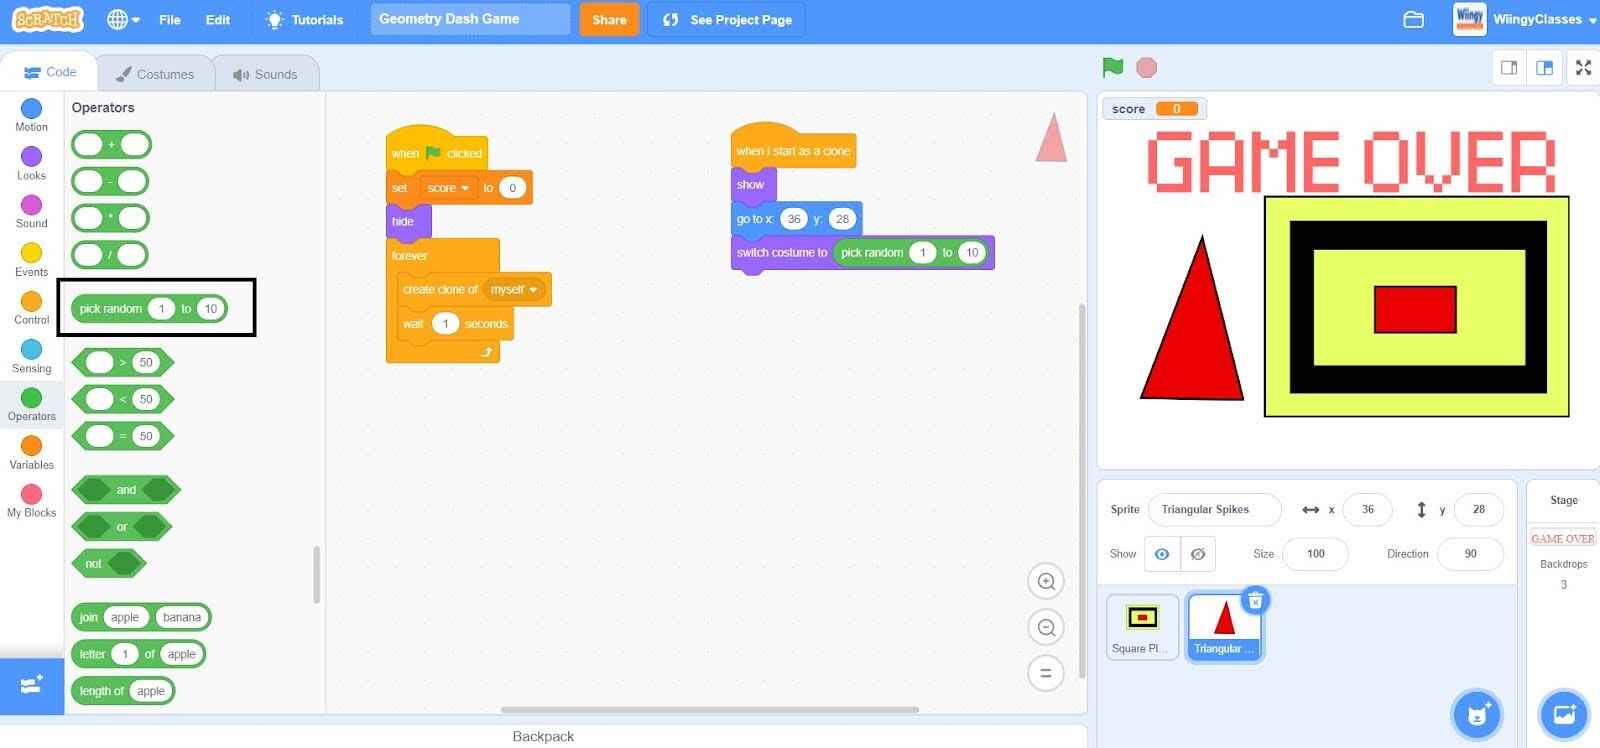
- Step 6: In the ‘pick random ( ) to ( )’ block, leave the first value as ‘1’ and change the second value to ‘3’.
- Step 7: Go to the “Motion” block in the block palette, select the ‘glide ( ) secs to x: ( ) y: ( )’ block, drag it to the coding area, and place it under the ‘switch costume to ( )’ block.
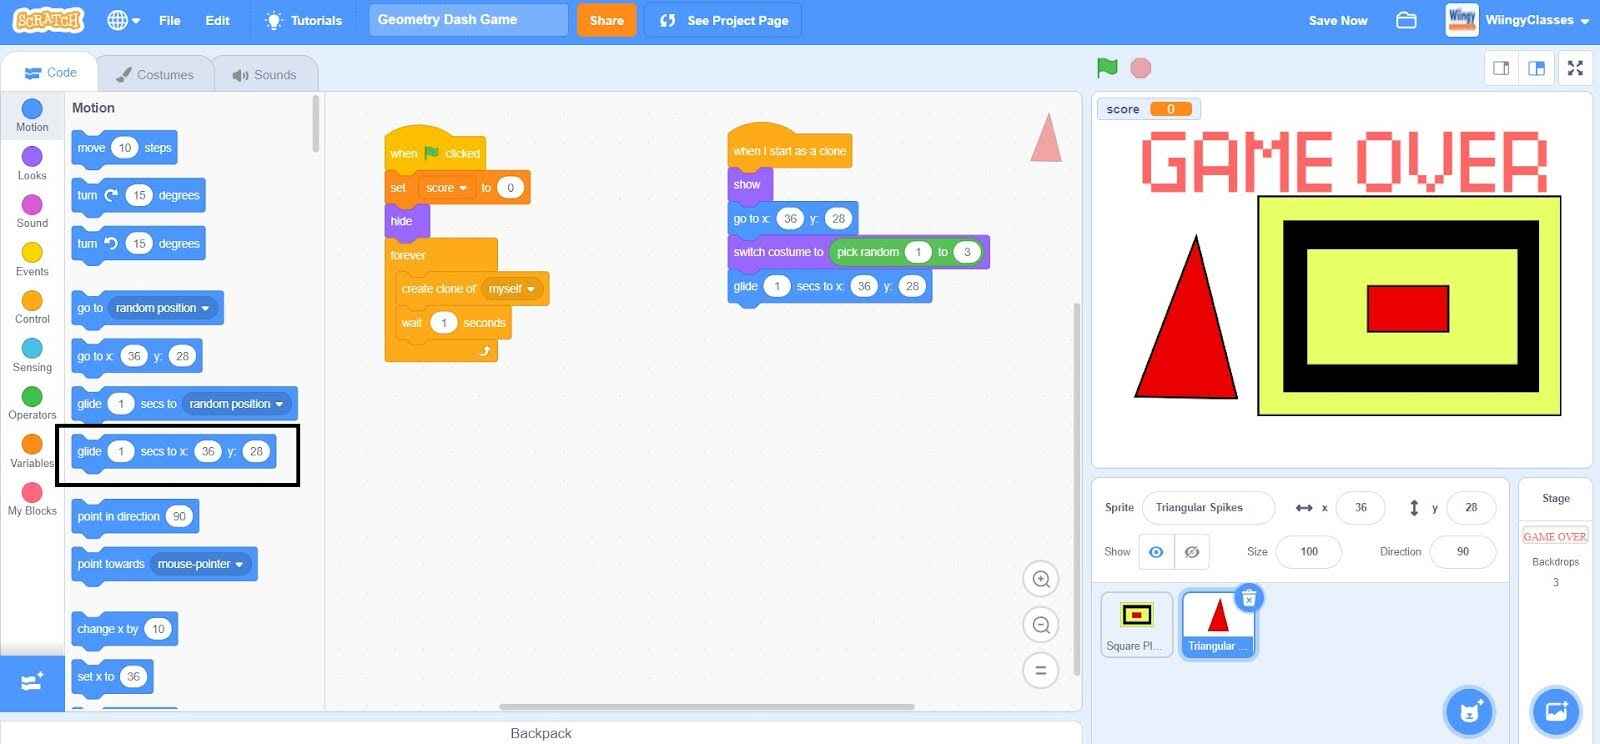
- Step 8: From the “Motion” block in the block palette, select the ‘y position’ block, drag it to the coding area, and place it in the value for y in the ‘glide ( ) secs to x: ( ) y: ( )’ block.
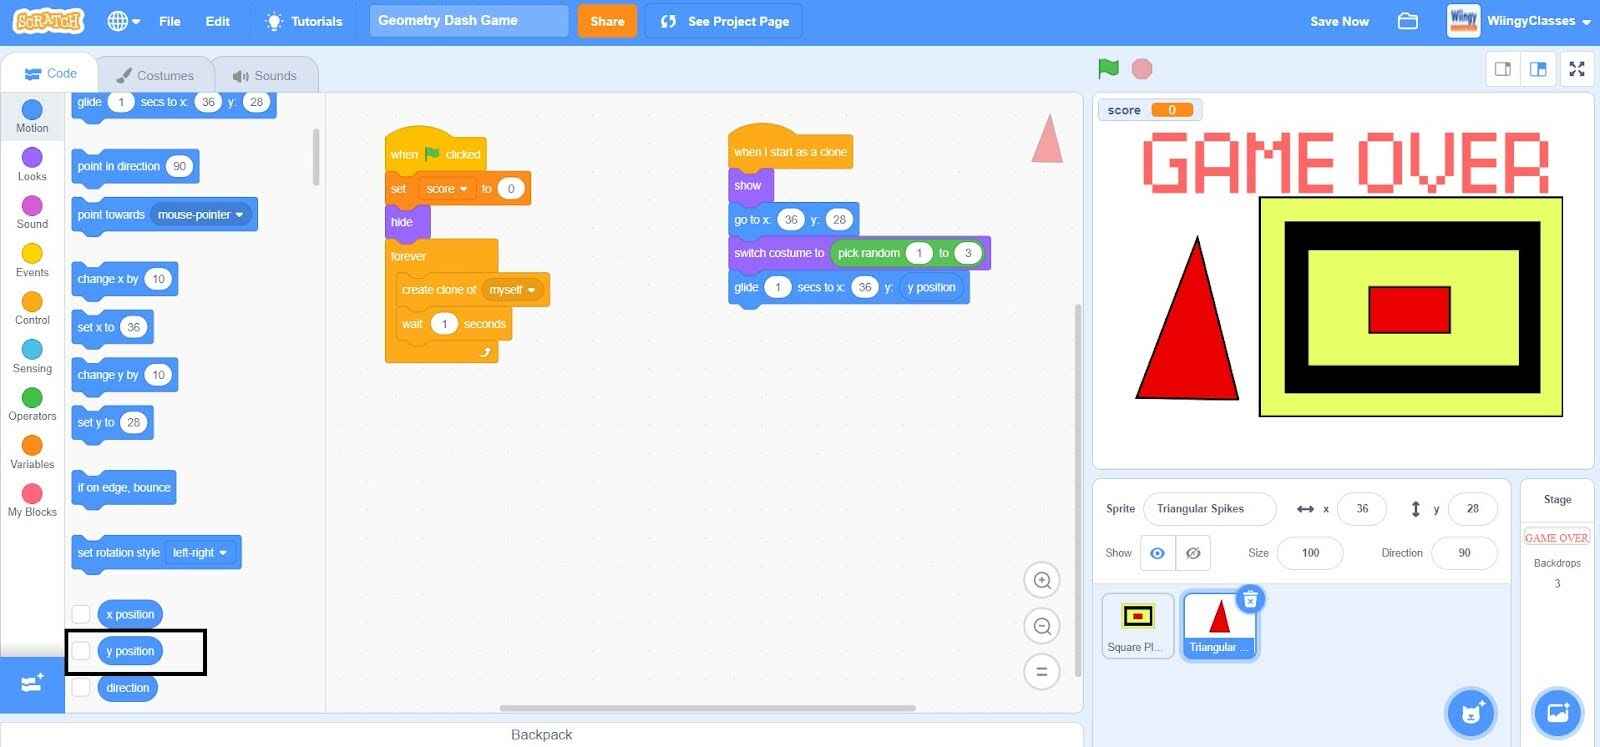
- Step 9: Go to the “Control” block in the block palette, select the ‘delete this clone’ block, drag it to the coding area, and place it under the ‘glide ( ) secs to x: ( ) y: ( )’ block.
Code to score the points
When the game starts, the player will start to gain points and it will continue to gain points until it touches a triangular spike. Make sure that the triangular spikes sprite is selected while coding this part.
- Step 1: Go to the “Events” block in the block palette, select the ‘when green flag clicked’ block, and drag it to the coding area.

- Step 2: Go to the “Control” block in the block palette, select the ‘forever’ block, drag it to the coding area, and place it under the ‘when green flag clicked’ block.

- Step 3: From the “Control” block in the block palette, select the ‘repeat until ( )’ block, drag it to the coding area, and place it inside the ‘forever’ block.
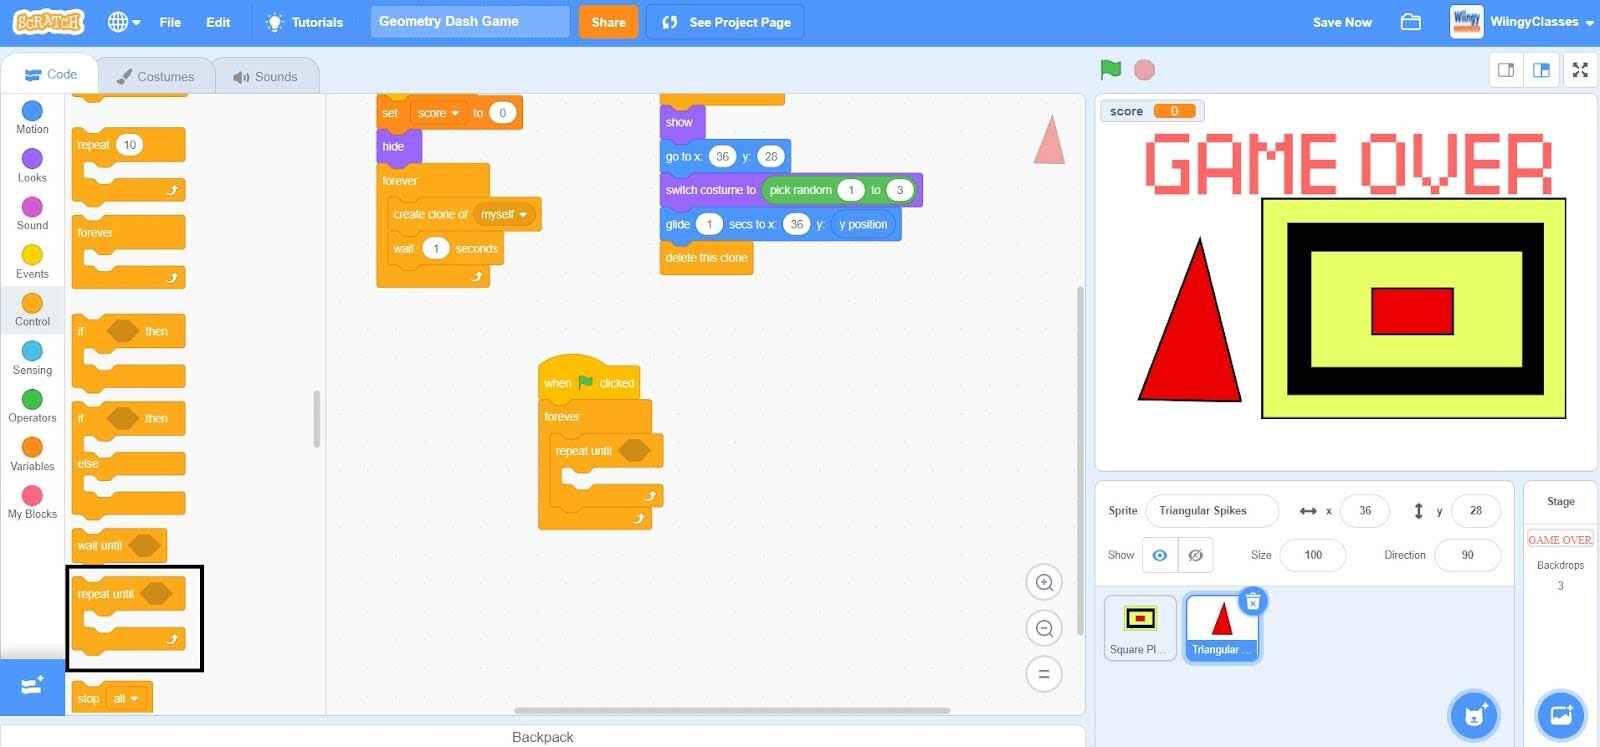
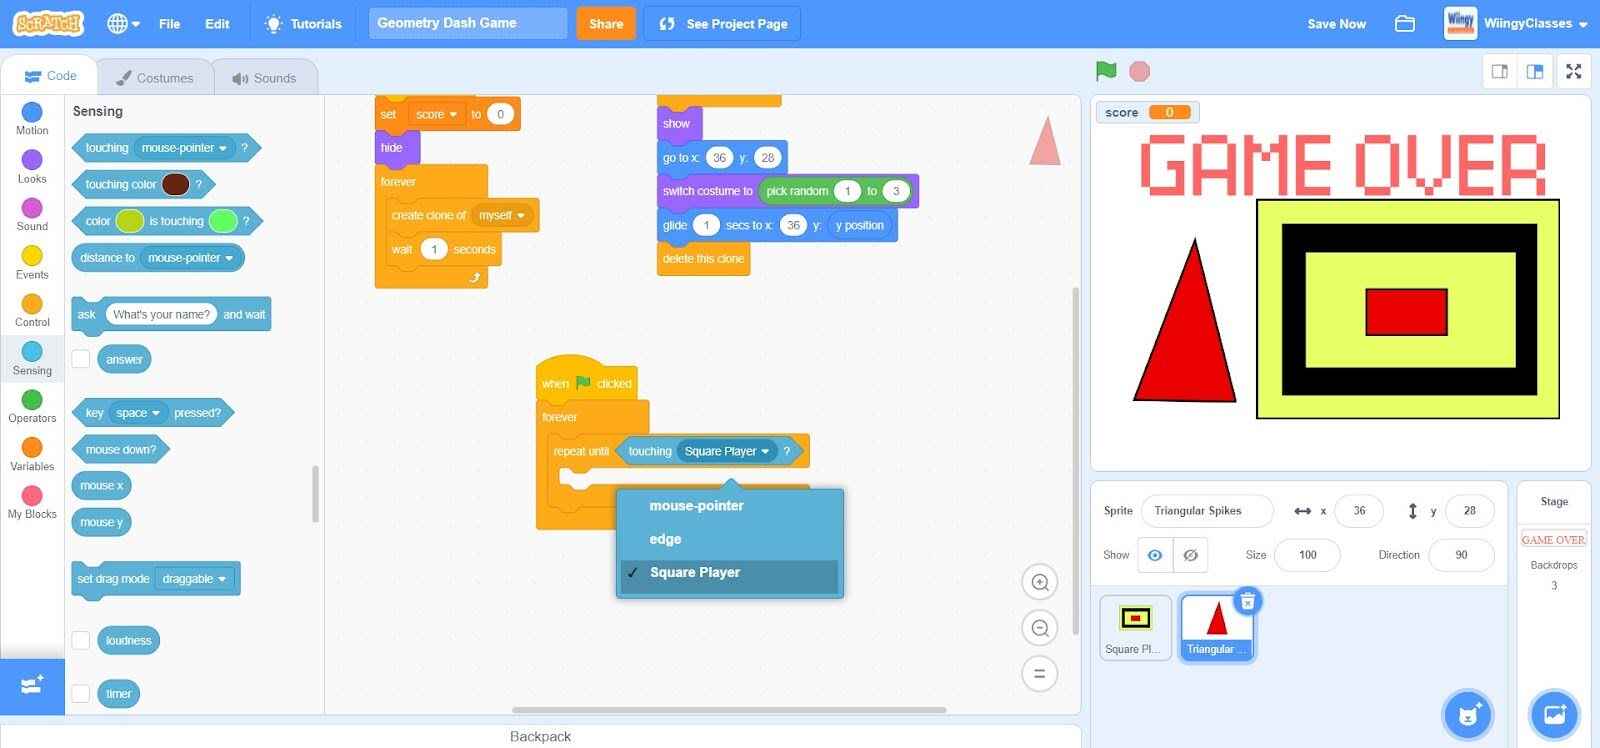
- Step 4: Go to the “Sensing” block in the block palette, select the ‘touching ( )?’ block, drag it to the coding area, and place it in the value part of the ‘repeat until ( )’ block.
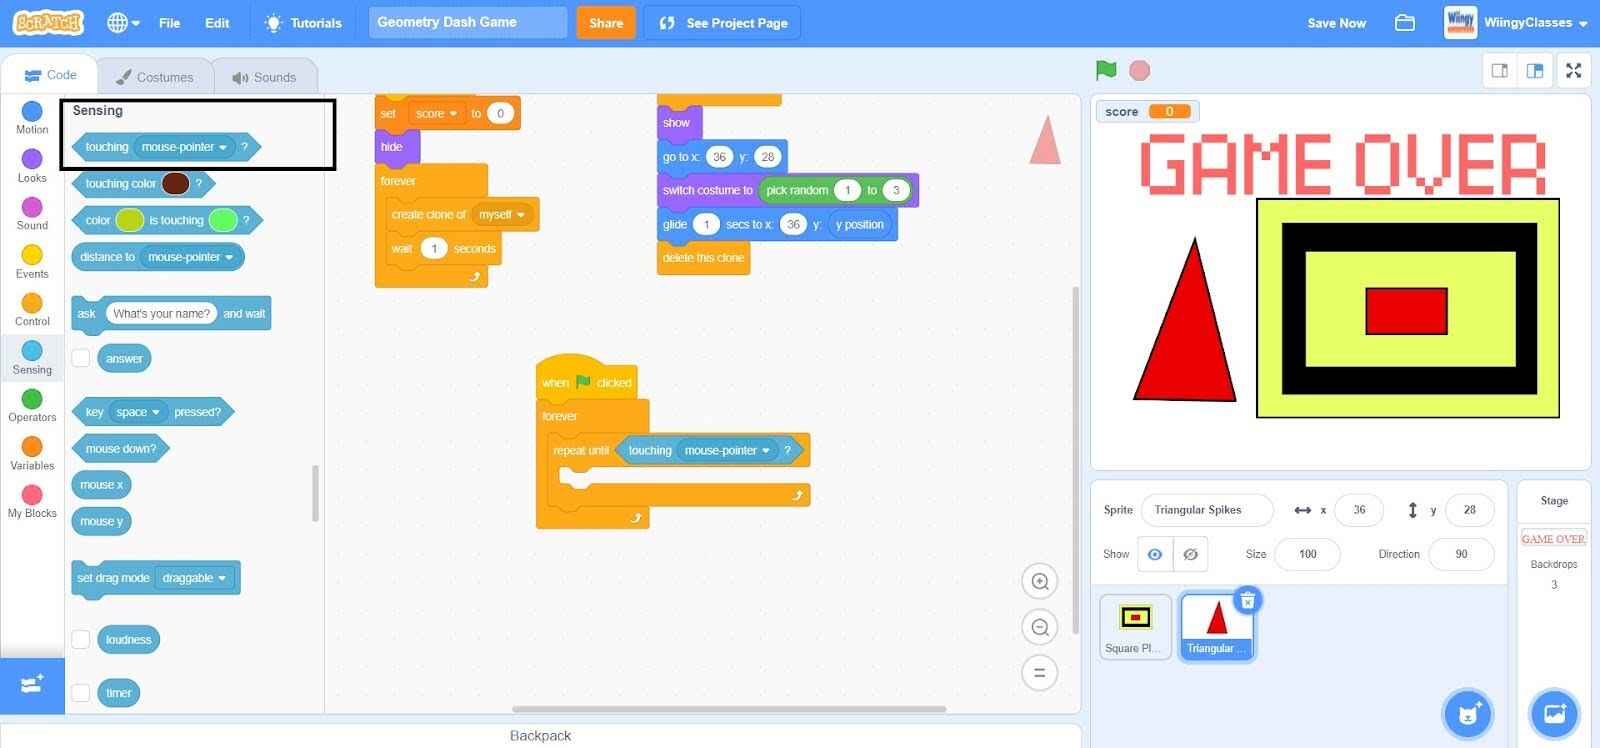
- Step 5: In the ‘touching ( )?’ block, select the value ‘Square Player’ from the drop-down menu.
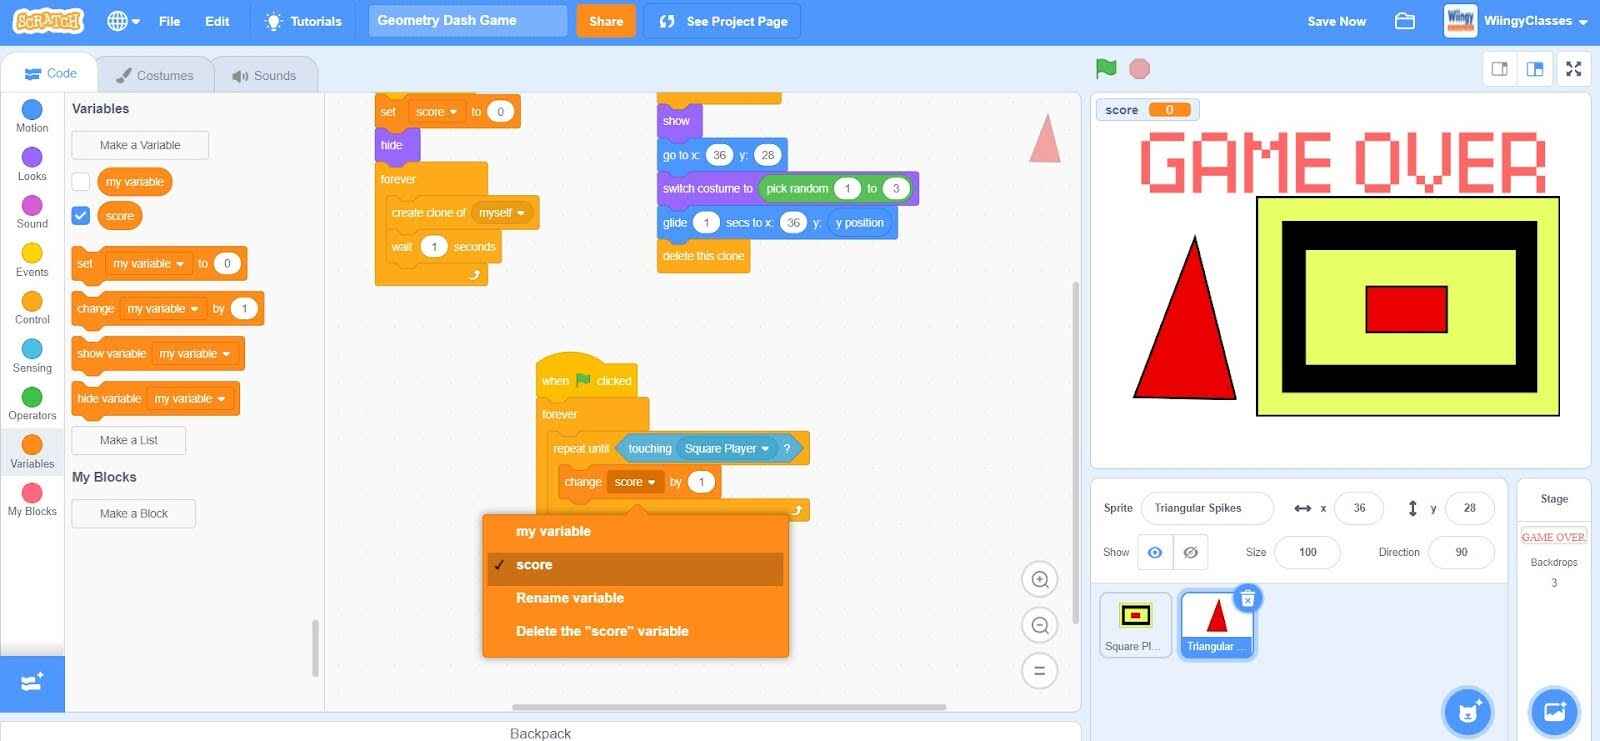
- Step 6: Go to the “Variables” block in the block palette, select the ‘change ( ) by ( )’ block, drag it to the coding area, and place it in the ‘repeat until ( )’ block inside the ‘forever’ block.

- Step 7: In the ‘change ( ) by ( )’ block, select the first value as ‘score’ from the drop-down menu and leave the second value as ‘1’.
Code to stop the game when the player touches the spikes
When the player touches the spikes, the game ends. Make sure that the square player sprite is selected while coding this part.
- Step 1: Go to the “Events” block in the block palette, select the ‘when green flag clicked’ block, and drag it to the coding area.
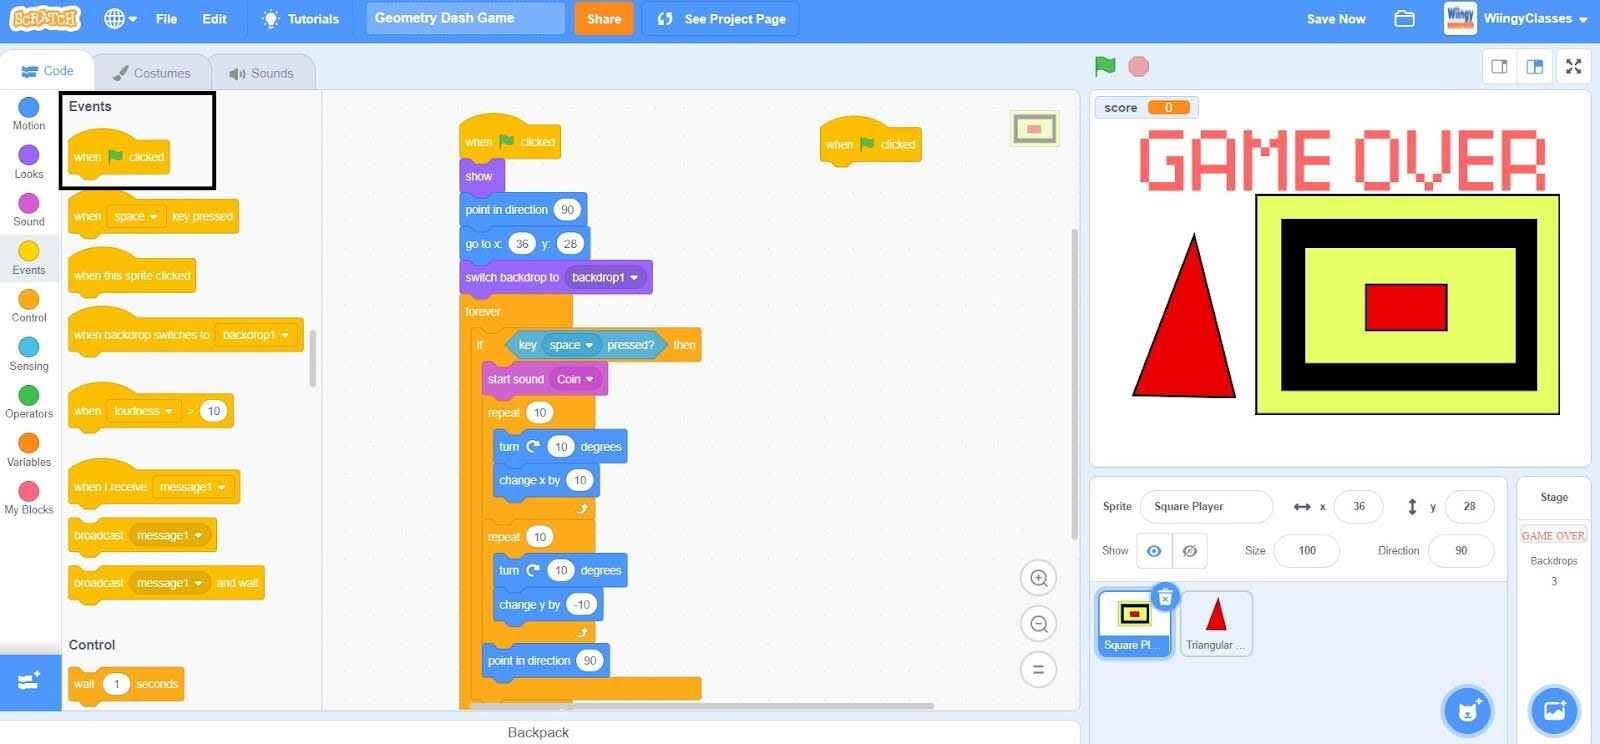
- Step 2: Go to the “Control” block in the block palette, select the ‘forever’ block, drag it to the coding area, and place it under the ‘when green flag clicked’ block.
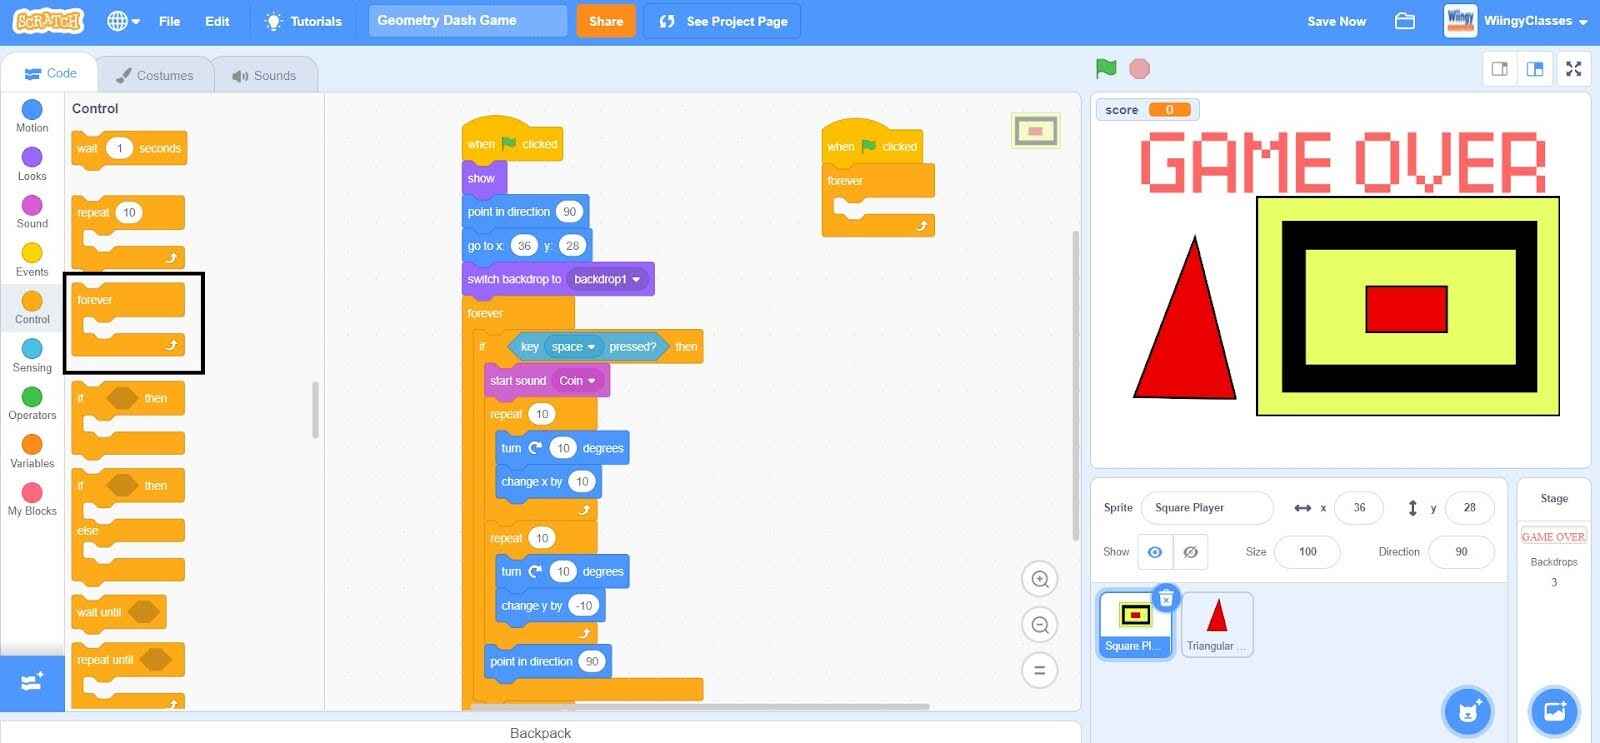
- Step 3: From the “Control” block in the block palette, select the ‘if ( ) then’ block, drag it to the coding area, and place it in the ‘forever’ block.
- Step 4: Go to the “Sensing” block in the block palette, select the ‘touching ( )?’ block, drag it to the coding area, and place it in the value part of the ‘if ( ) then’ block.
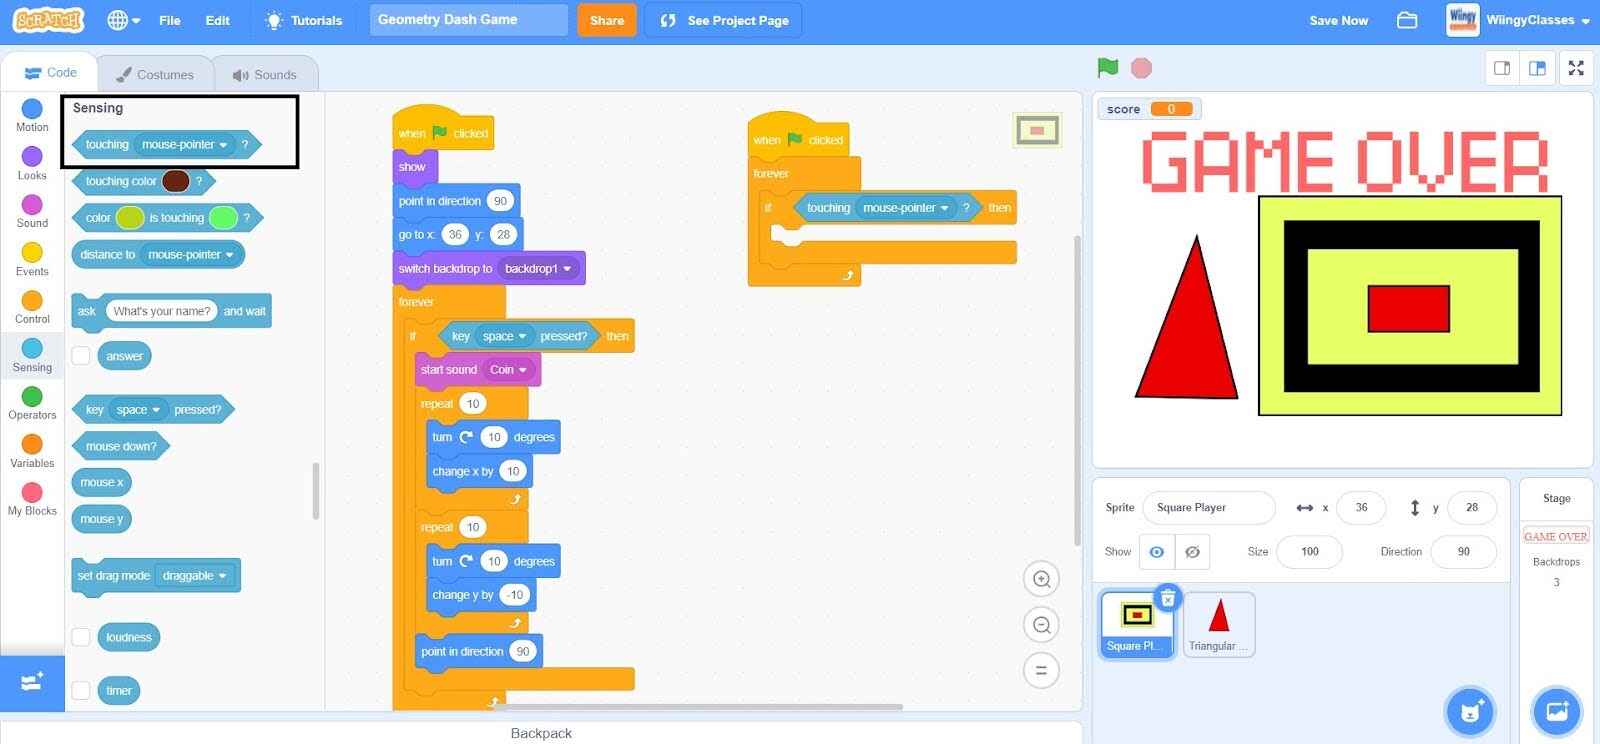
- Step 5: In the ‘touching ( )?’ block, select the value as ‘Triangular Spikes’ from the drop-down menu.
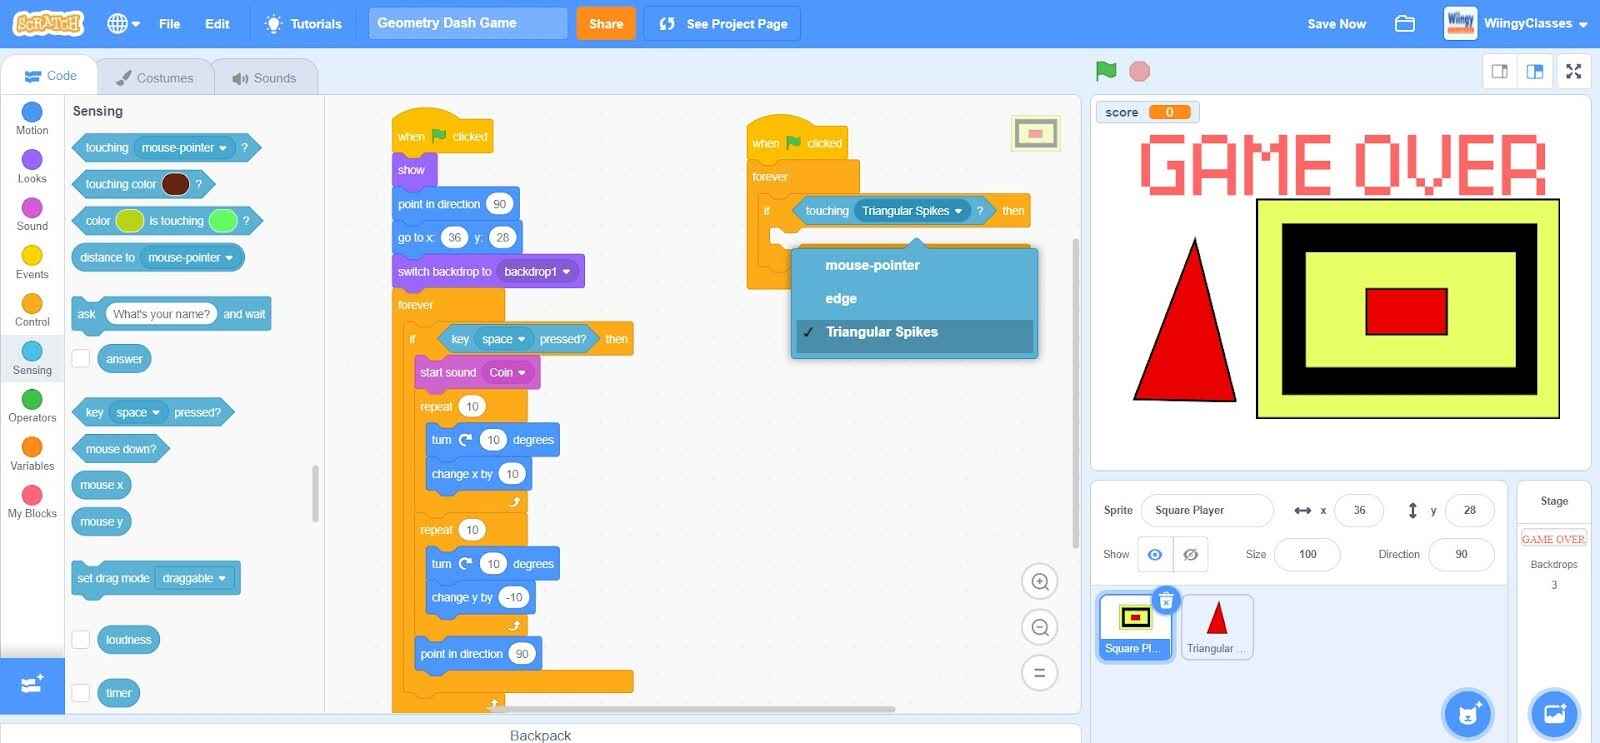
- Step 6: Go to the “Looks” block in the block palette, select the ‘switch backdrop to ( )’ block, drag it to the coding area, and place it in the ‘if ( ) then’ block inside the ‘forever’ block.
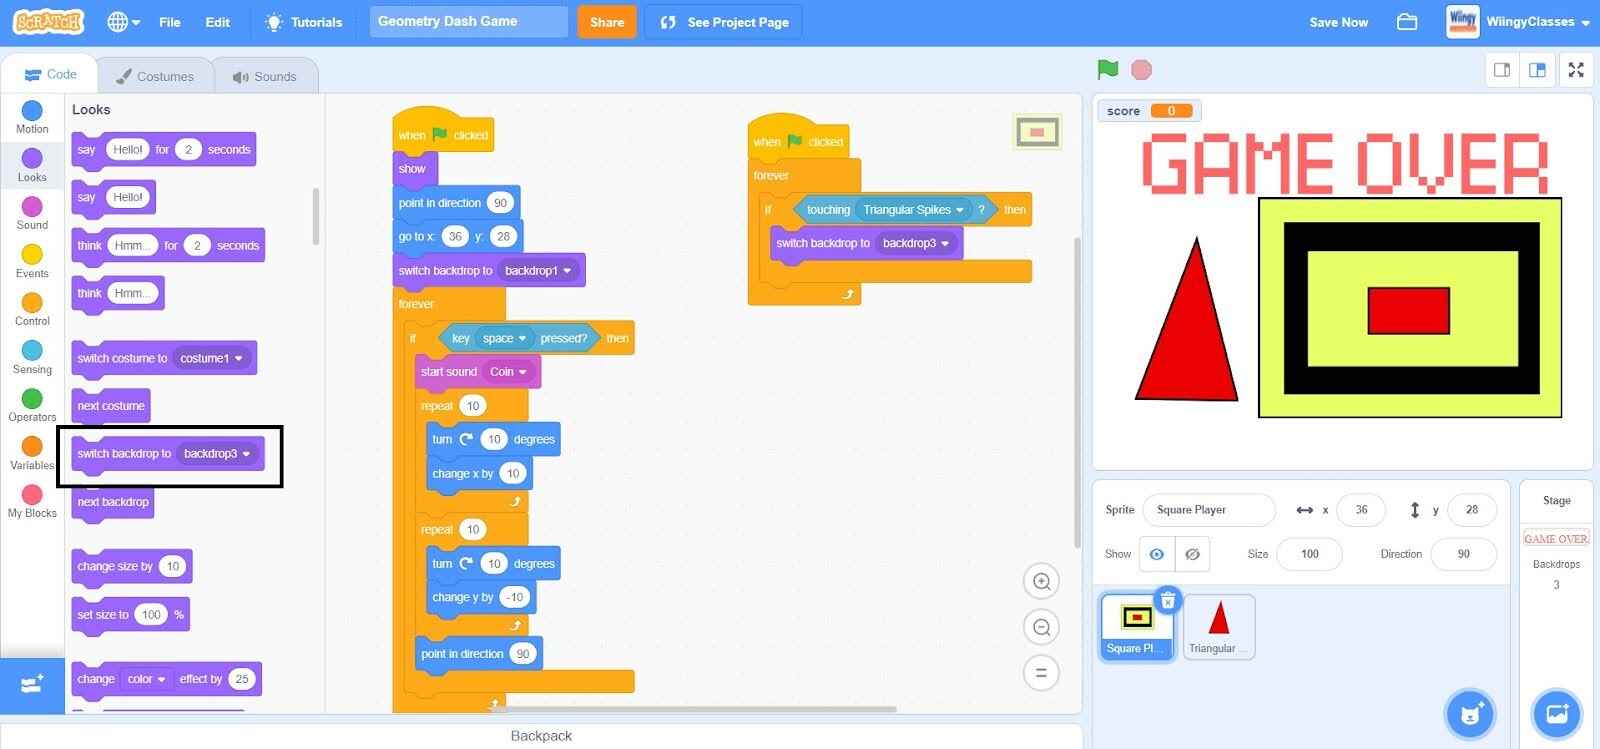
- Step 7: In the ‘switch backdrop to ( )’ block, select the vale as ‘backdrop 2’ from the drop-down menu.
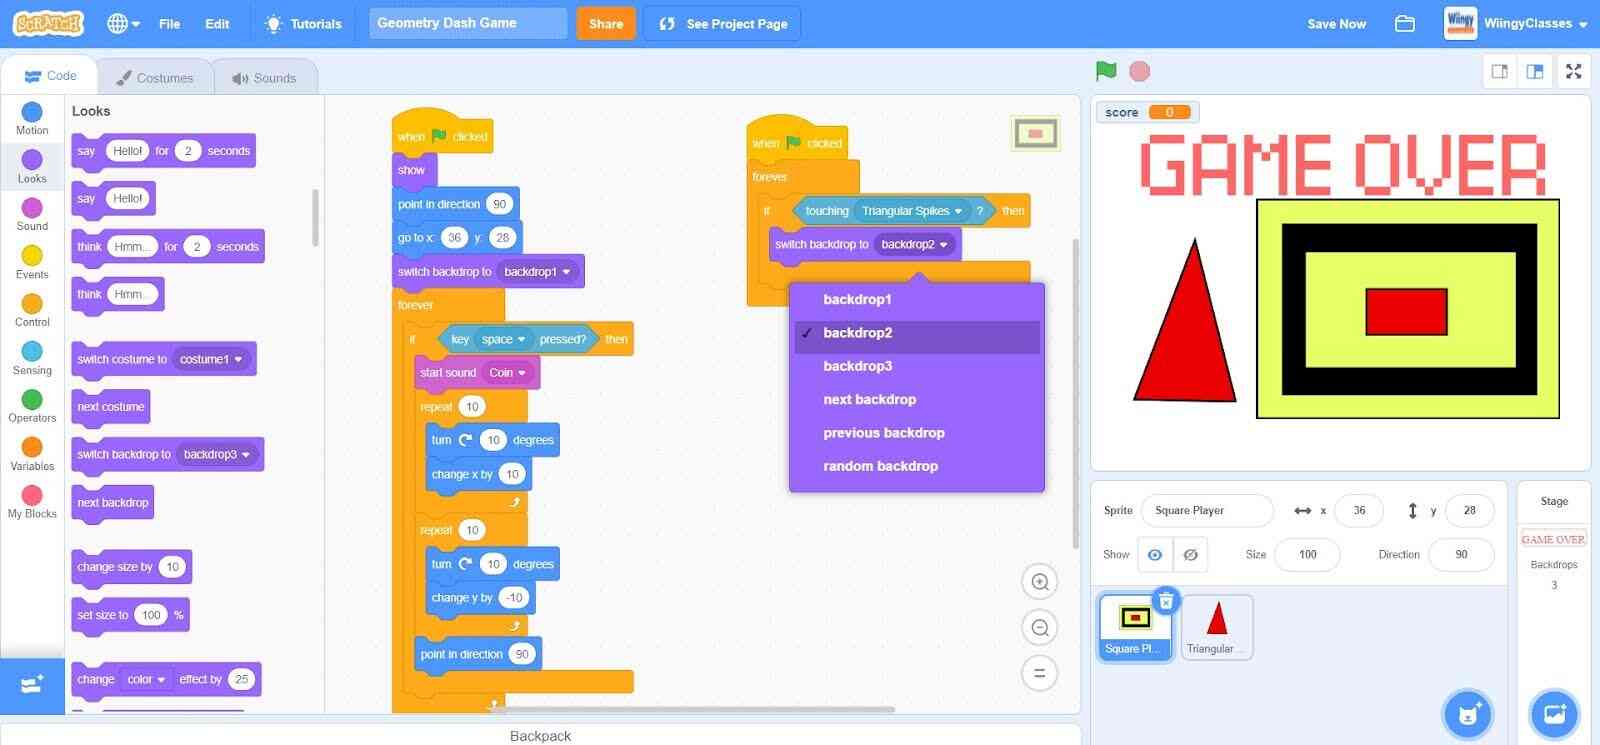
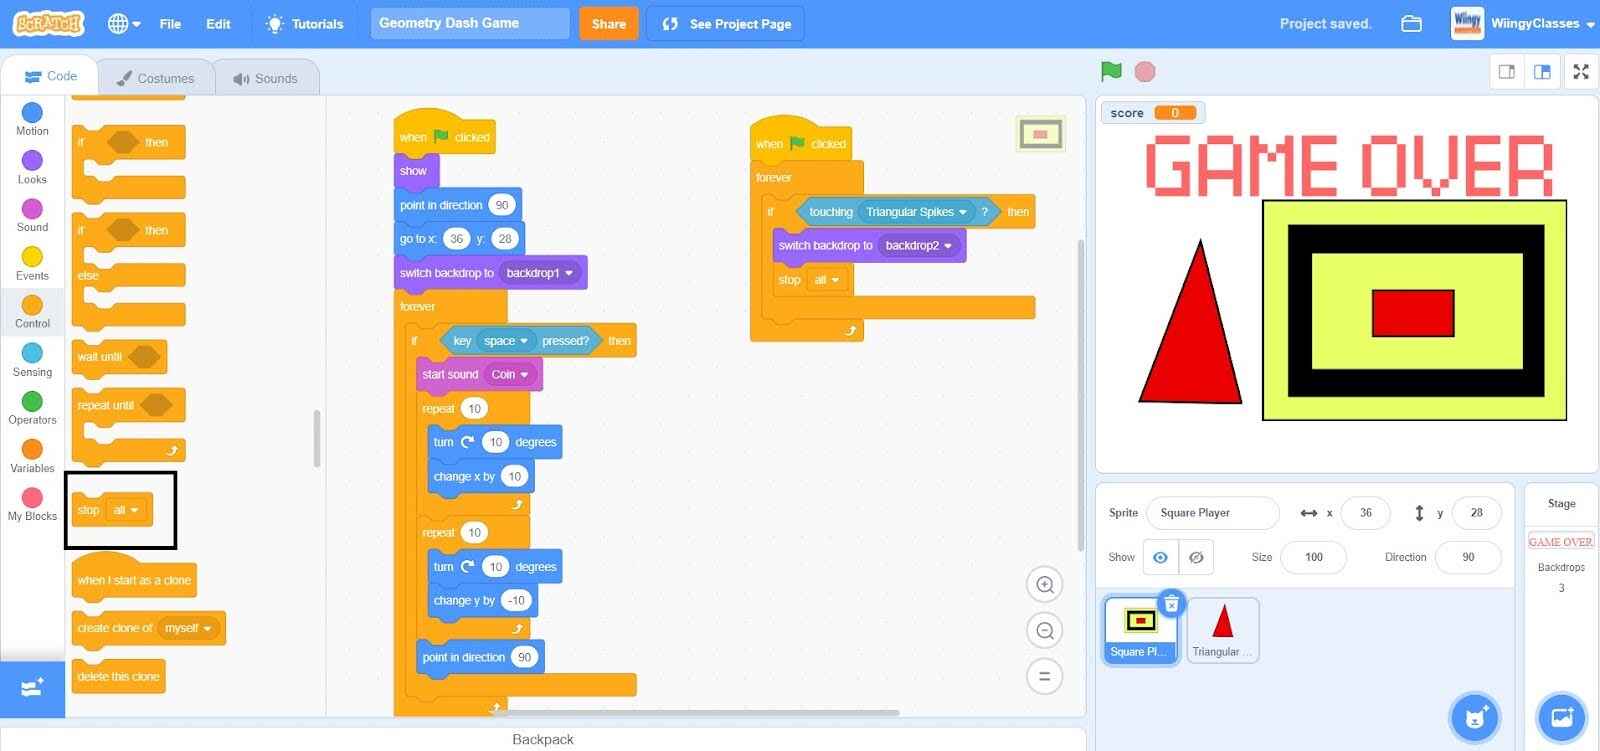
- Step 8: Go to the “Control” block in the block palette, select the ‘stop (all)’ block, drag it to the coding area, and place it under the ‘switch backdrop to ( )’ block inside the ‘forever’ block.
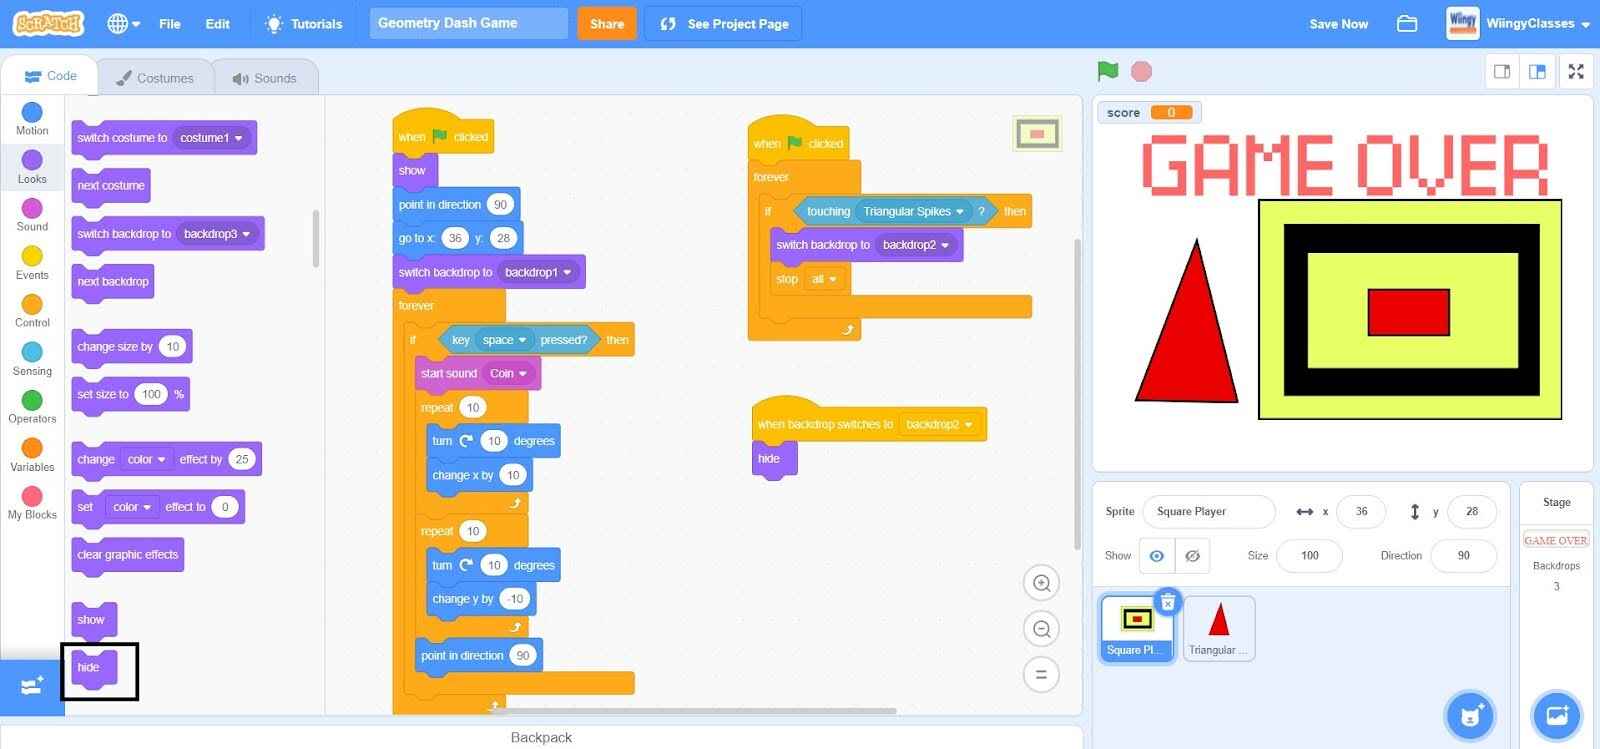
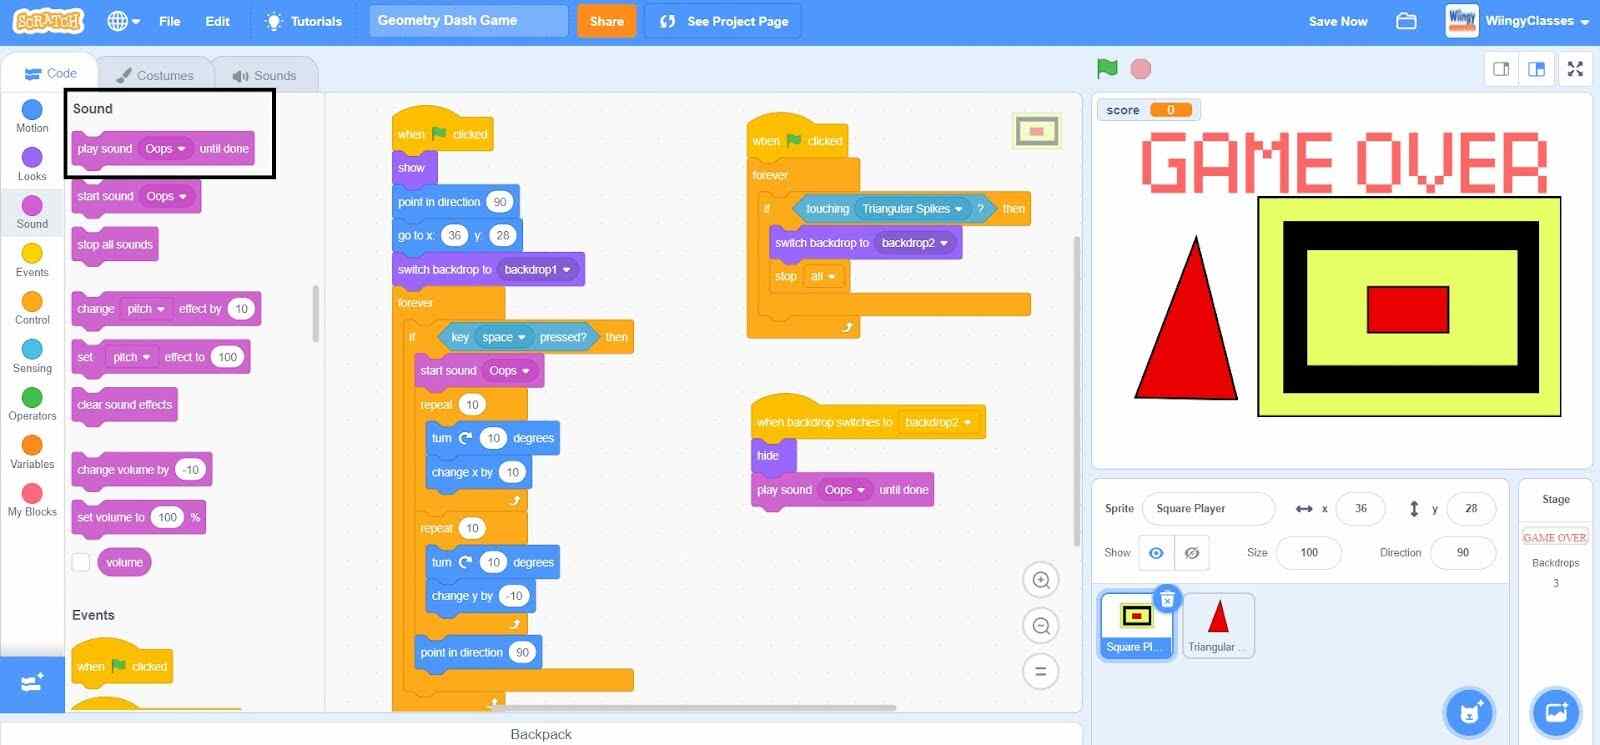
Code to hide the square player sprite when the game ends
When the game ends, we need to hide the square player sprite. Make sure that the square player sprite is selected while coding this part.
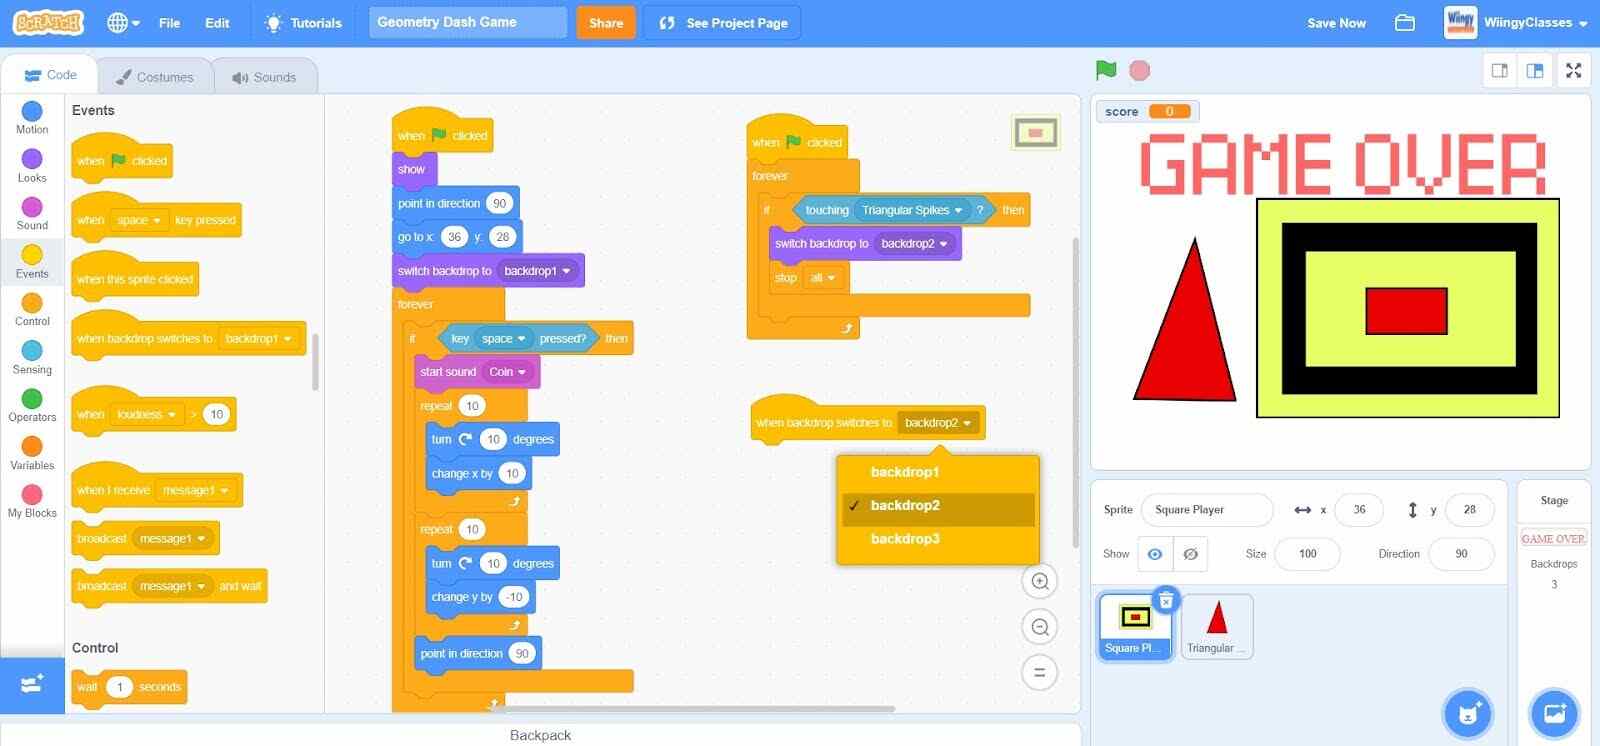
- Step 1: Go to the “Events” block in the block palette, select the ‘when backdrop switches to ( )’ block, and drag it to the coding area.
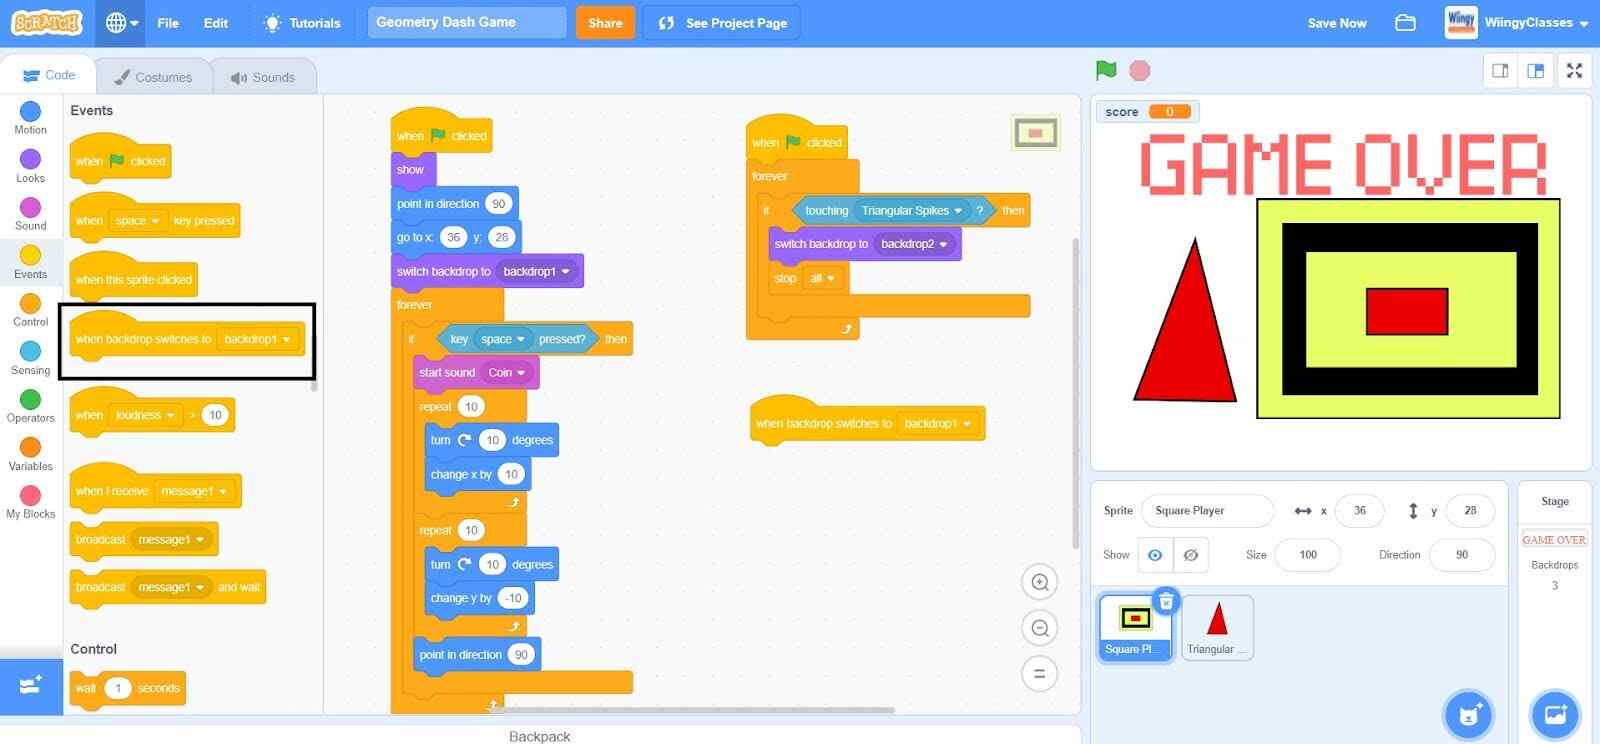
- Step 2: In the ‘when backdrop switches to ( )’ block, select the vale as ‘backdrop 2’ from the drop-down menu.
- Step 3: Go to the “Looks” block in the block palette, select the ‘hide’ block, drag it to the coding area, and place it under the ‘when backdrop switches to ( )’ block.
- Step 4: Go to the “Sound” block in the block palette, select the ‘play sound ( ) until done’ block, drag it to the coding area, and place it under the ‘hide’ block. In the ‘play sound ( ) until done’ block, make sure to change the name of the sound to ‘Oops’.
Congratulations, your Geometry Dash game is finally ready !!
Conclusion
Creating games on Scratch is a fun way of learning the basics of coding. It also provides users with an understanding of game development. We hope this step-by-step tutorial on the Geometry Dash game was easy to follow and fun to create! If you are interested in learning about more Scratch games, then read our blog on how to make a multiplayer game on Scratch.
Free Geometry Dash Game Code!
Looking to learn Scratch coding? Explore Wiingy’s Online Scratch Coding Classes For Kids to learn from top Scratch coding experts.
Frequently asked questions (FAQs)
What is a Geometry Dash game?
The Geometry Dash game is one of the simplest games to play. In this game, a square-shaped sprite moves along a path and jumps over the coming spikes in its way. If the square-shaped sprite hits or touches any one of the spikes, then the game will be over.
What is the use of Motion blocks in Scratch?
In Scratch, the Motion blocks are used to control the movement of sprites.
What is the use of Looks blocks in Scratch?
In Scratch, the Looks blocks are used to control the visual appearance of sprites.
Which concepts of Scratch do the users learn from the Geometry Dash game?
The Geometry Dash game helps the users understand the concept of variables, loops concept, and the if-then statements in Scratch.
What is the use of Sound blocks in Scratch?
In Scratch, the Sound blocks are used to control the sound functions.
Want to create more fun games on Scratch? Read our other Scratch game blogs like knife game, snake game, Pac-man game, and many more!


