Text Rendering in Scratch is the process to edit text in Scratch. Text Rendering helps in displaying text on the stage area in Scratch. Displaying of text in Scratch can also be done using a ‘say ( )’ block.
The ‘say ( )’ block in Scratch comes under the category of the ‘Looks’ block and it is a stack block as well. This block is used to give the sprites a speech bubble along with a specific text which stays until the stop sign is pressed.
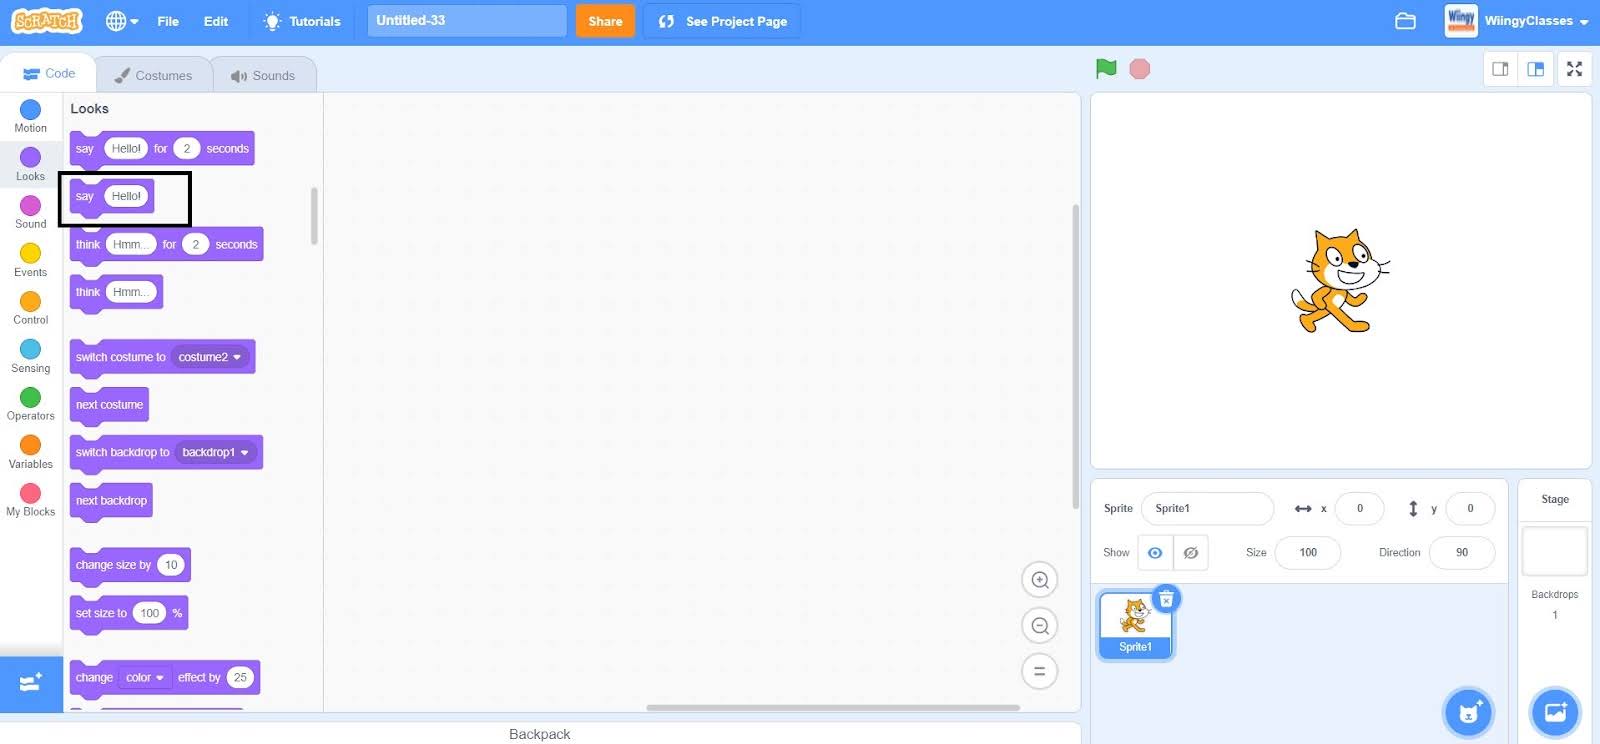
The major difference between displaying the texts in Scratch using text rendering and the ‘say ( )’ block is that text rendering helps in displaying the text more flexibly way than the ‘say ( )’ block.
Looking to learn Scratch coding? Explore Wiingy’s Online Scratch Coding Classes For Kids to learn from top Scratch coding experts.
How to edit text in Scratch?
So, there are two main approaches to editing text or displaying text through text rendering on Scratch. They are:
- Repeated use of the ‘say ( )’ block that produces a teletype style in the speech bubble.
- Using multiple sprite costumes for displaying images of letters.
Approach 1: Repeated use of the ‘say ( )’ block
Displaying or editing text by the repeated use of the ‘say ( )’ block, so that it produces a teletype style in the speech bubble is a simple process to follow. This process requires two variables, ‘character number’ and ‘text’. Apart from this, the user needs to define a custom block as well.
In order to define the custom block, the user first needs to create a custom block. So, to create a custom block, go to the “My Blocks” block in the block palette and then click on the ‘Make a Block’ option.
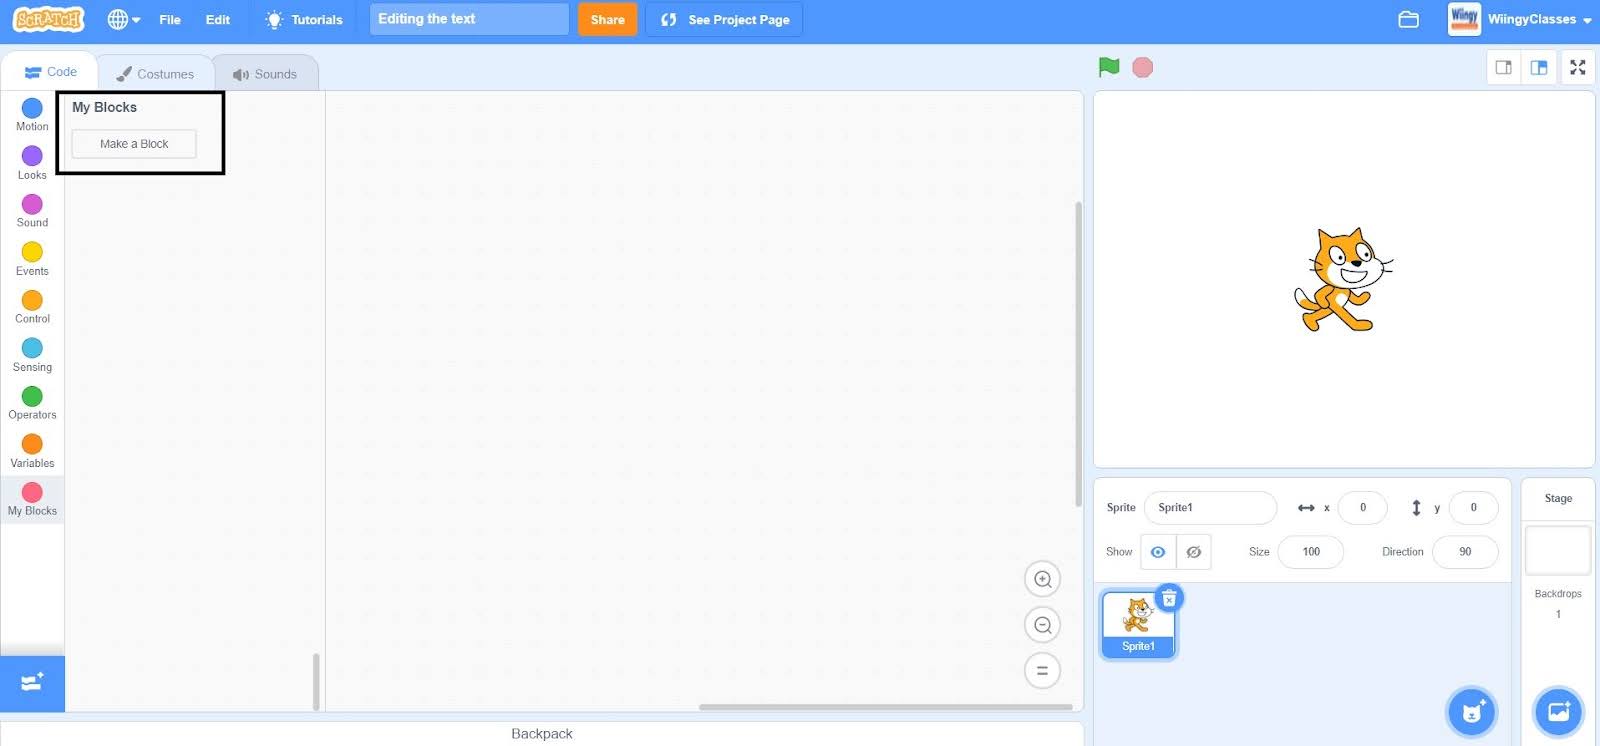
As the user clicks on the ‘Make a Block’ option, the following screen will appear.
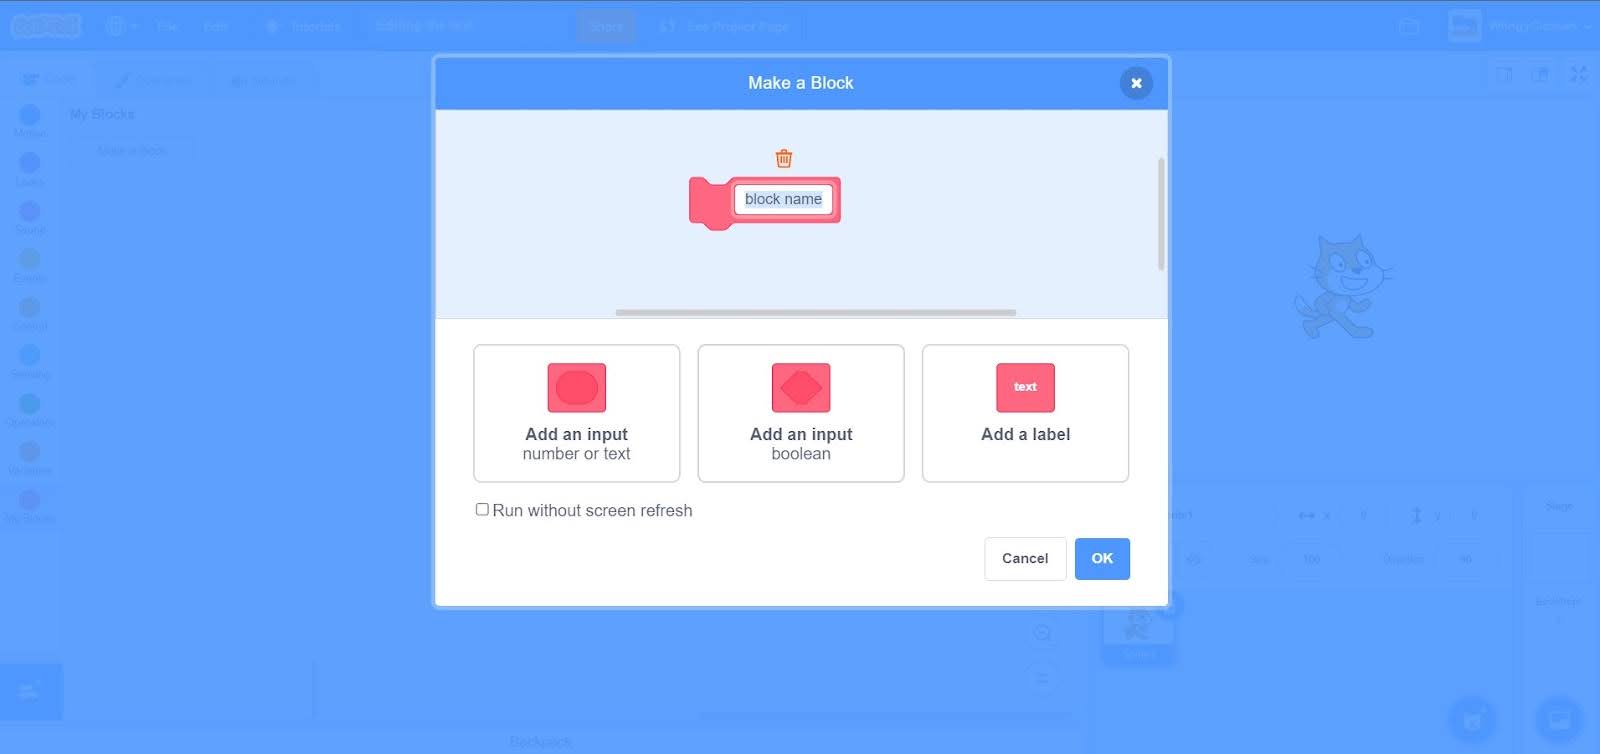
Now, the user just needs to click on the first option, give the name to the block as ‘render text’ or ‘edit text’ and in the value part, enter the value as ‘string’, and click on the ‘OK’ option which is available at the bottom right corner. For this explanation, we are giving the block name as ‘render text’.
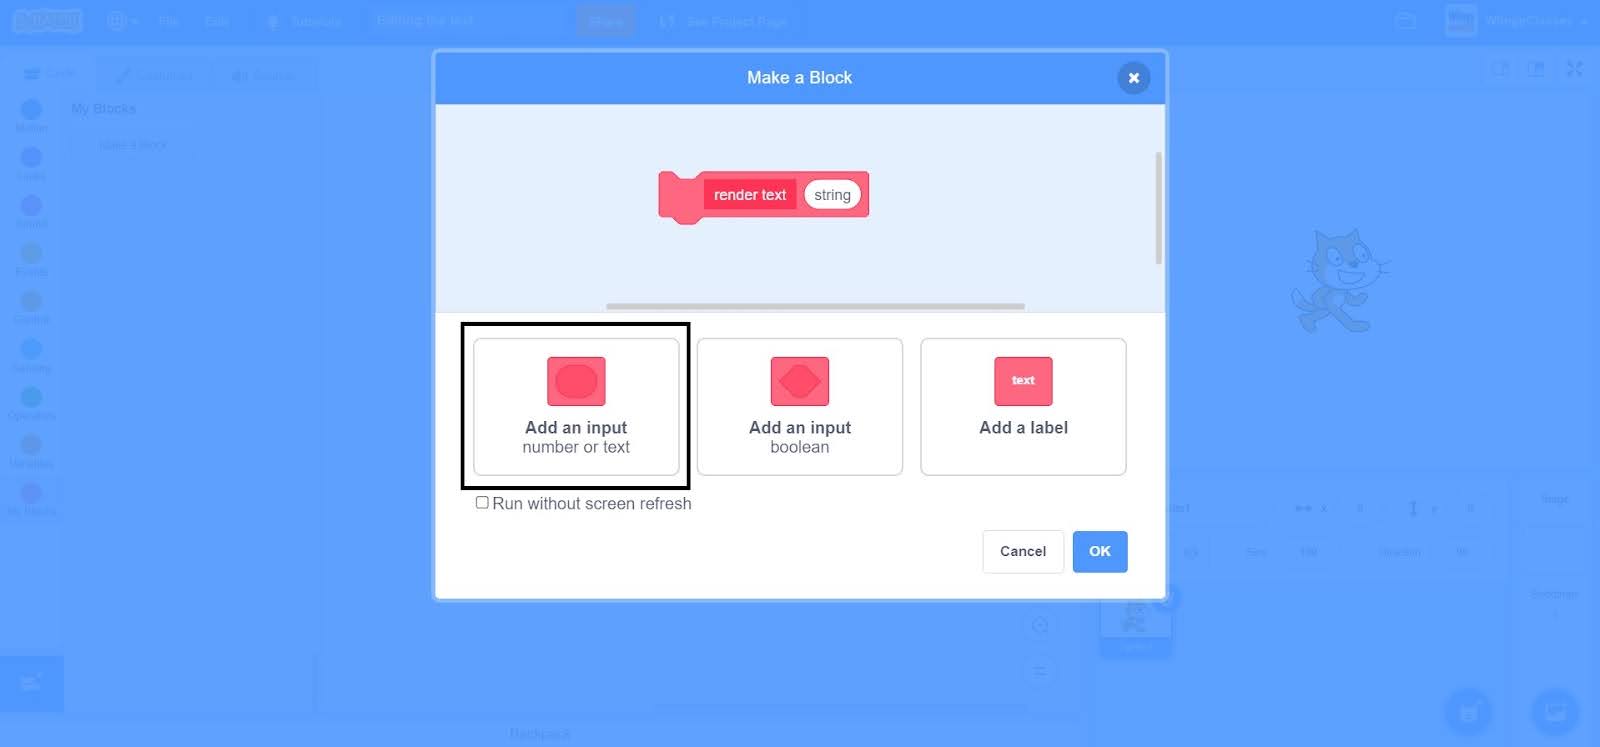
Make sure to not check the ‘Run without screen fresh’ option while creating the custom block because if it is checked, no text will be displayed, and hence no text will be rendered or edited.
The block’s argument that you have created can be the text or the number that needs to be rendered or edited. Now, after the creation of the custom block, it’s time to define the custom block. For defining the custom block, the user needs to follow the following steps:
- Step 1: When the user created the custom block, one block would have automatically appeared on the screen, as shown below.
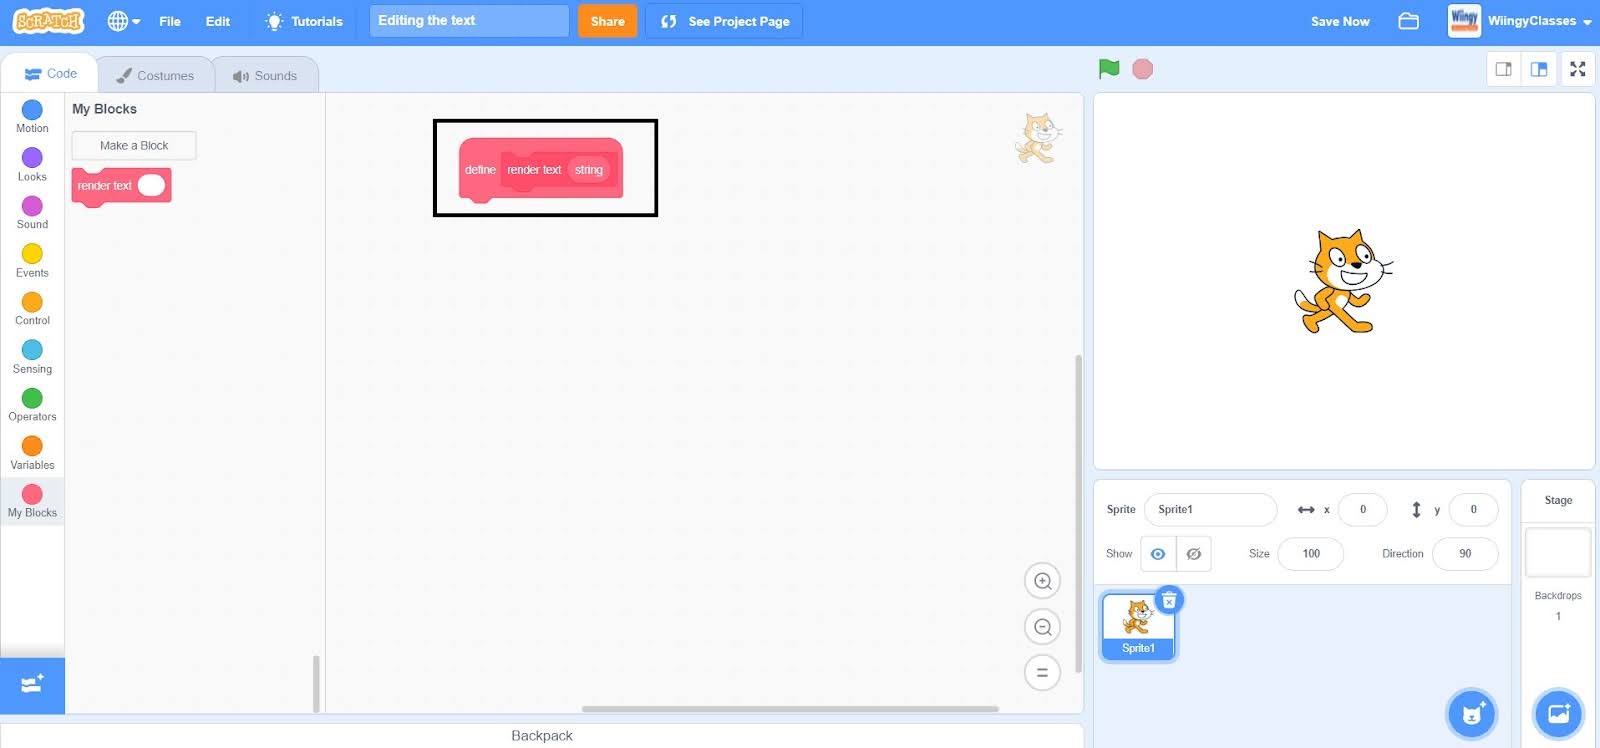
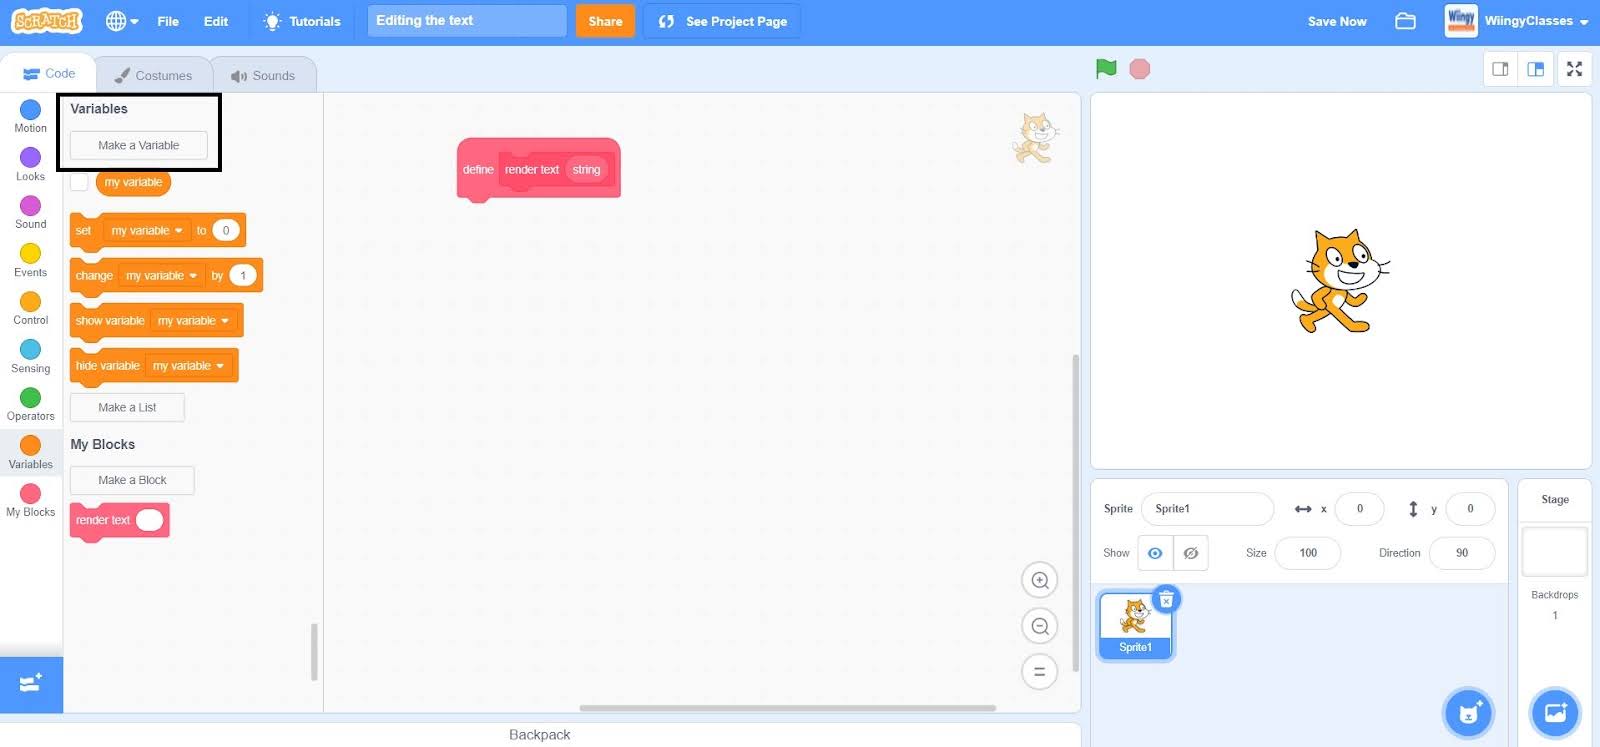
- Step 2: As we have already mentioned above, the text editing process requires two variables, ‘character number’ and ‘text’. So, now you need to create these variables and for that, go to the “Variables” block in the block palette, click on the ‘Make a Variable’ option, and create two variables named ‘character number’ and ‘text’.
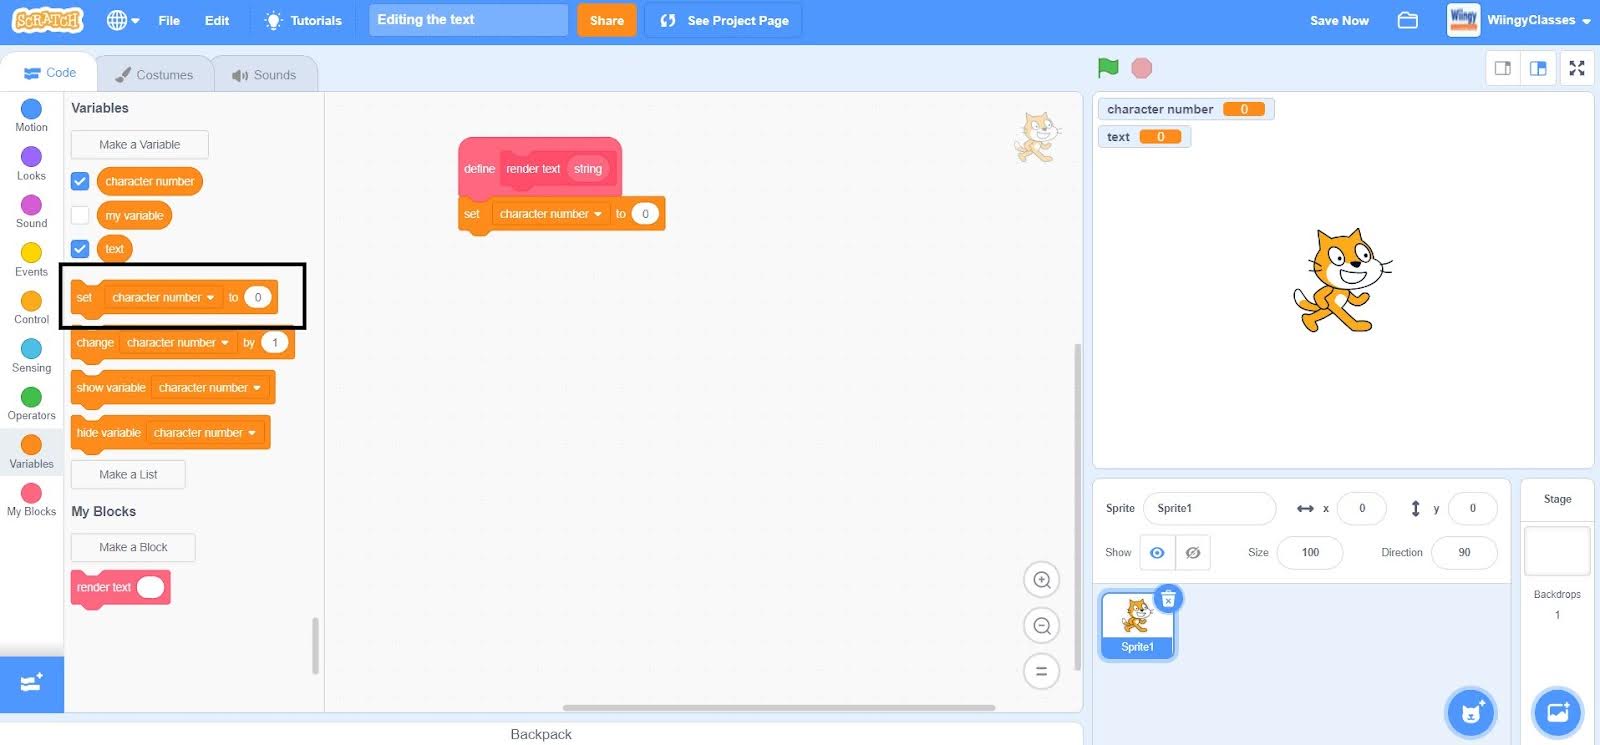
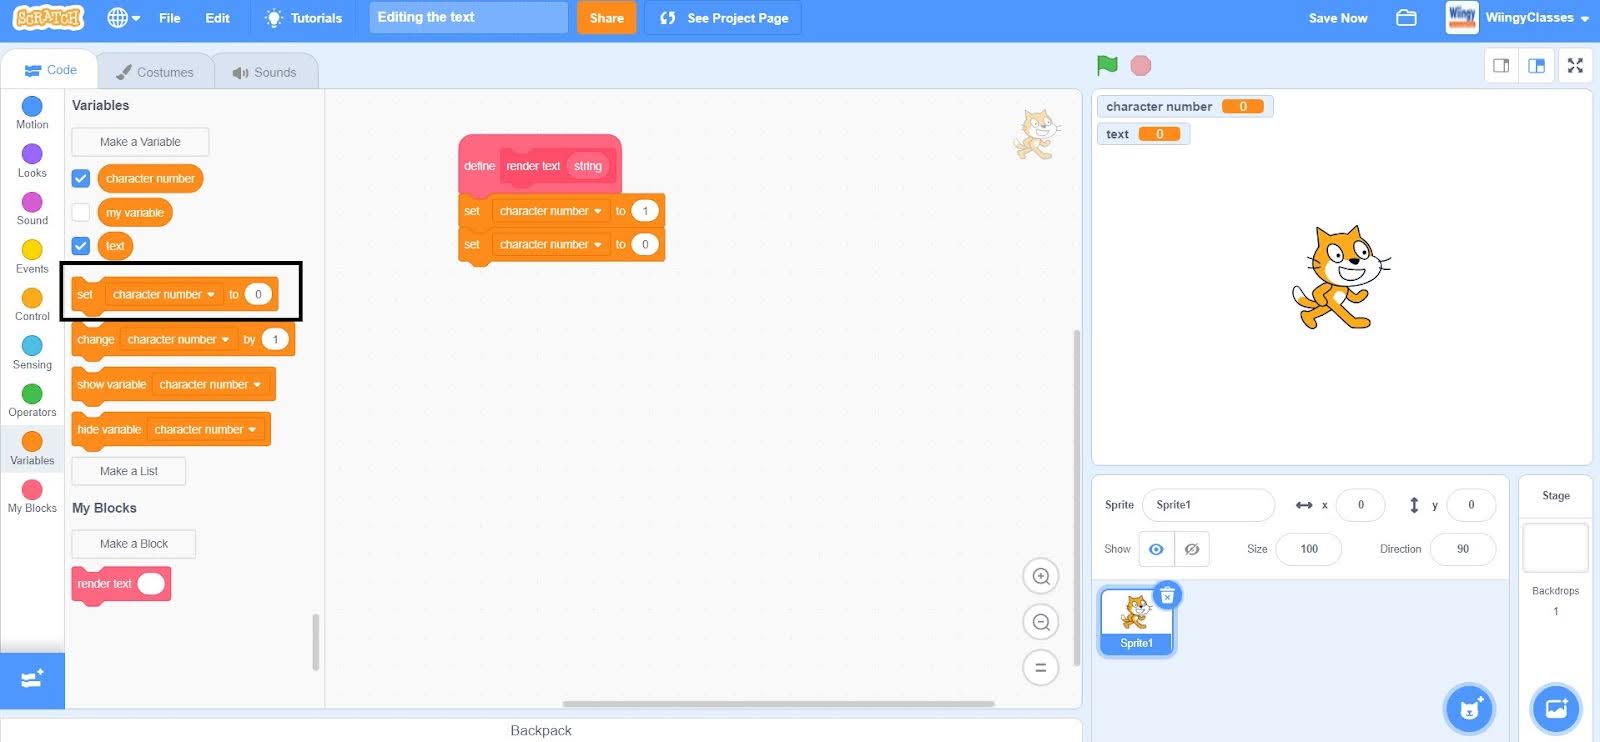
- Step 3: Go to the “Variables” block in the block palette, select the ‘set ( ) to ( )’ block, drag it to the coding area, and place it under the custom block that you have created.
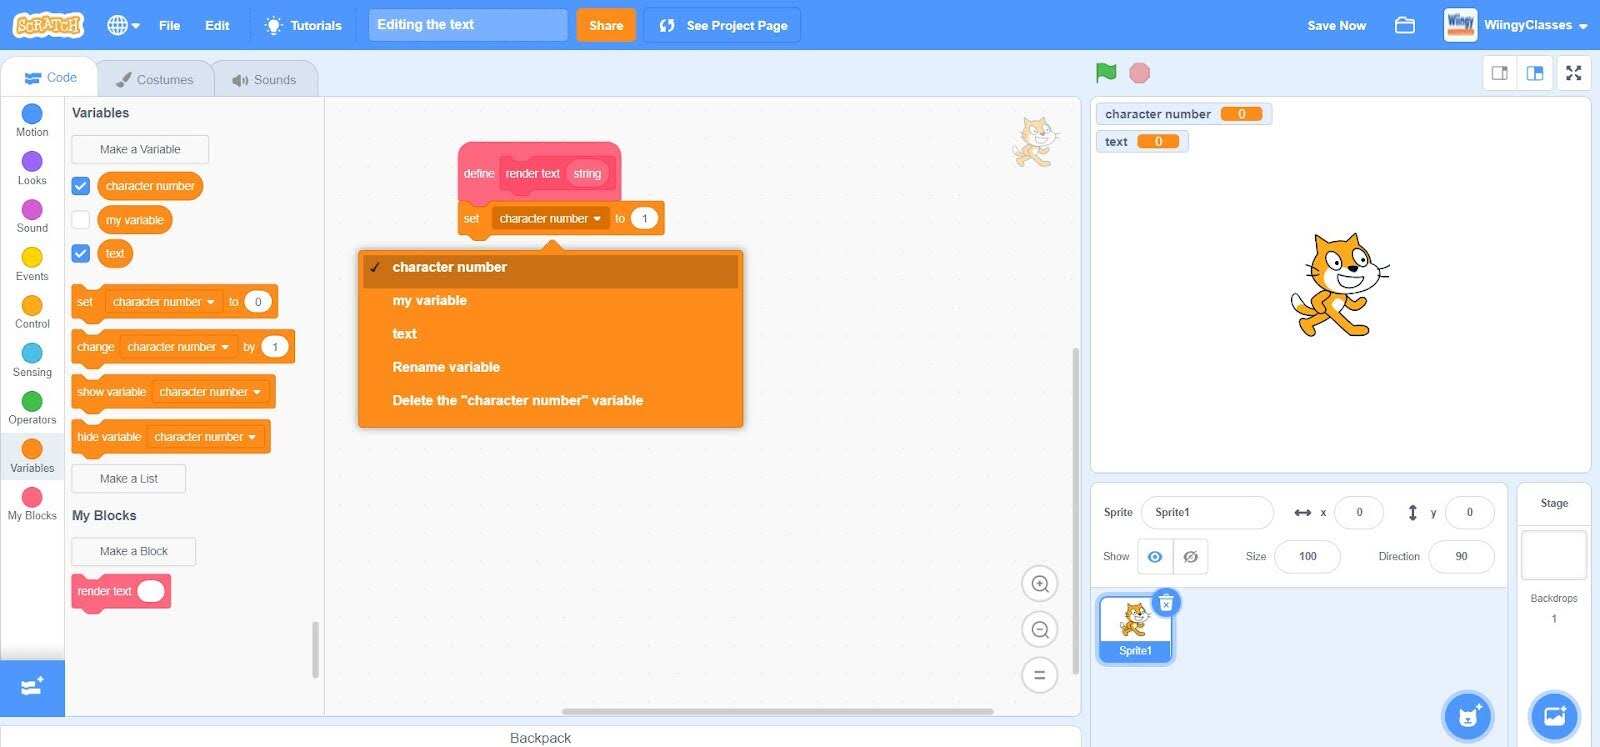
- Step 4: In the ‘set ( ) to ( )’ block, select the first value as ‘character number’ from the drop-down menu and leave the second value as ‘1’.
- Step 5: Again from the “Variables” block in the block palette, select the ‘set ( ) to ( )’ block, drag it to the coding area, and place it under the first ‘set ( ) to ( )’ block.
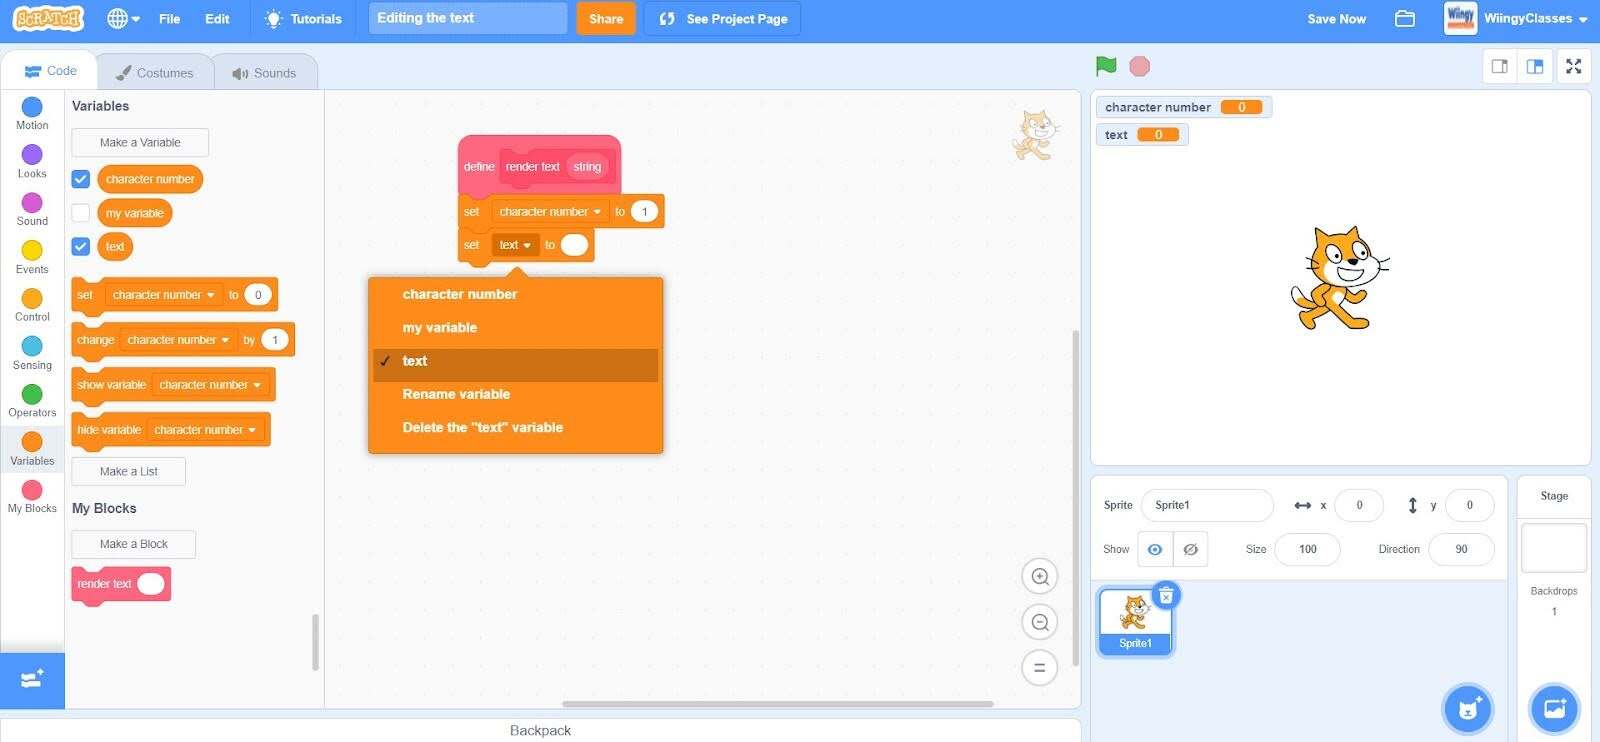
- Step 6: In the ‘set ( ) to ( )’ block, select the first value as ‘text’ from the drop-down menu and put no value in place of the second value.
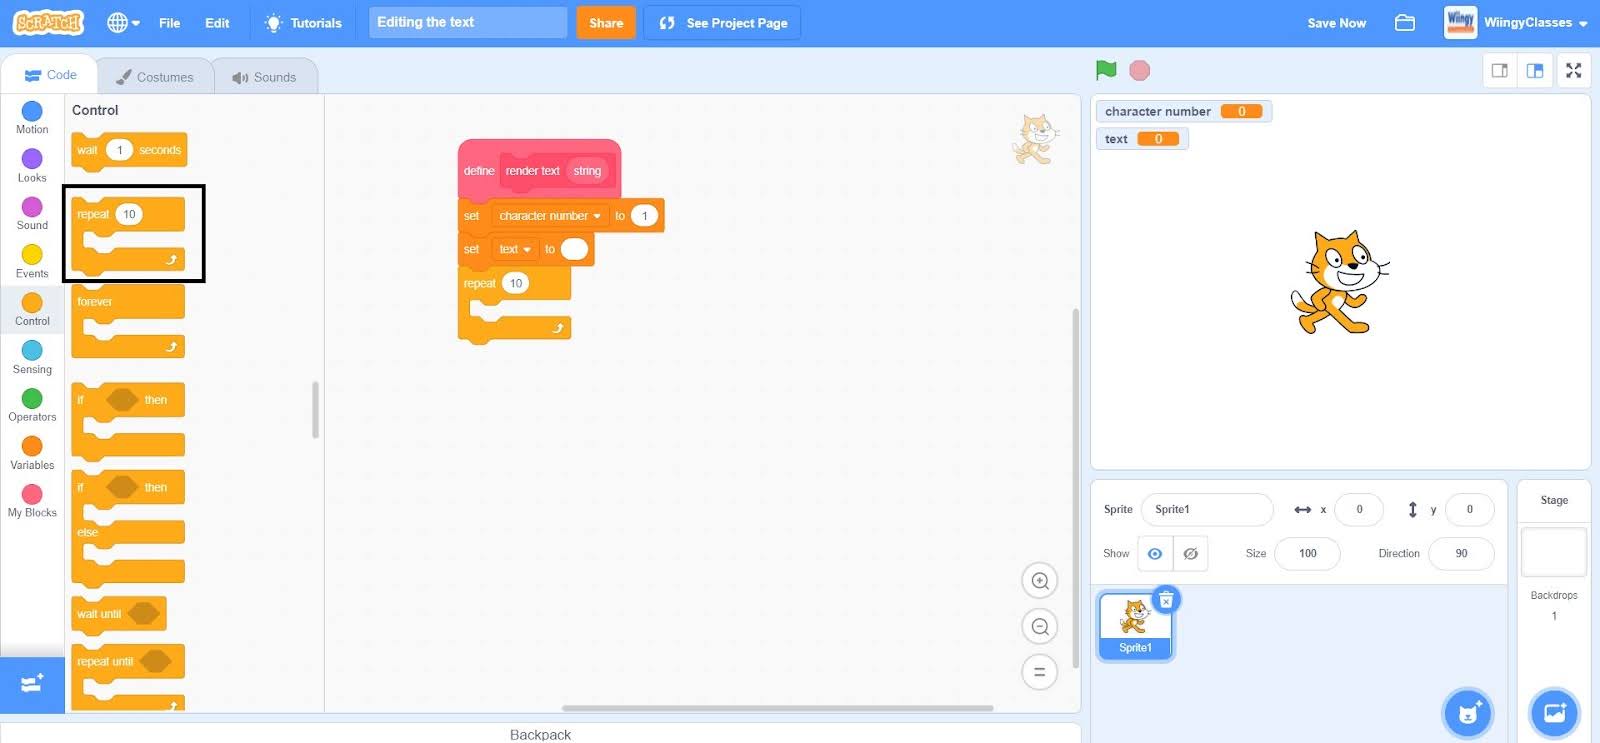
- Step 7: Go to the “Control” block in the block palette, select the ‘repeat ( )’ block, drag it to the coding area, and place it under the second ‘set ( ) to ( )’ block.
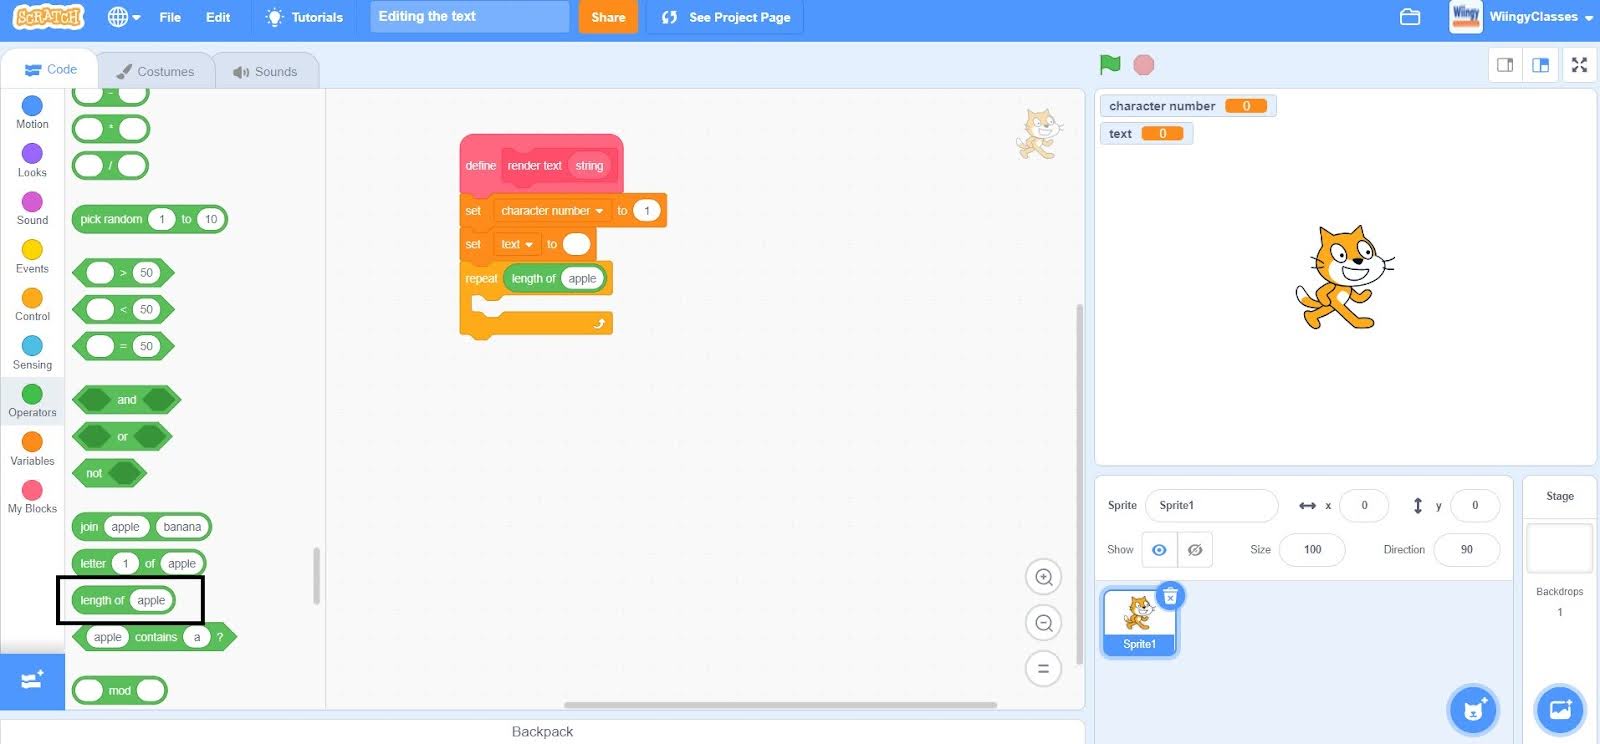
- Step 8: Go to the “Operators” block in the block palette, select the ‘length of ( )’ block, drag it to the coding area, and place it in the value part of the ‘repeat ( )’ block.
- Step 9: In the ‘length of ( )’ block, put the value as ‘string’ by selecting and dragging the block from the custom block which is on the top of the coding stack blocks.
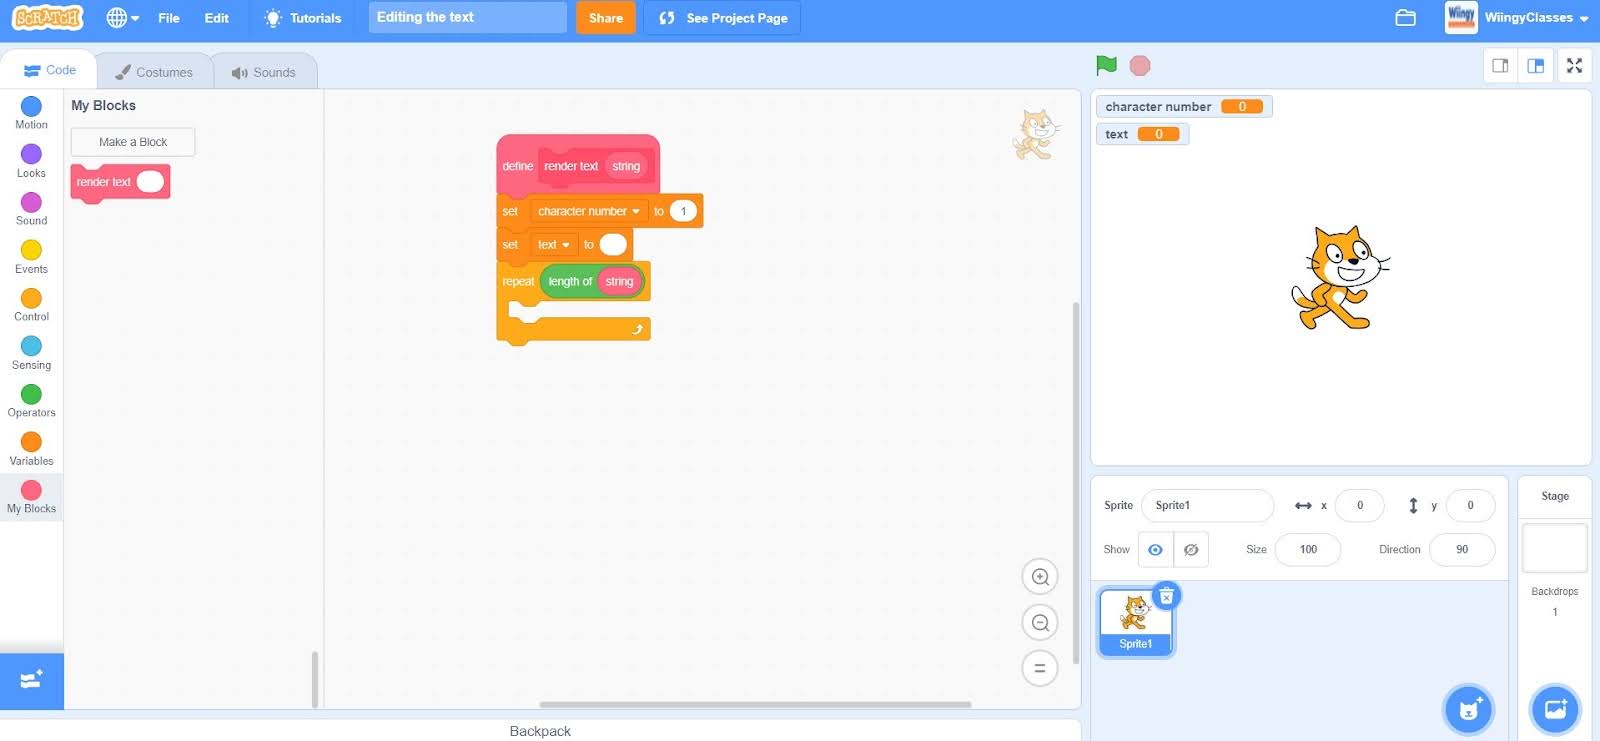
- Step 10: Go to the “Variables” block in the block palette, select the ‘set ( ) to ( )’ block, drag it to the coding area, and place it inside the ‘repeat ( )’ block.
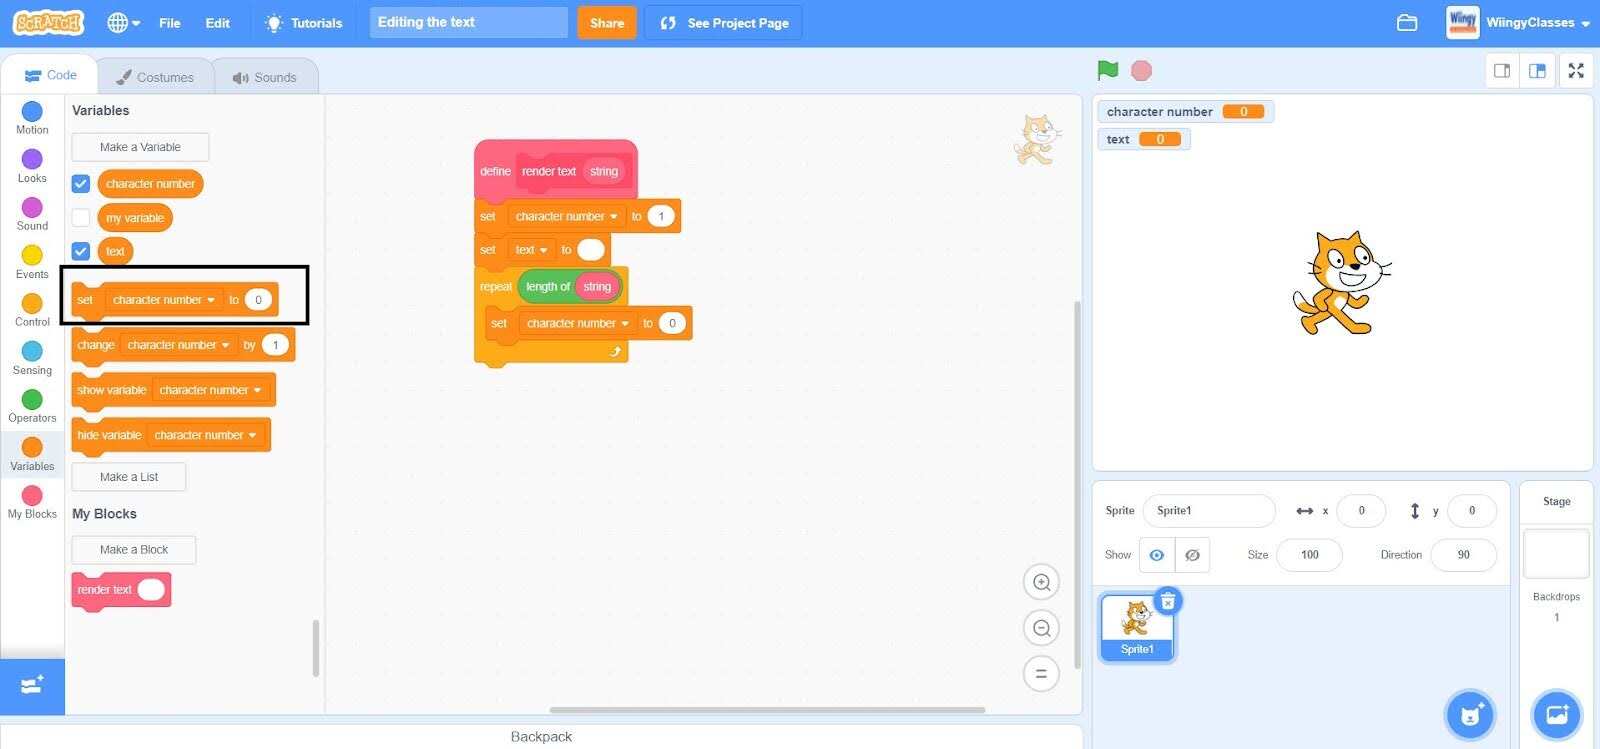
- Step 11: In the ‘set ( ) to ( )’ block, select the first value as ‘text’ from the drop-down menu and put no value in place of the second value.
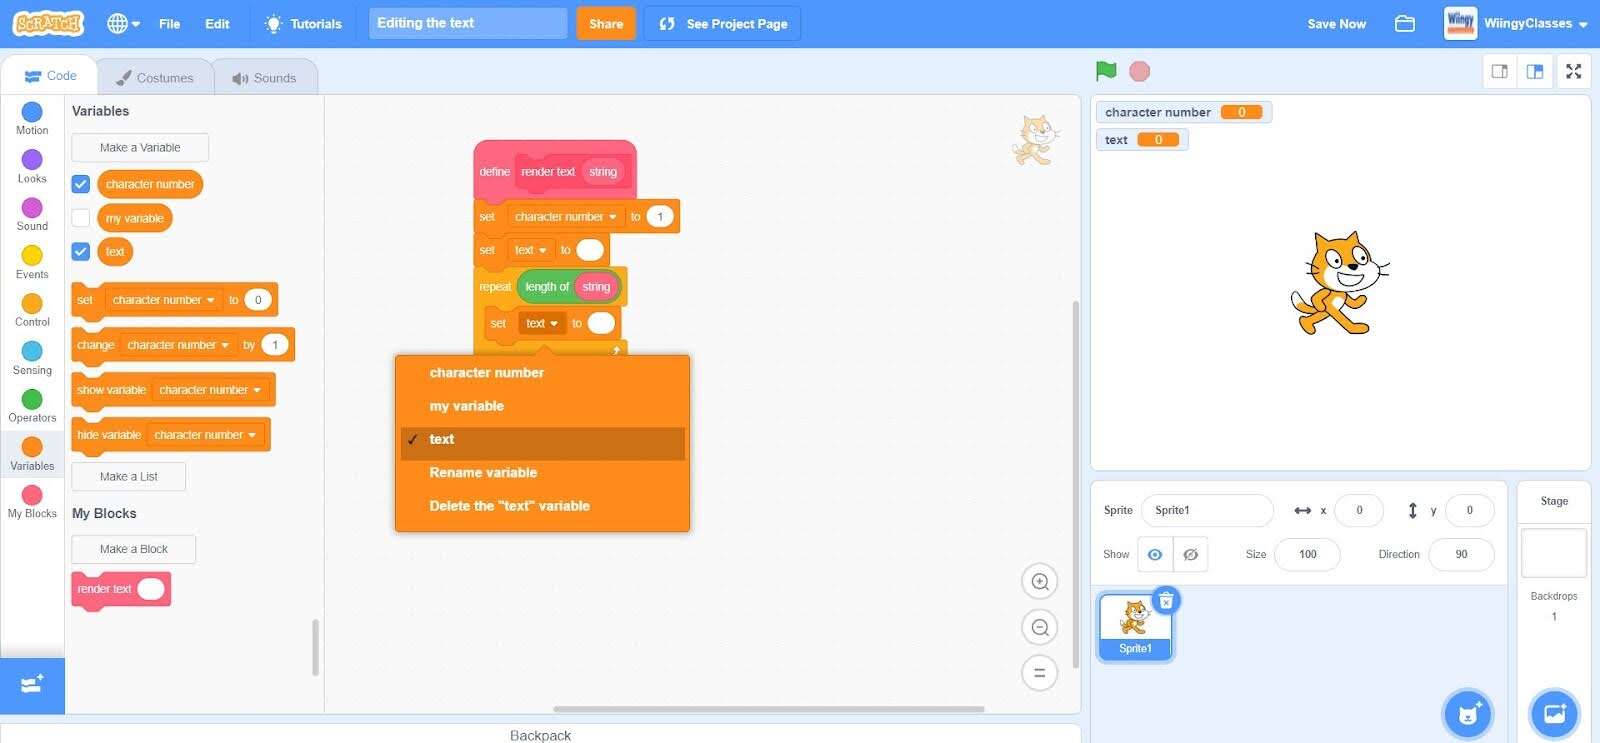
- Step 12: Go to the “Operators” block in the block palette, select the ‘join ( ) ( )’ block, drag it to the coding area, and place it in the value part of the ‘set ( ) to ( )’ block.
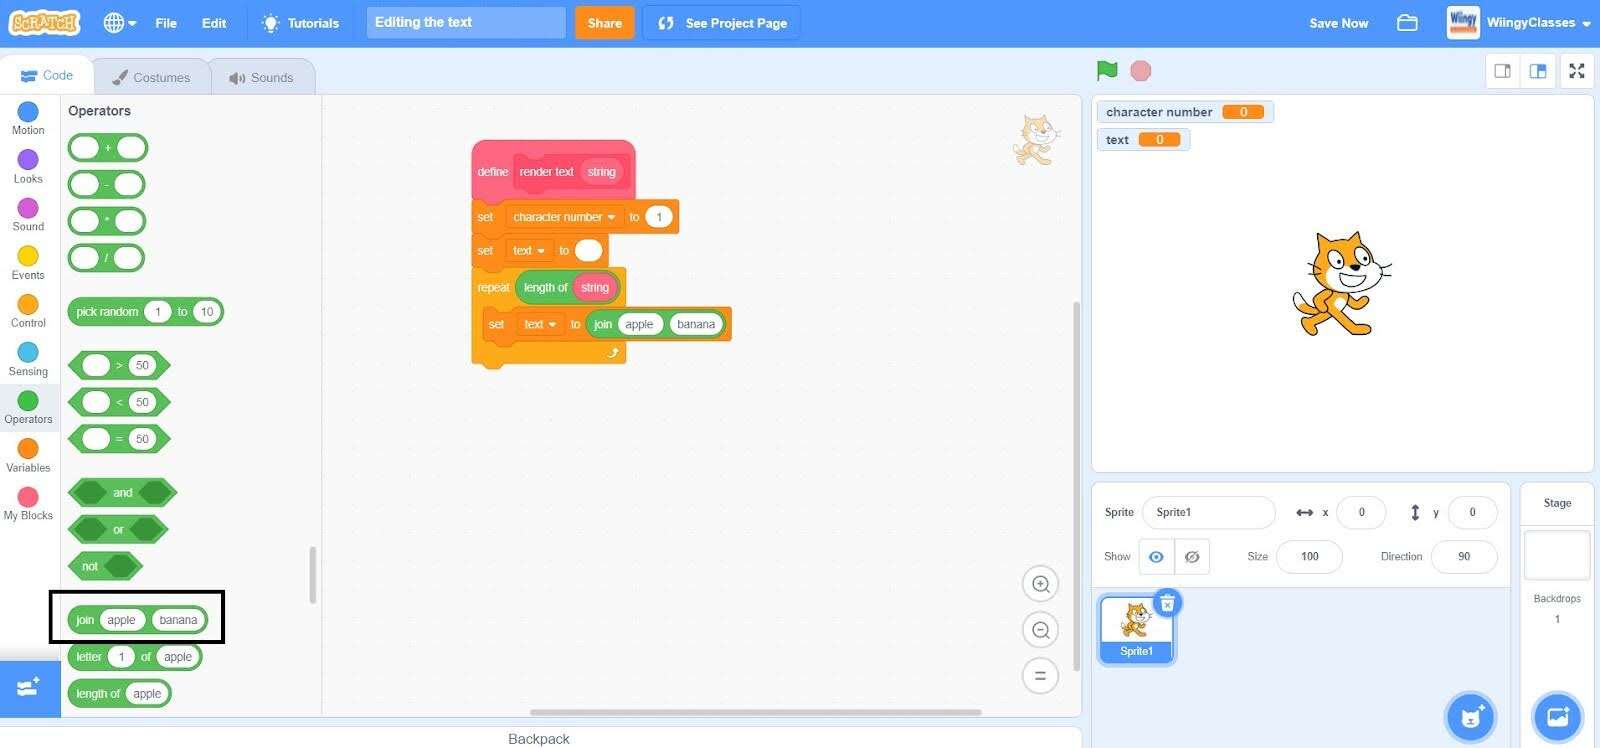
- Step 13: Go to the “Variables” block in the block palette, select the ‘text’ block, drag it to the coding area, and place it in the first value part of the ‘join ( ) ( )’ block.
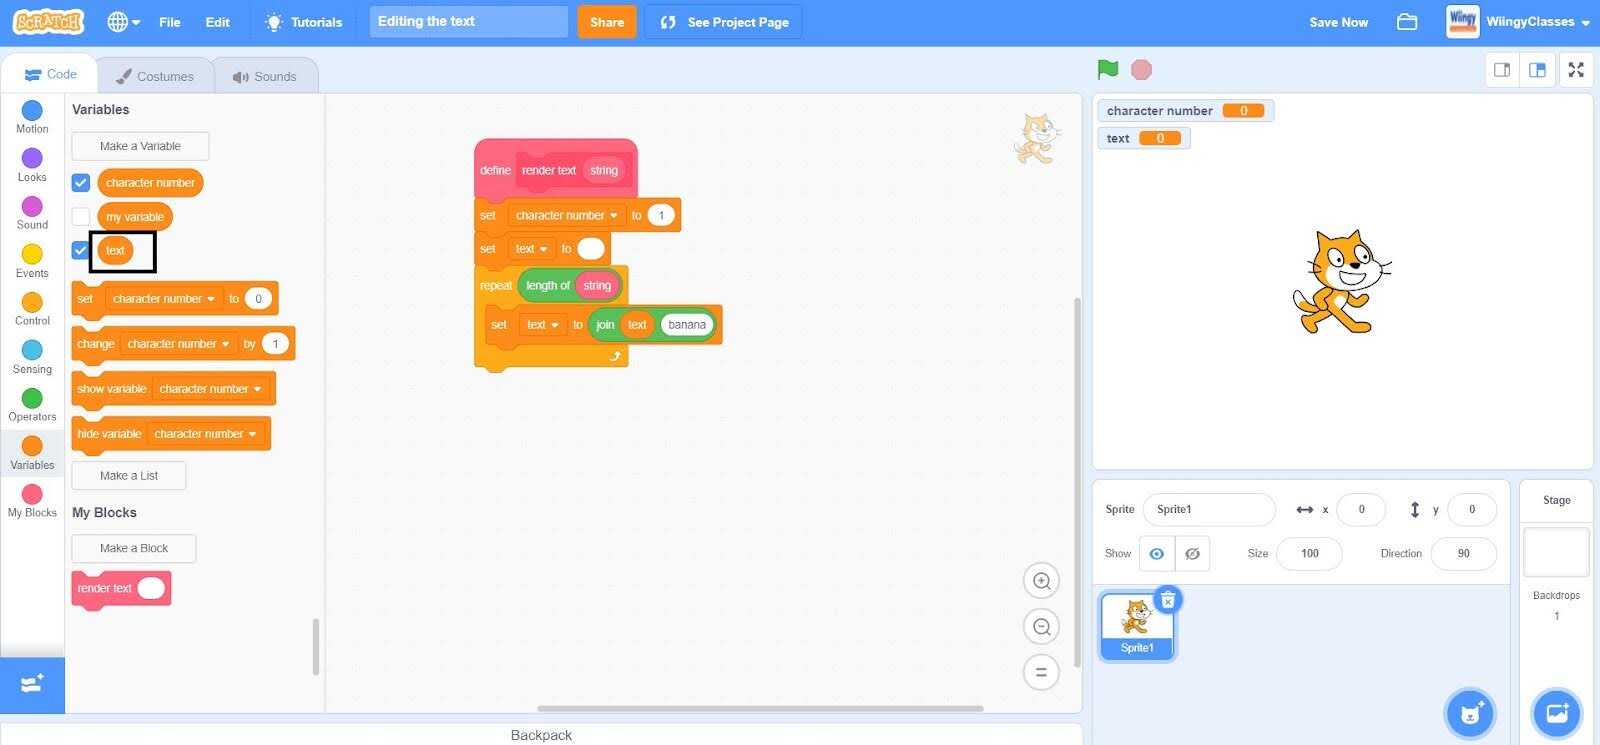
- Step 14: Go to the “Operators” block in the block palette, select the ‘letter ( ) of ( )’ block, drag it to the coding area, and place it in the second value part of the ‘join ( ) ( )’ block.
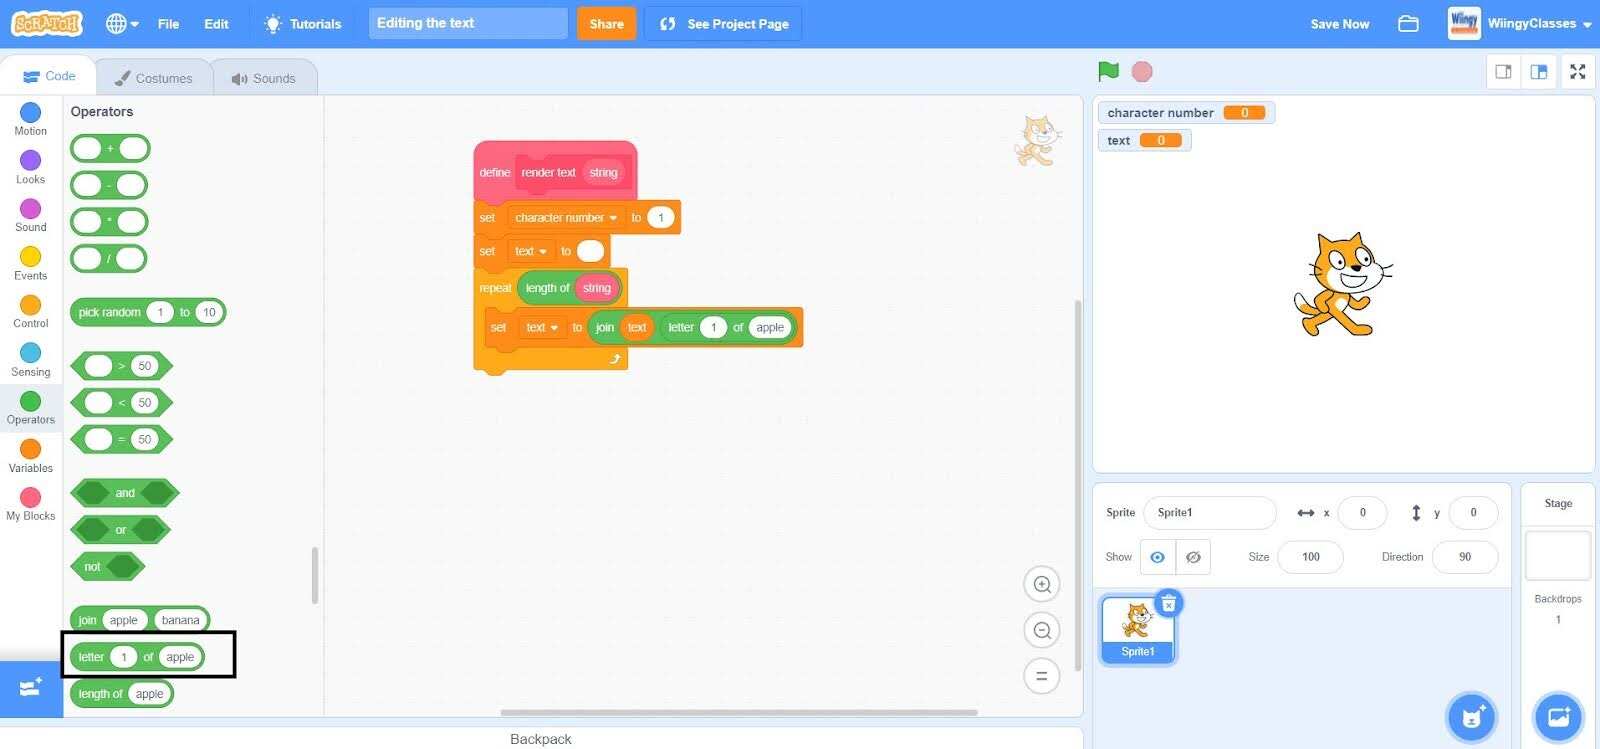
- Step 15: Go to the “Variables” block in the block palette, select the ‘character number’ block, drag it to the coding area, and place it in the first value part of the ‘letter ( ) of ( )’ block.
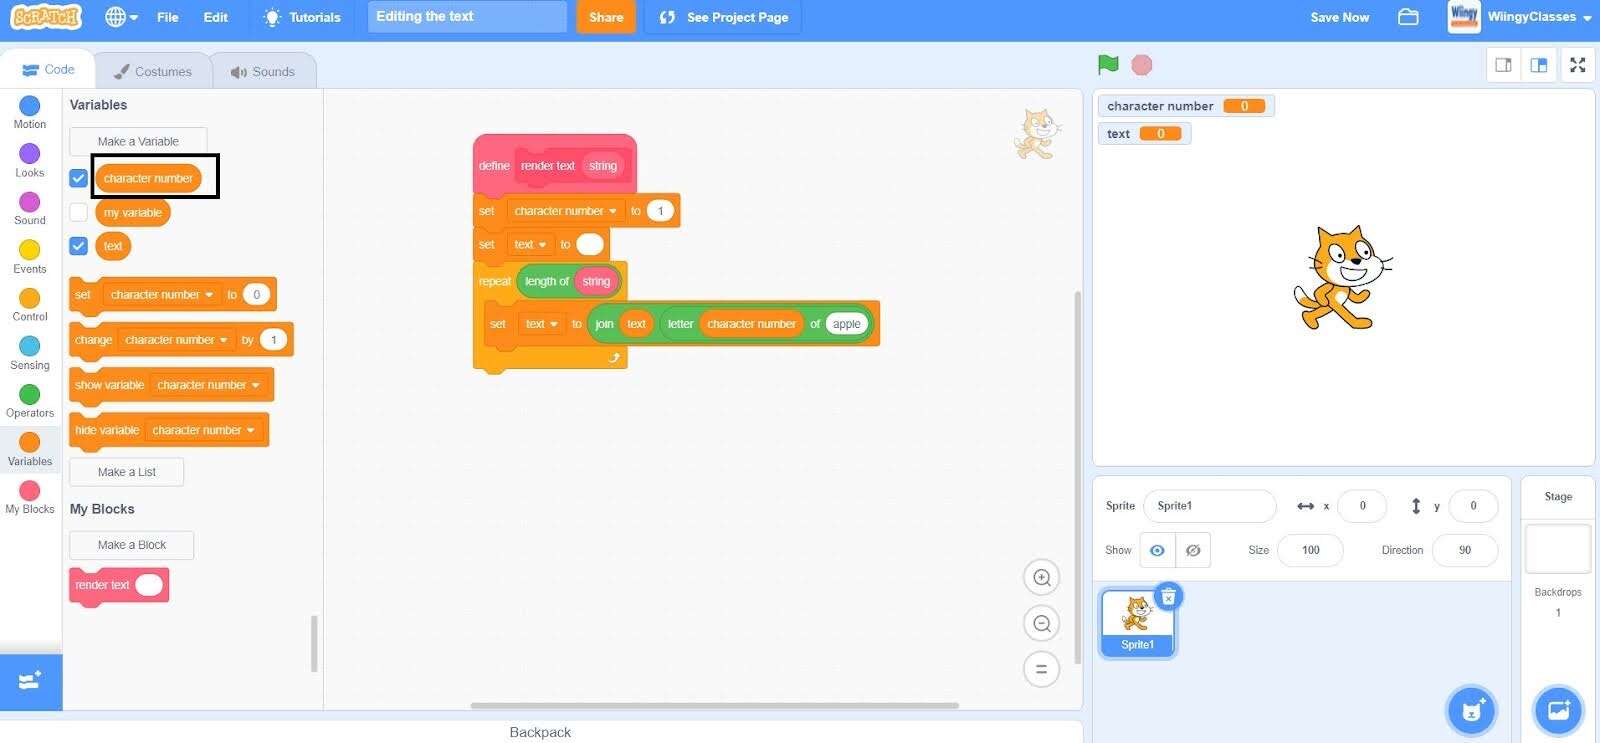
- Step 16: In the ‘letter ( ) of ( )’ block, put the second value as ‘string’ by selecting and dragging the block from the custom block which is on the top of the coding stack blocks.
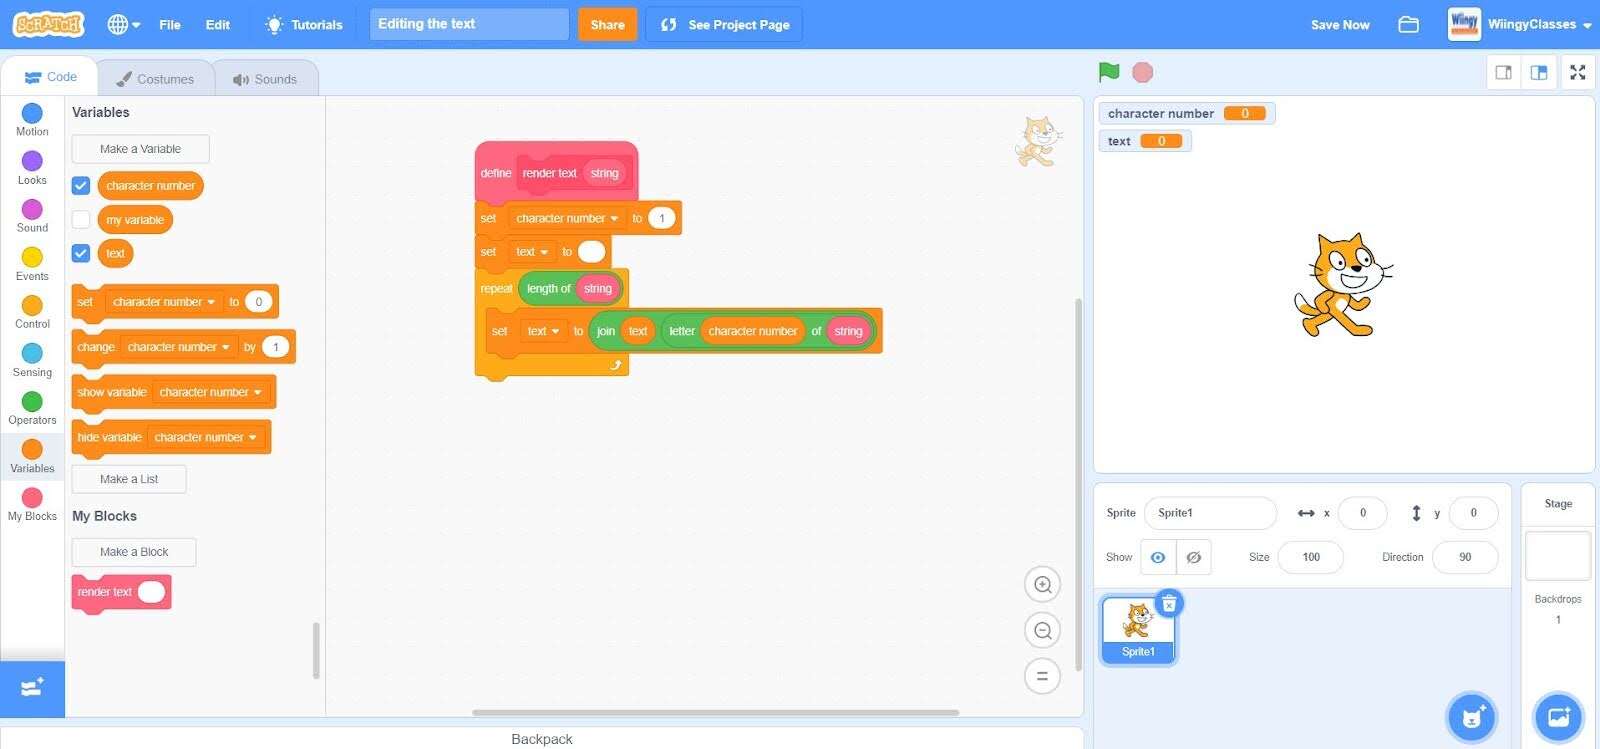
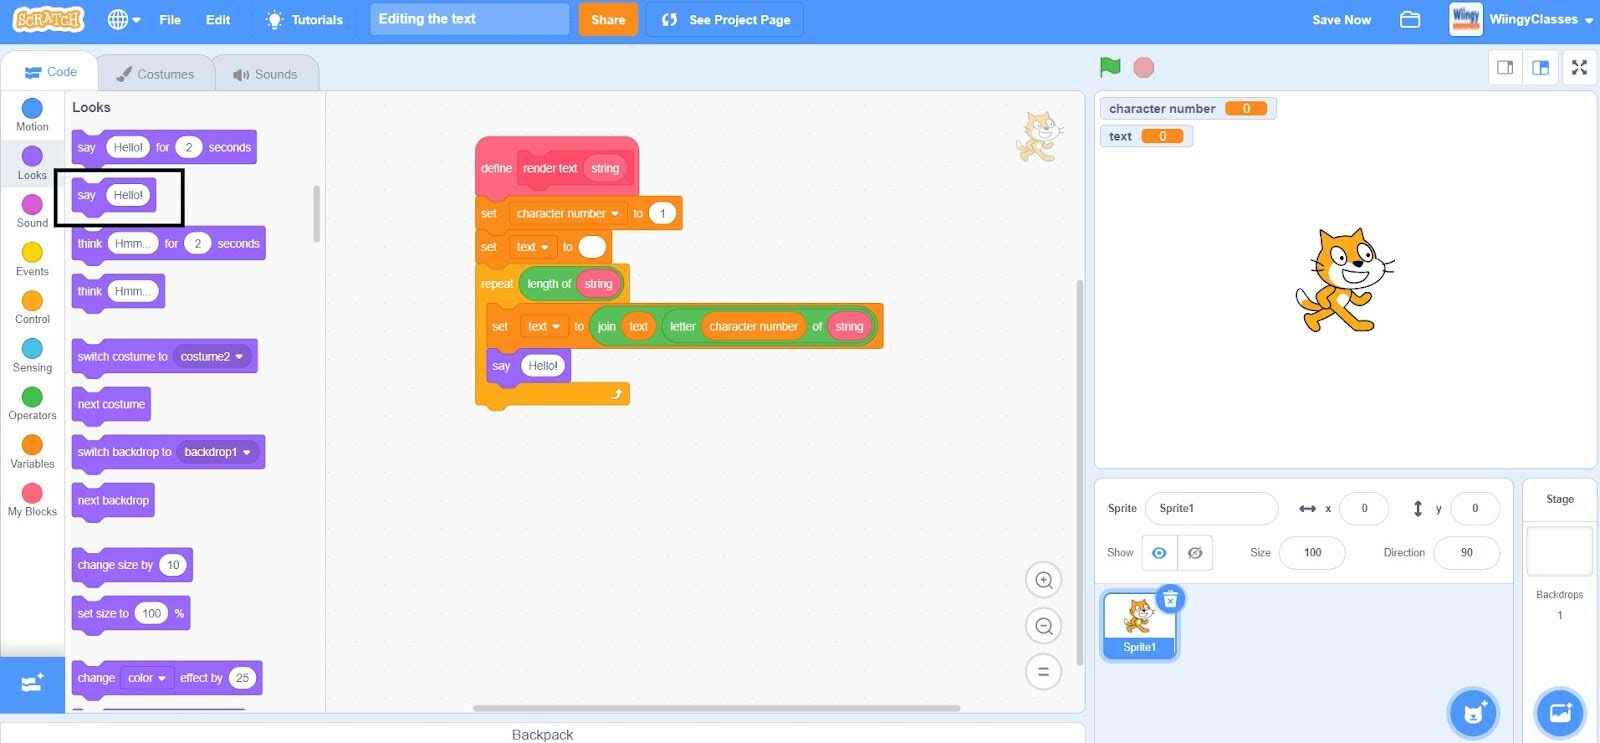
- Step 17: Go to the “Looks” block in the block palette, select the ‘say ( )’ block, drag it to the coding area, and place it under the ‘set ( ) to ( )’ block inside the ‘repeat ( )’ block.
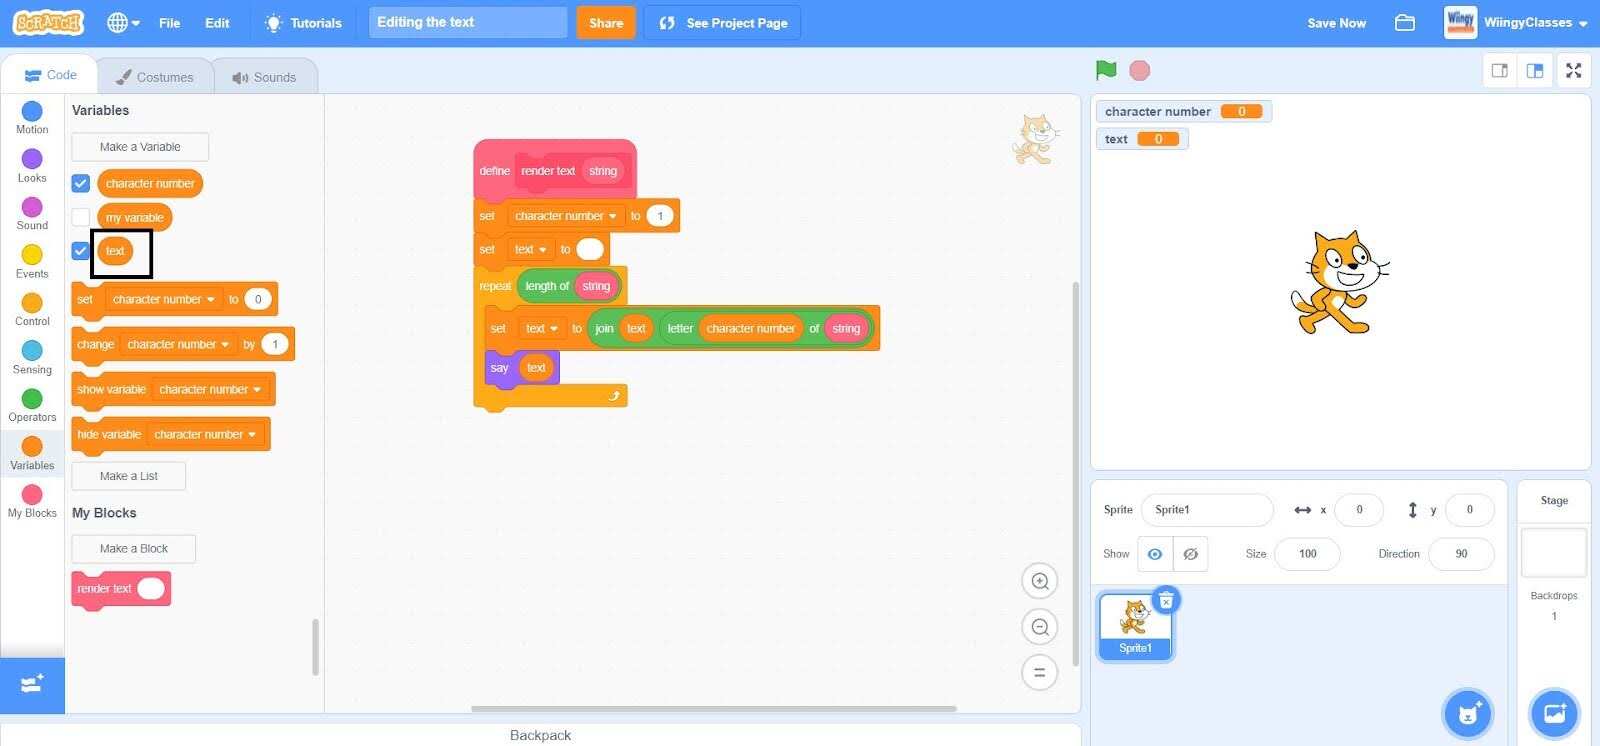
- Step 18: Go to the “Variables” block in the block palette, select the ‘text’ block, drag it to the coding area, and place it in the value part of the ‘say ( )’ block.
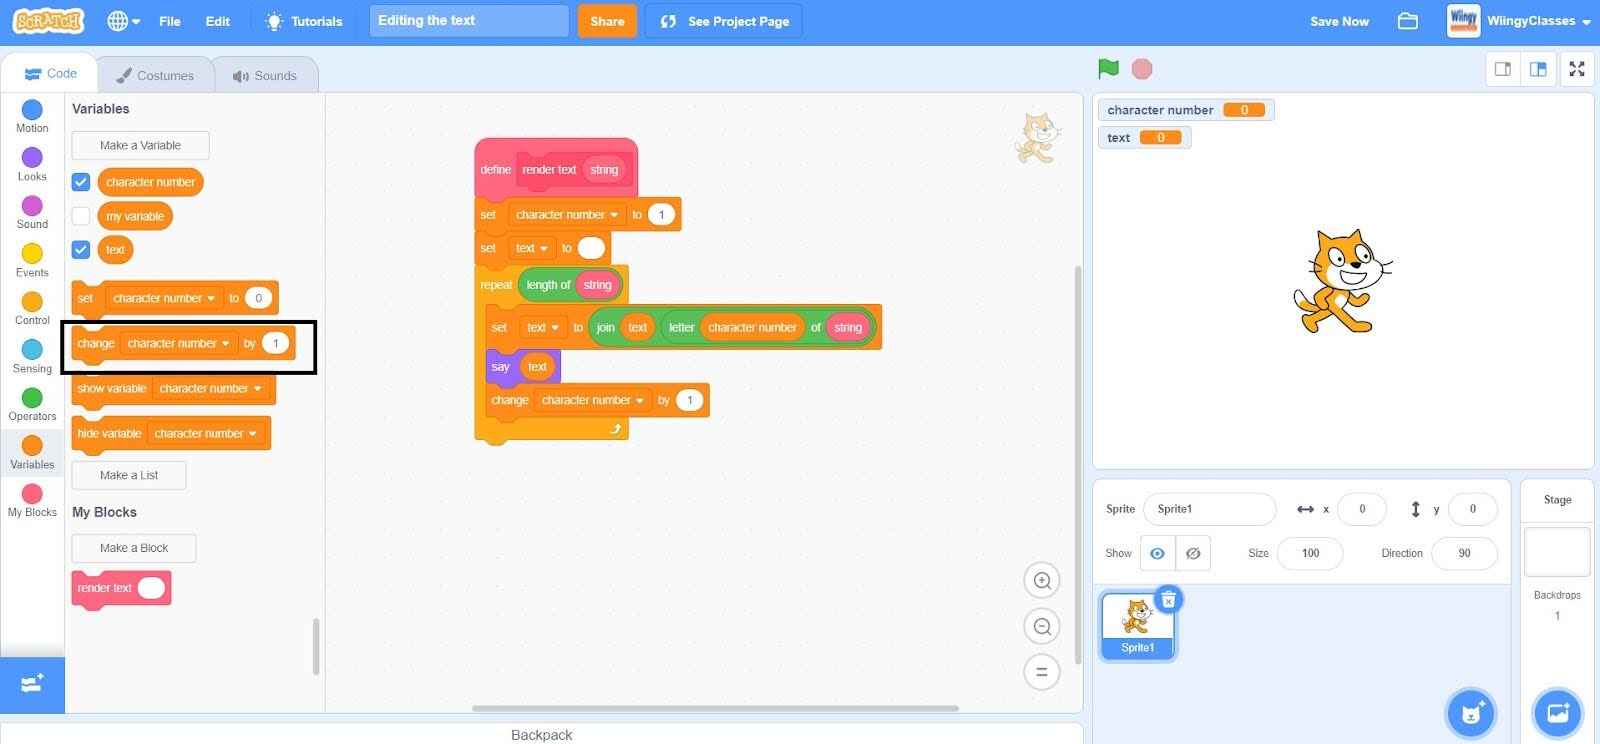
- Step 19: Go to the “Variables” block in the block palette, select the ‘change ( ) by ( )’ block, drag it to the coding area, and place it under the ‘say ( )’ block inside the ‘repeat ( )’ block.
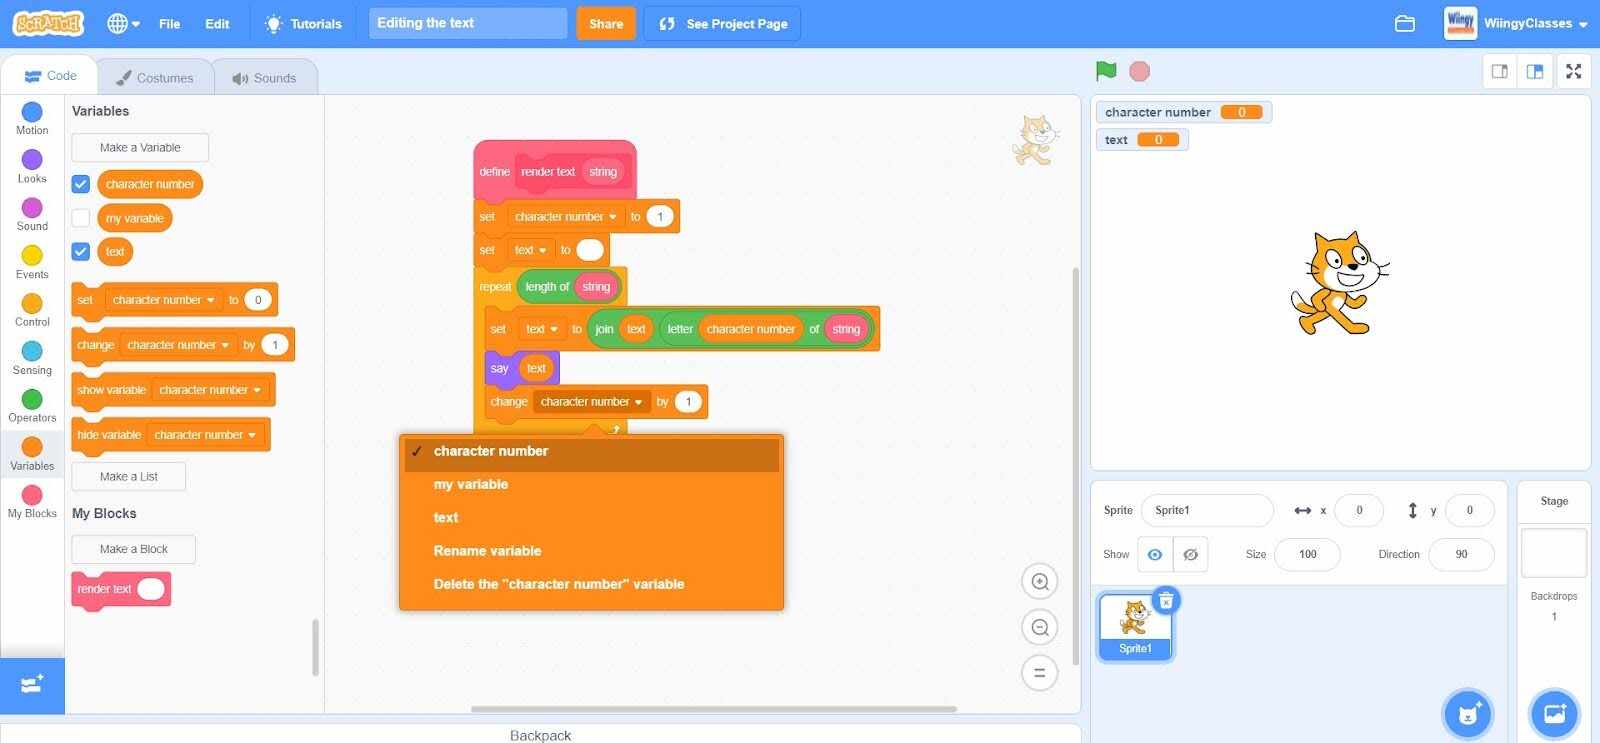
- Step 20: In the ‘set ( ) to ( )’ block, select the first value as ‘character number’ from the drop-down menu and leave the second value as ‘1’.
By creating and defining a custom block as per the steps mentioned above, you will be able to edit or render a text by repeated use of the ‘say ( )’ block that produces a teletype style in the speech bubble.
Approach 2: Using multiple sprite costumes
Displaying or editing text by using multiple sprite costumes for displaying images of letters is a process that requires ‘Stamp blocks’ which come in the category of Pen blocks to create a visual effect of the text or numbers.
However, it is also possible to achieve the same visual effect by creating clones. For creating clones, the user just needs to replace each stamp block with a ‘create clone of (myself)’ block which comes in the category of Control blocks in Scratch.
Using this process for editing or rendering the text might result in unwanted results if the input string has unanticipated characters.
Also, the use ‘create clone of (myself)’ block and creating clones in this process has two disadvantages:
- The project gets a high chance of lagging.
- Scratch has a limit of 300 clones which might limit the number of characters that can be displayed simultaneously.
Conclusion
The simplicity of Scratch is one of the major reasons for its popularity. Creating projects becomes a fun and exciting learning opportunity as the platform provides many interesting features and elements to explore. Using these little features one can make their projects more attractive. Also, these features are easy to understand and implement.
Looking to learn Scratch coding? Explore Wiingy’s Online Scratch Coding Classes For Kids to learn from top Scratch coding experts.
Frequently asked questions (FAQs)
What is the editing of text in Scratch known as?
Editing of text in Scratch is known as Text Rendering. Text Rendering helps in displaying text on the stage area in Scratch.
What are the two ways of displaying text in Scratch?
In Scratch, the text can be displayed by either using the ‘say ( )’ block or by text rendering.
What is the difference between displaying text Scratch using text rendering and the ‘say ( )’ block?
The difference between displaying the texts in Scratch using text rendering and the ‘say ( )’ block is that text rendering helps in displaying the text more flexibly than the ‘say ( )’ block.
What are the two approaches for editing text or displaying text through text rendering on Scratch?
The two main approaches for editing text or displaying text through text rendering on Scratch. They are:
1. Repeated use of the ‘say ( )’ block that produces a teletype style in the speech bubble.
2. Using multiple sprite costumes for displaying images of letters.
What is the one drawback of using multiple sprite costumes for displaying images of letters for editing or displaying the text in Scratch?
The drawback of multiple sprite costumes for displaying images of letters for editing or displaying the text in Scratch is that this process might result in unwanted results if the input string has unanticipated characters.
We hope you understand how to edit the text in Scratch. If you have any doubts, you can ask your doubts in the comment section. For further reading, read our blog on 30 game ideas on Scratch to create and play!

