How to Make a Game with Levels on Scratch? Step-by-Step Tutorial
- Aditi |
- May 30, 2024
Updated By
Reviewed By

Games can be of different types with some having only one level and some having more than one. However, games with more than one level are considered to be the best games because a game having multiple levels are more exciting to play and brings new challenges for the players to explore and win.
So, in this blog, we will give you a step-by-step game tutorial on how to make a game with levels on Scratch and help you in creating a “Balloon-Pop” game.
Looking to learn Scratch coding? Explore Wiingy’s Online Scratch Coding Classes For Kids to learn from top Scratch coding experts.
How to make a game with levels on Scratch?
This game with levels is called the “Ballon-Pop” game. This is a multilevel game in which the player has to pop at least 10 balloons which will be moving at a fast pace. As the player accomplishes the challenge, he/she will be moving onto the next level and with each increasing level, it will become harder to ‘pop’ the balloons.
So, to create the “Balloon-Pop” game in Scratch, just patiently follow the below-given steps:
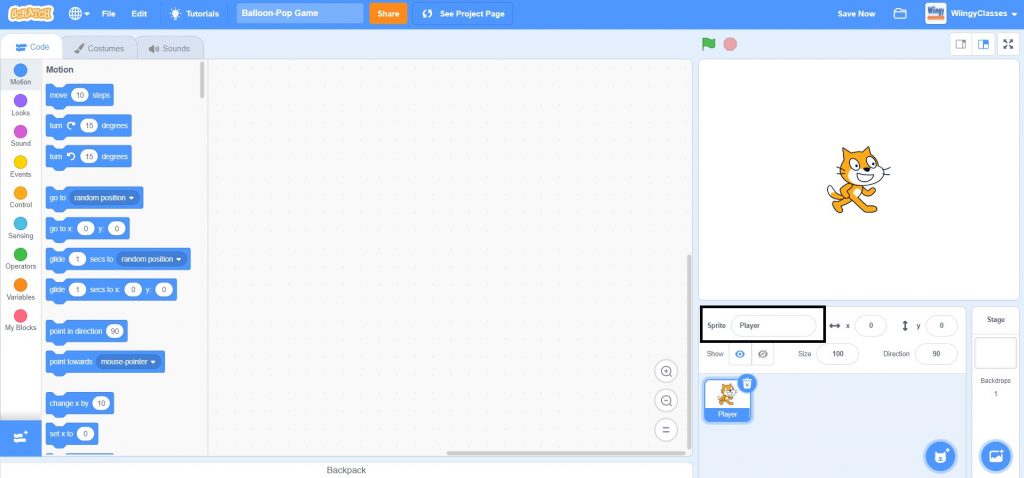
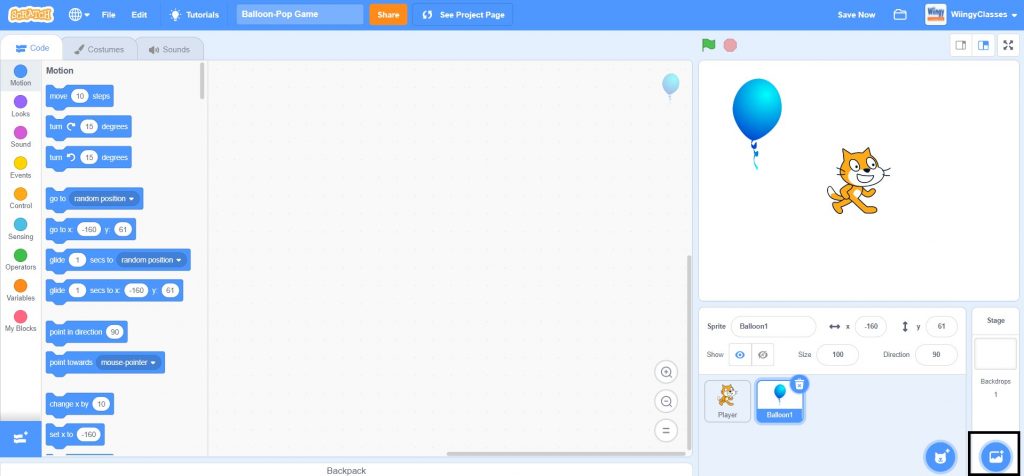
- Step 1: Open Scratch and start creating sprites. For this game, you will be using the pre-made Scratch cat sprite as the sonic character, so rename it as ‘Player’ to avoid confusion while coding.
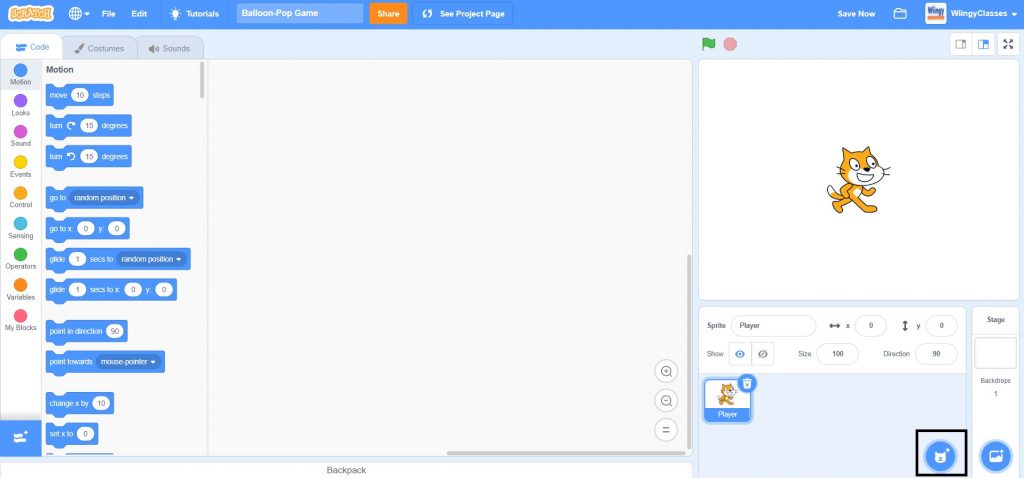
- Step 2: It’s time to choose another sprite, so to choose another sprite, click on the blue circle with the cat icon.
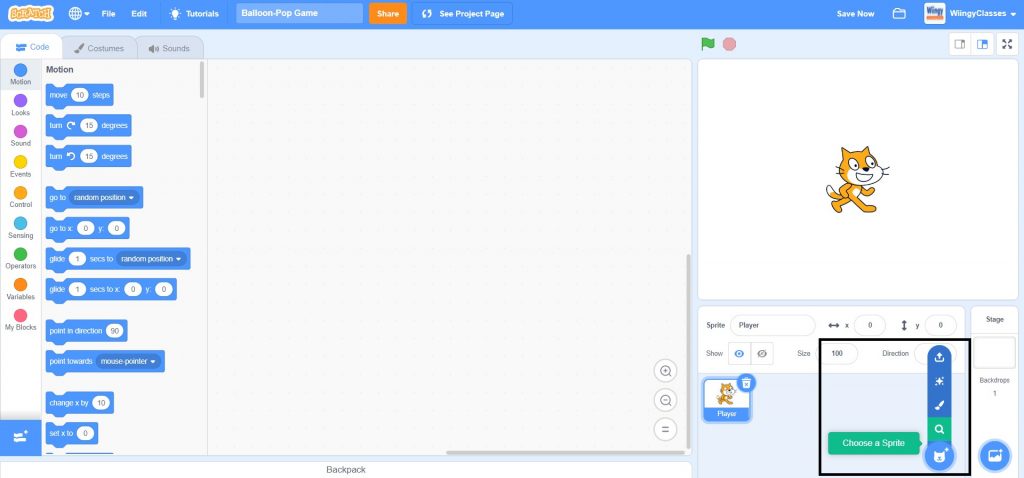
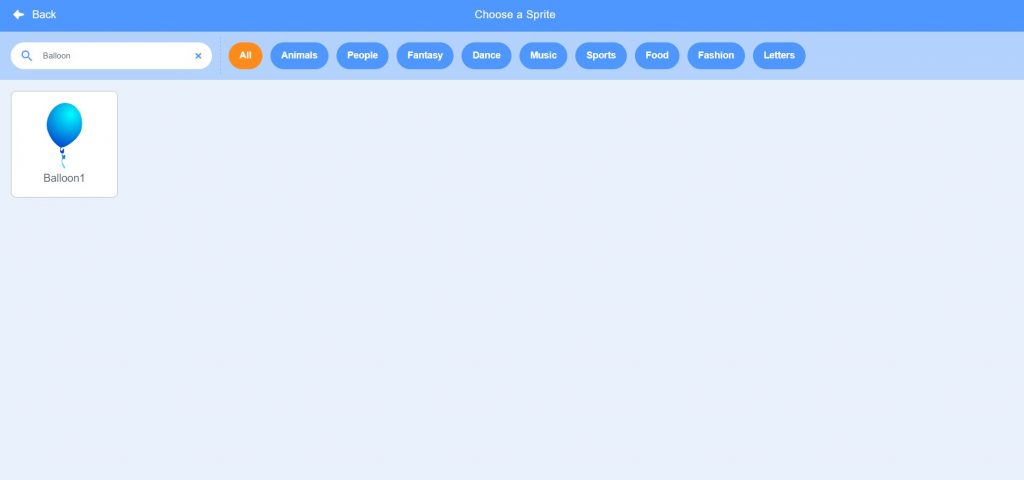
- Step 3: After clicking on the blue circle for choosing a sprite, select the first option from below that says ‘Choose a Sprite’.
- Step 4: Once you click on the ‘Choose a Sprite’ option, the following screen will appear.
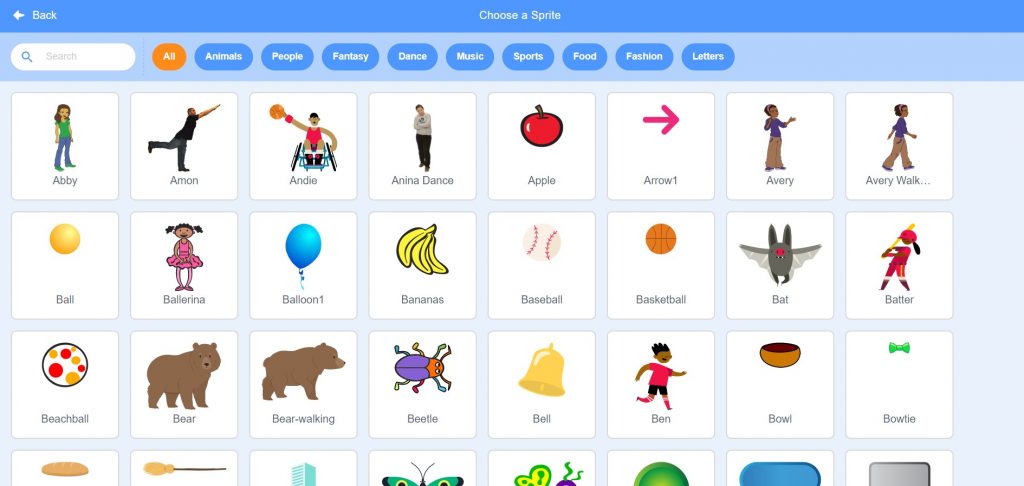
- Step 5: Search for ‘Balloon’ and ‘Robot’ and select them, as shown below. Rename the sprites as ‘Balloon’ and ‘Robot’ to avoid confusion while coding.
- Step 6: Now, it’s time to choose the backdrops for this game. So, to choose the backdrop, click on the blue circle available at the extreme right of the screen.
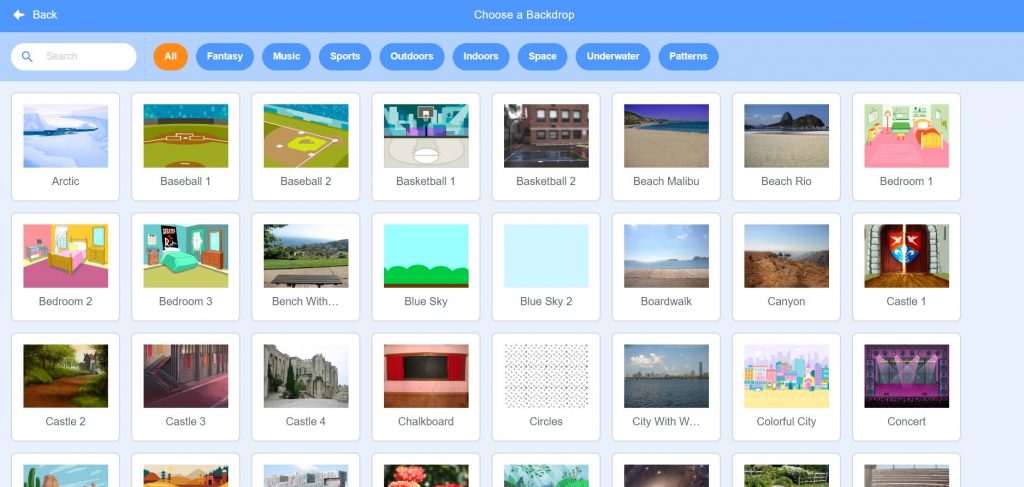
- Step 7: After clicking on the blue circle for choosing a backdrop, select the first option from below that says ‘Choose a Backdrop’.

- Step 8: Once you click on the ‘Choose a Backdrop’ option, the following screen will appear.
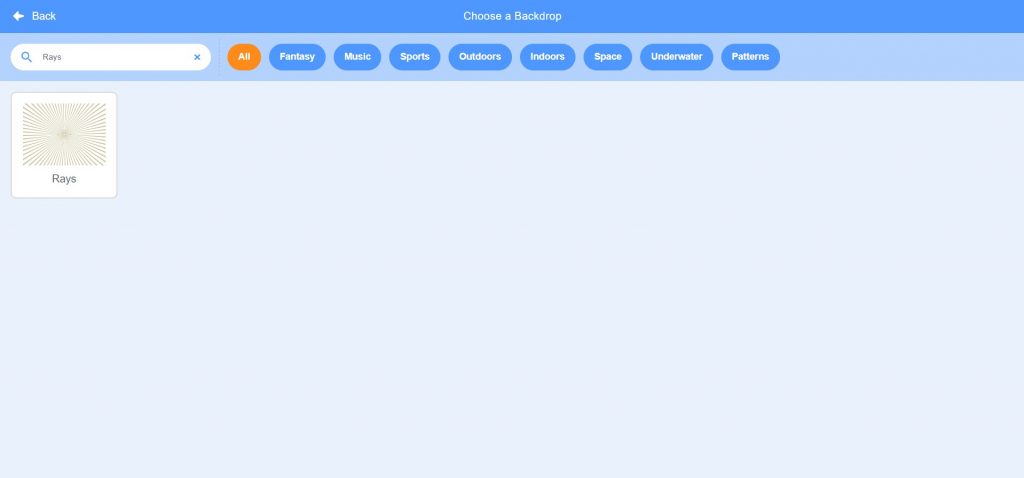
- Step 9: Search for ‘Rays’ and ‘Circles’ and select them, as shown below. Leave the name of the backdrops as ‘Rays’ and ‘Circles’ to avoid confusion while coding.
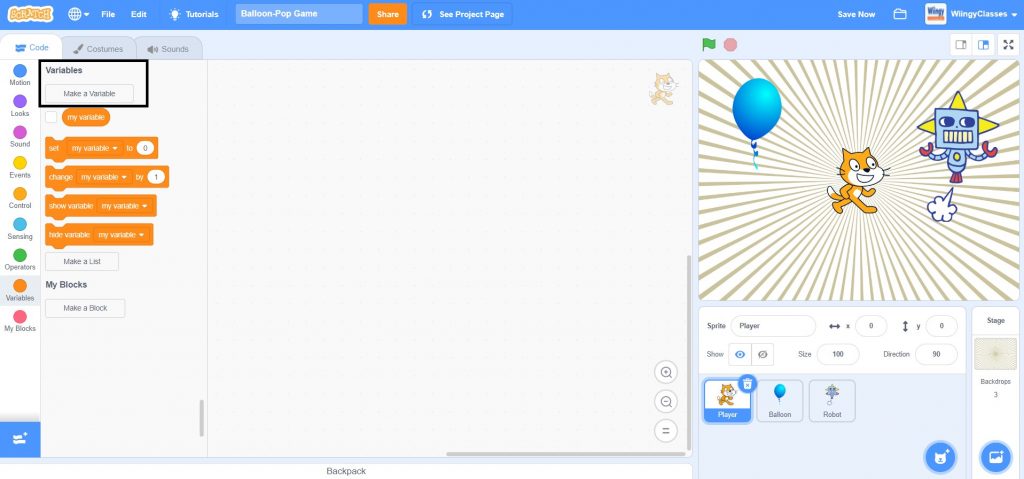
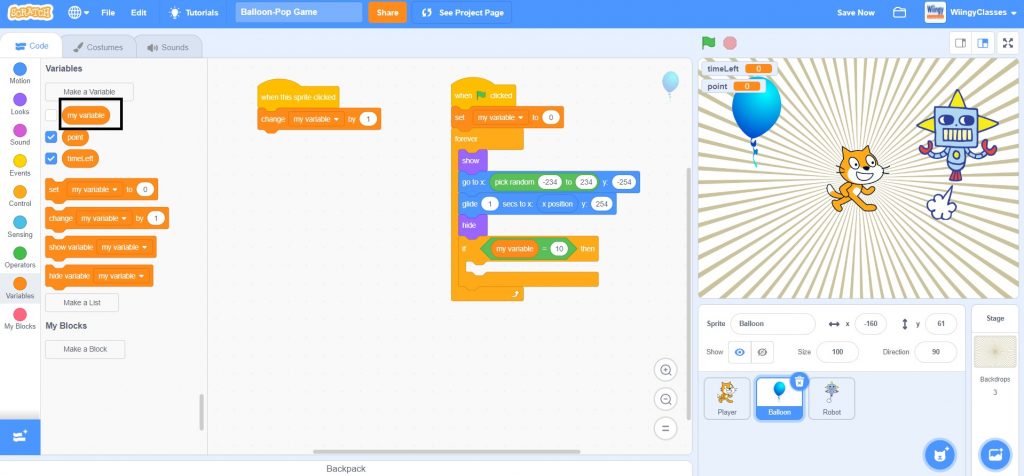
- Step 10: After selecting the sprites and the backdrops, it’s time to make the variables of the game. So, first, switch to the ‘Code’ section, then go to the “Variables” block in the block palette, click on the ‘Make a Variable’ option, and create variables named ‘timeLeft’ and ‘point’. Make sure to select the ‘For this sprite only’ option while creating the sprites.
Code for the ‘Balloon’ sprite
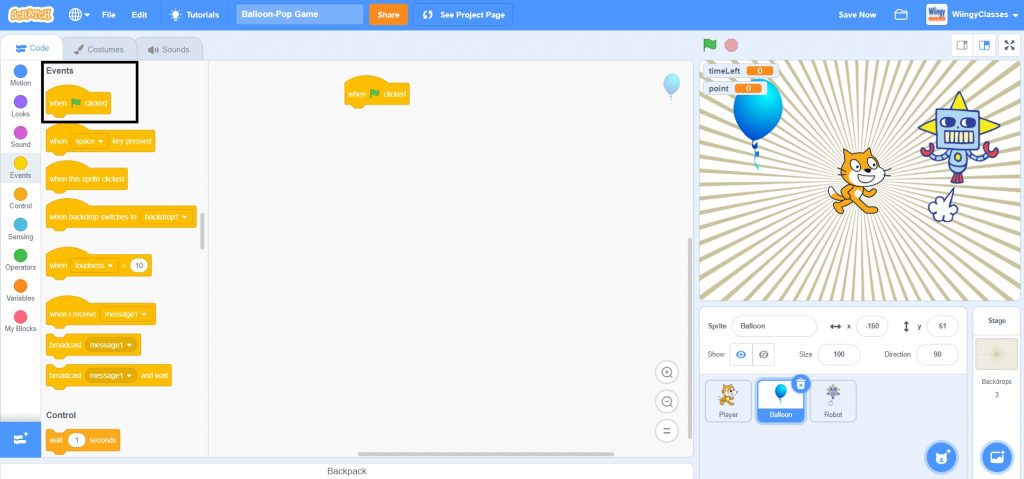
It’s time for coding, so let’s start by creating a code for the ‘Balloon’ sprite. Make sure that the ‘Balloon’ sprite and ‘Rays’ backdrop is selected while coding this part.
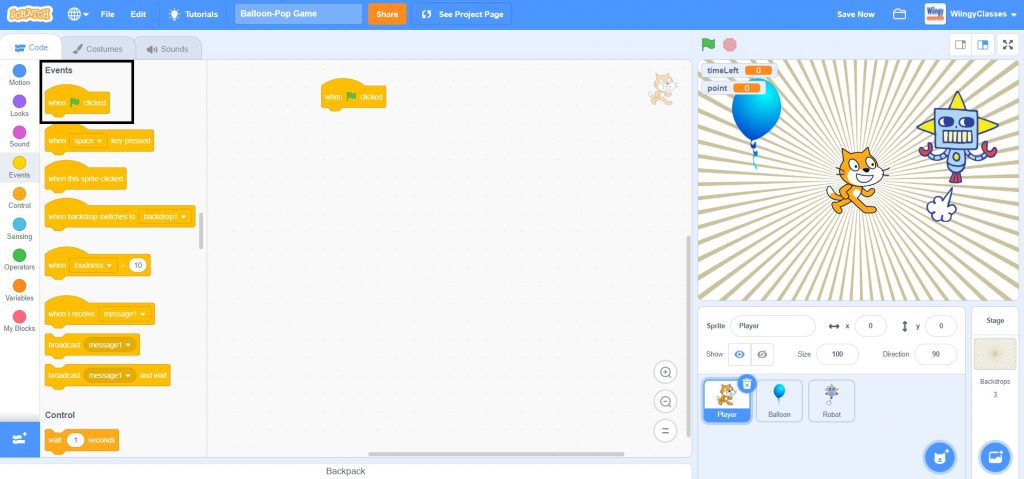
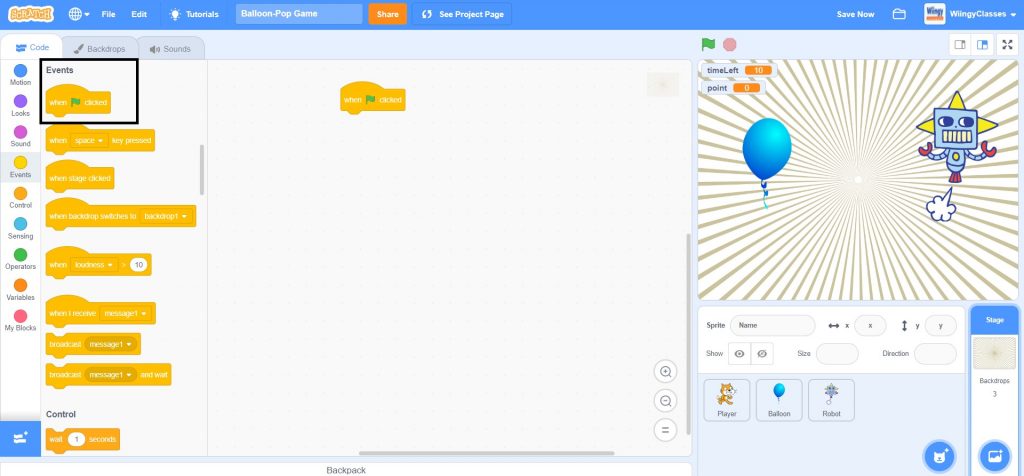
- Step 1: Go to the “Events” block in the block palette, select the ‘when green flag clicked’ block, and drag it to the coding area.
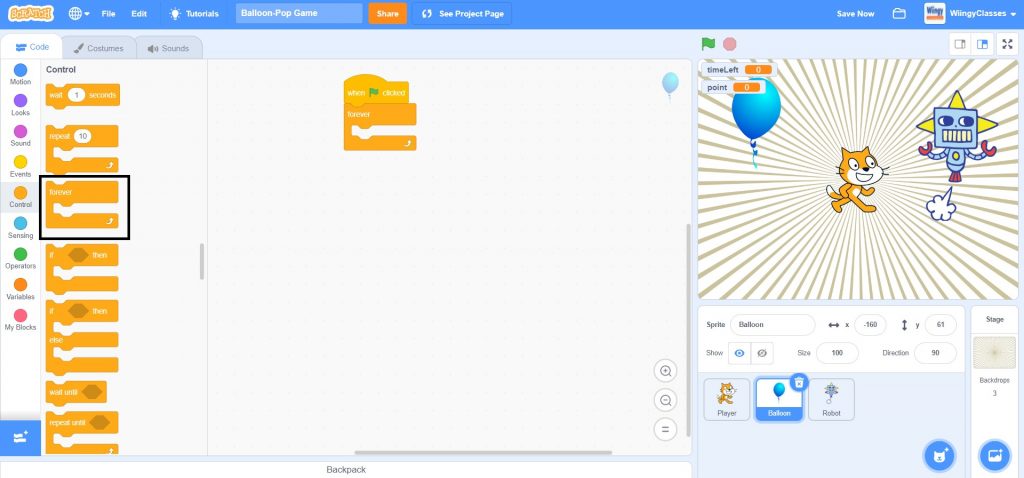
- Step 2: Go to the “Control” block in the block palette, select the ‘forever’ block, drag it to the coding area, and place it under the ‘when green flag clicked’ block.
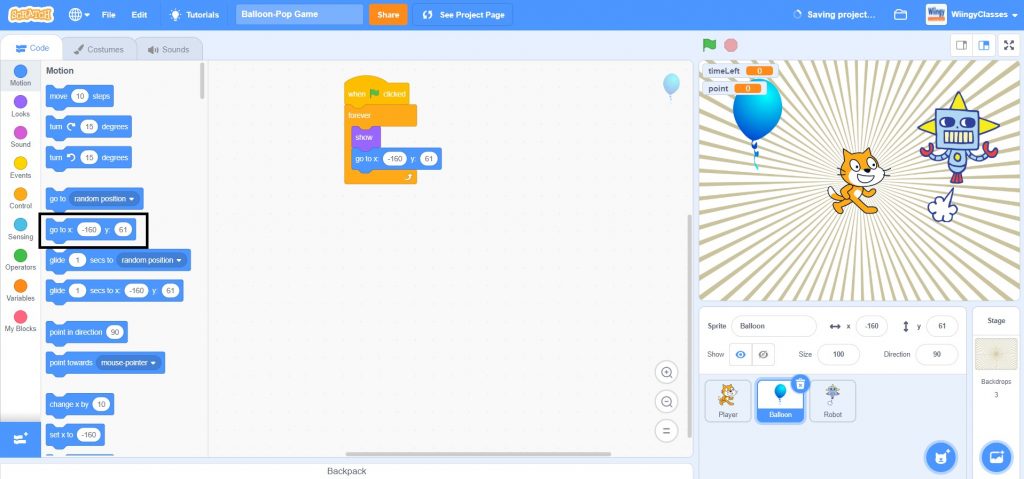
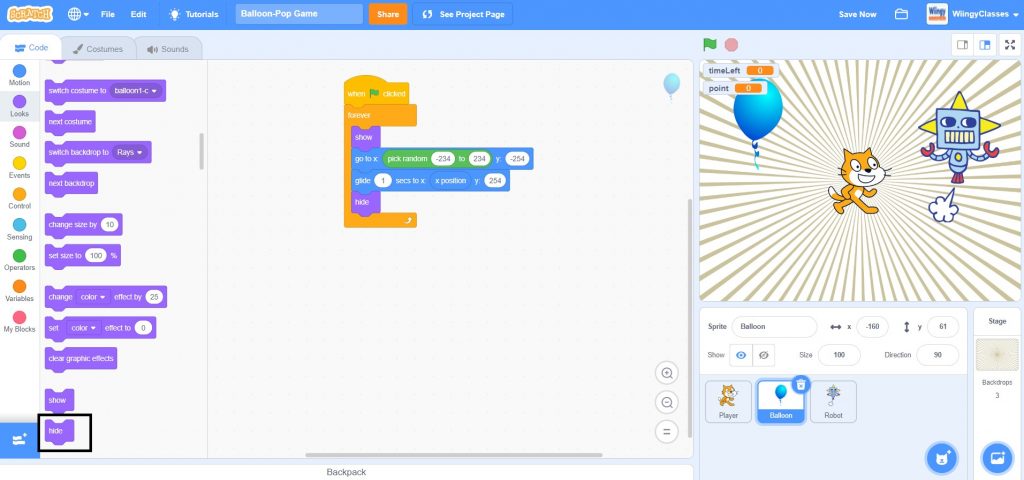
- Step 3: Go to the “Looks” block in the block palette, select the ‘show’ block, drag it to the coding area, and place it inside the ‘forever’ block.

- Step 4: Go to the “Motion” block in the block palette, select the ‘go to x: ( ) y: ( )’ block, drag it to the coding area, and place it under the ‘show’ block inside the ‘forever’ block.
- Step 5: Go to the “Operators” block in the block palette, select the ‘pick random ( ) to ( )’ block, drag it to the coding area, and place it in the first value part of the ‘go to x: ( ) y: ( )’ block and enter the value ‘-254’ in the second value part of the ‘go to x: ( ) y: ( )’ block.
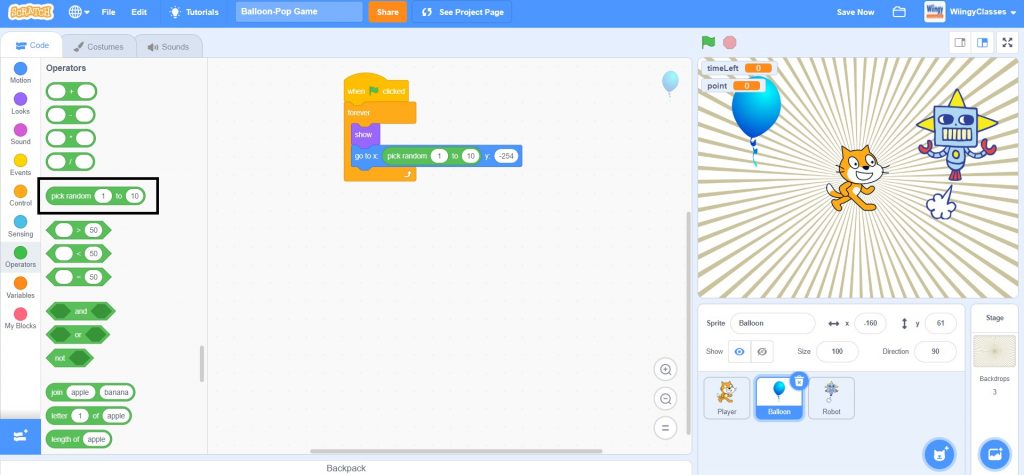
- Step 6: In the ‘pick random ( ) to ( )’ block, enter the values ‘-234’ and ‘234’ in the first and second value places, respectively.
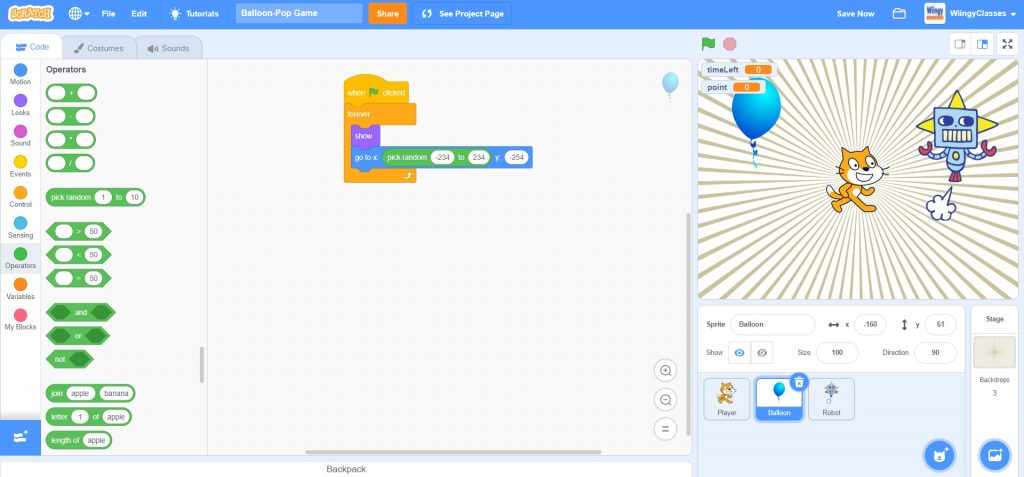
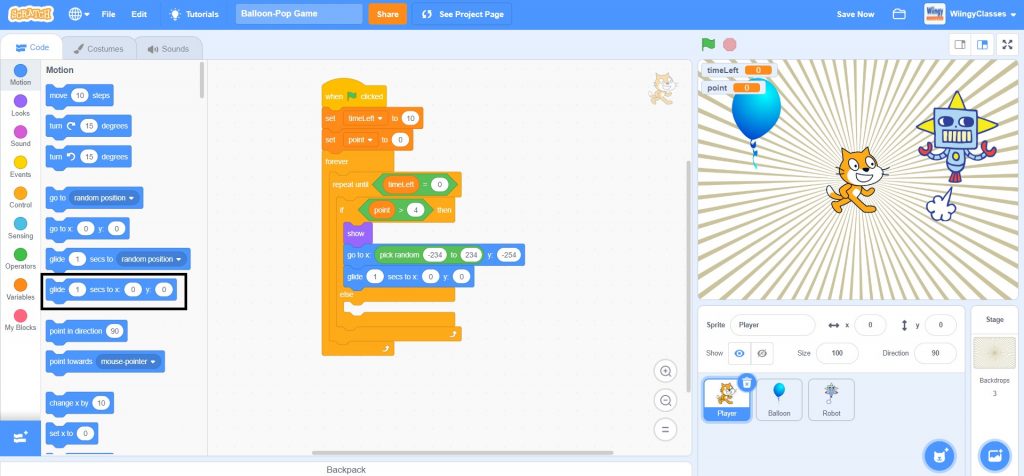
- Step 7: Go to the “Motion” block in the block palette, select the ‘glide ( ) secs to x: ( ) y: ( )’ block, drag it to the coding area, and place it under the ‘go to x: ( ) y: ( )’ block inside the ‘forever’ block.
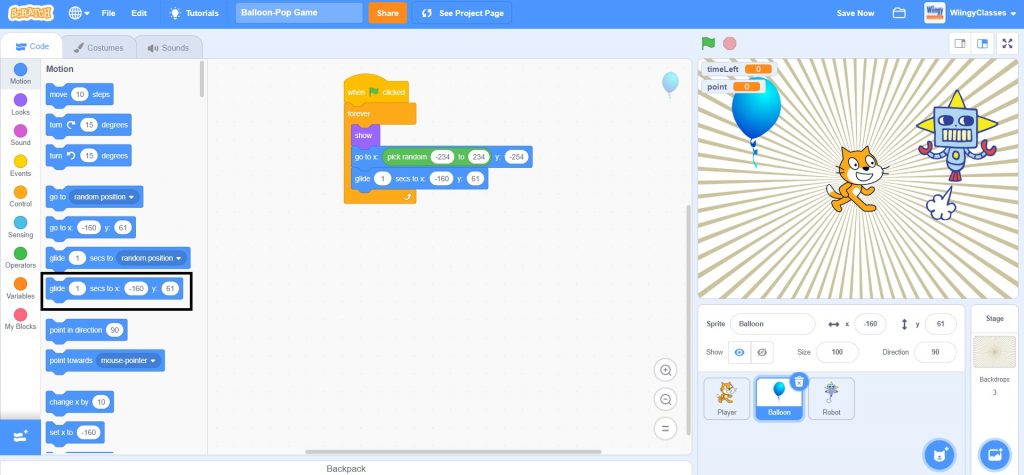
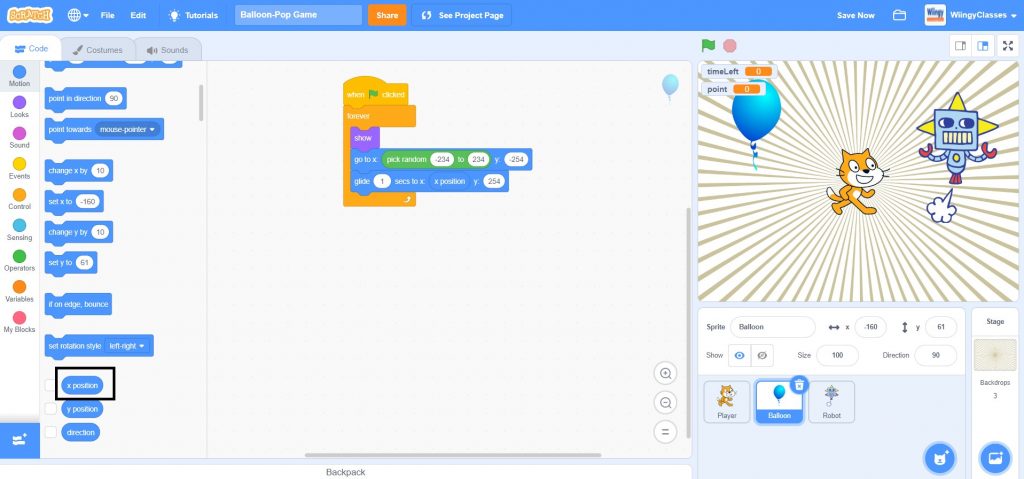
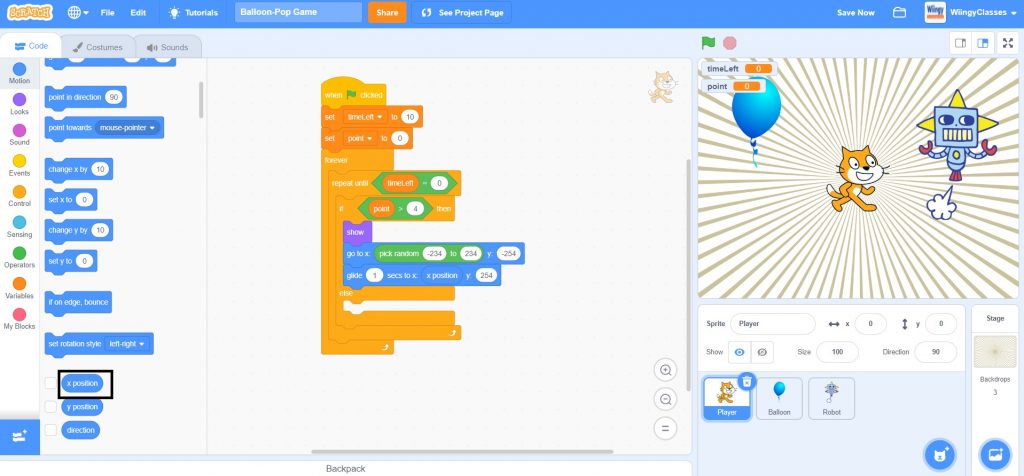
- Step 8: From the “Motion” block in the block palette, select the ‘x position’ block, drag it to the coding area, and place it in the second value place of the ‘glide ( ) secs to x: ( ) y: ( )’ block. For the third value place of the ‘glide ( ) secs to x: ( ) y: ( )’ block, enter the value ‘254’ and for the first value place of the ‘glide ( ) secs to x: ( ) y: ( )’ block, leave the value as ‘1’.
- Step 9: Go to the “Looks” block in the block palette, select the ‘hide’ block, drag it to the coding area, and place it under the ‘glide ( ) secs to x: ( ) y: ( )’ block inside the ‘forever’ block.
Code for counting the points and moving up
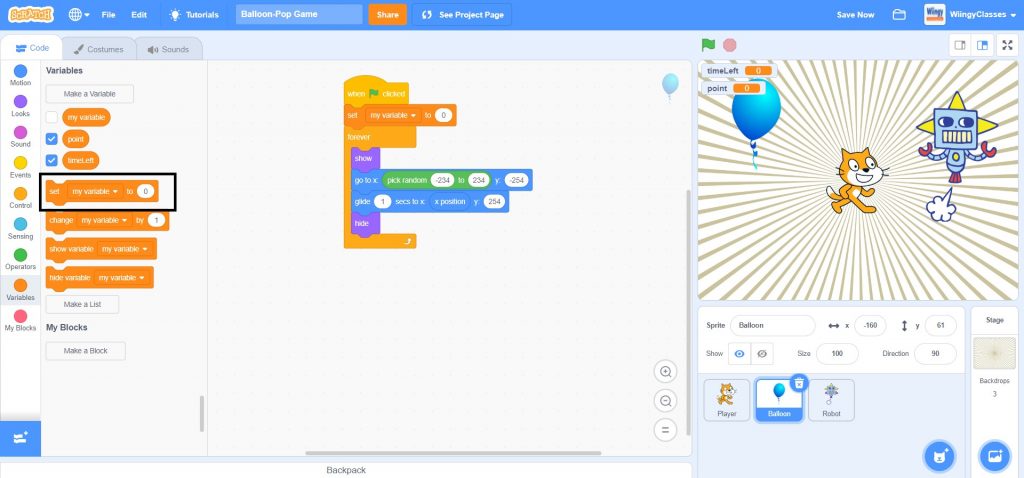
The player gets 1 point in the game for every click on the ‘Balloon’ sprite and the player needs a total of 5 points for moving to the next level. Make sure that the ‘Balloon’ sprite is selected while coding this part.
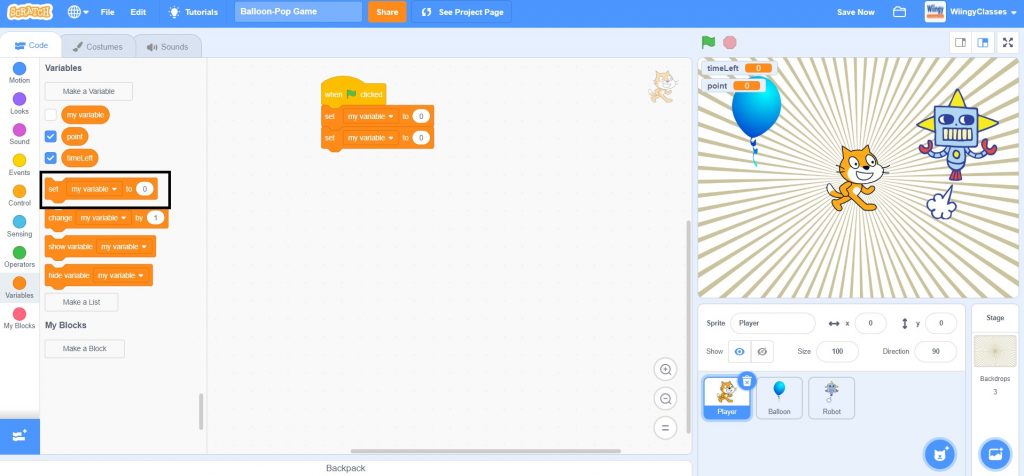
- Step 1: Go to the “Variables” block in the block palette, select ‘set ( ) to ( )’ block, drag it to the coding area, and place it under the ‘when green flag clicked’ block and above the ‘forever’ block in the above-explained code of the ‘Balloon’ sprite.
- Step 2: Now go to the “Events” block in the block palette, select the ‘when this sprite clicked’ block, and drag it to the coding area.
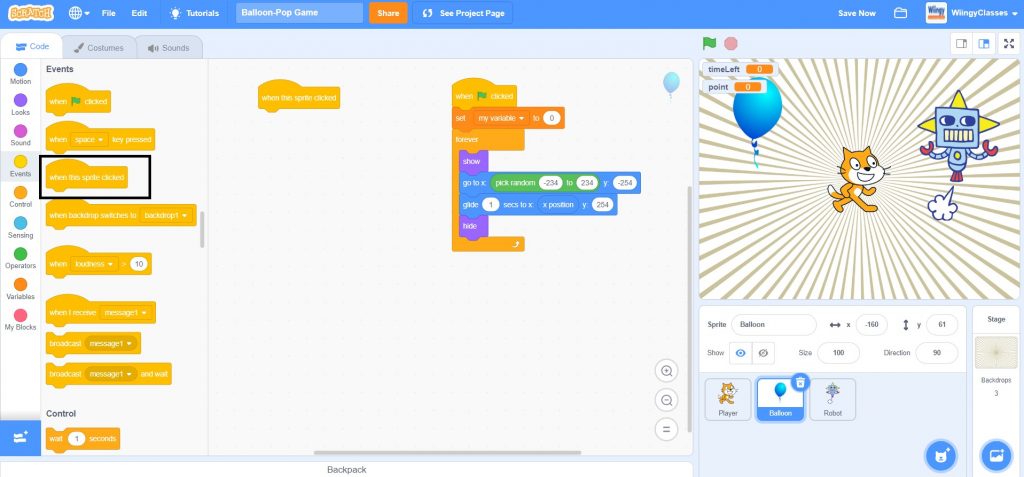
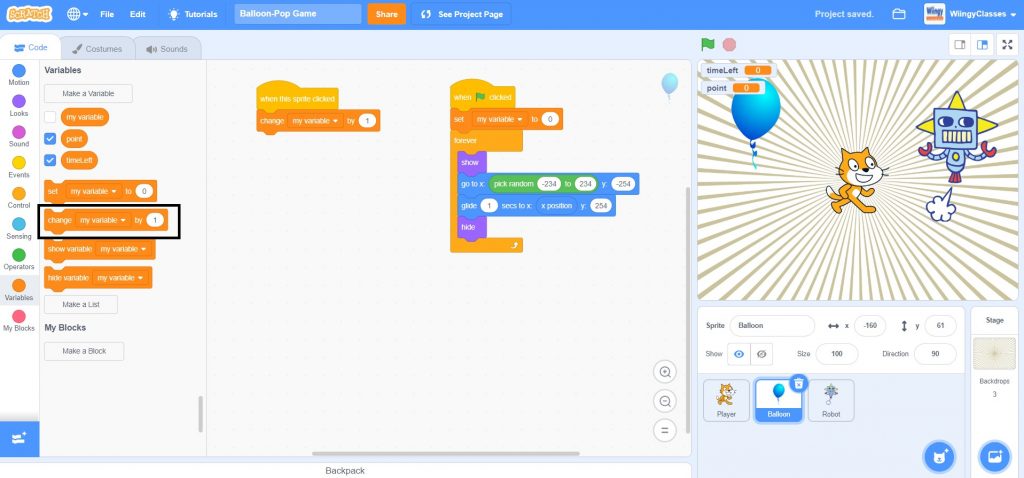
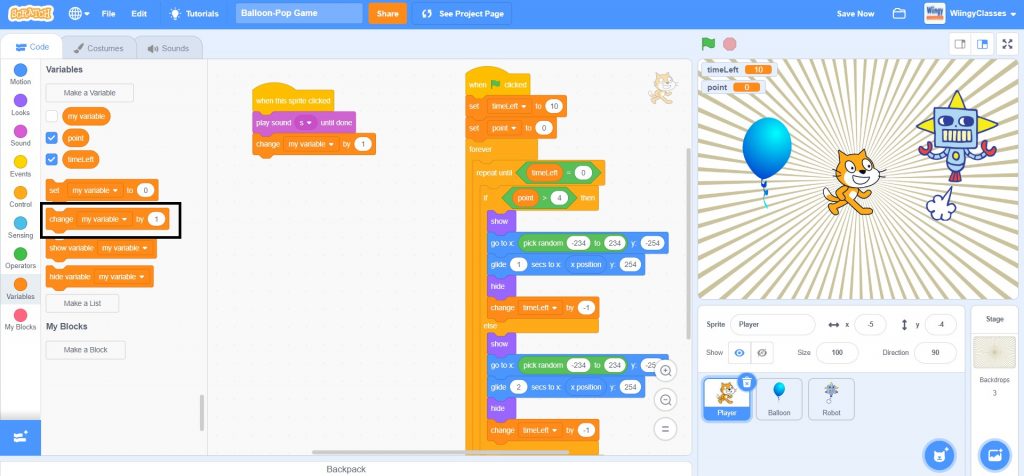
- Step 3: Go to the “Variables” block in the block palette, select the ‘change ( ) by ( )’ block, drag it to the coding area, and place it under the ‘when this sprite clicked’ block. In the ‘change ( ) by ( )’ block, leave the first and second values as ‘my variable’ and ‘1’, respectively.
Code to change the backdrop
Make sure that the ‘Balloon’ sprite is selected while coding this part.
- Step 1: Go to the “Control” block in the block palette, select ‘if ( ) then ( )’ block, drag it to the coding area, and place it under the ‘hide’ block inside the ‘forever’ block in the above-explained code of the ‘Balloon’ sprite for counting the points and moving up.
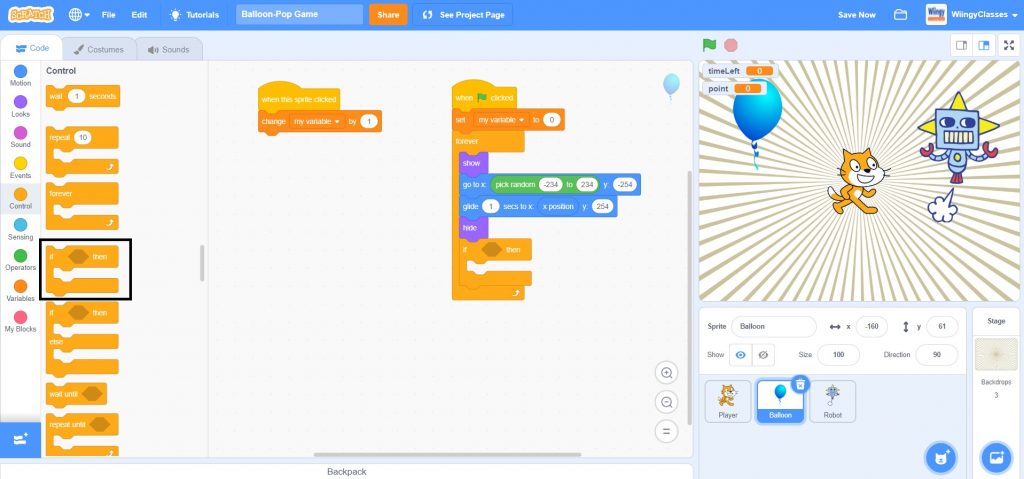
- Step 2: Go to the “Operators” block in the block palette, select the ‘( ) = ( )’ block, drag it to the coding area, and place it in the if condition of the ‘if ( ) then ( )’ block.

- Step 3: Go to the “Variables” block in the block palette, select the ‘my variable’ block, drag it to the coding area, and place it in the first value part of the ‘( ) = ( )’ block and in the second value part of the ‘( ) = ( )’, enter the value ‘10’, as shown below.
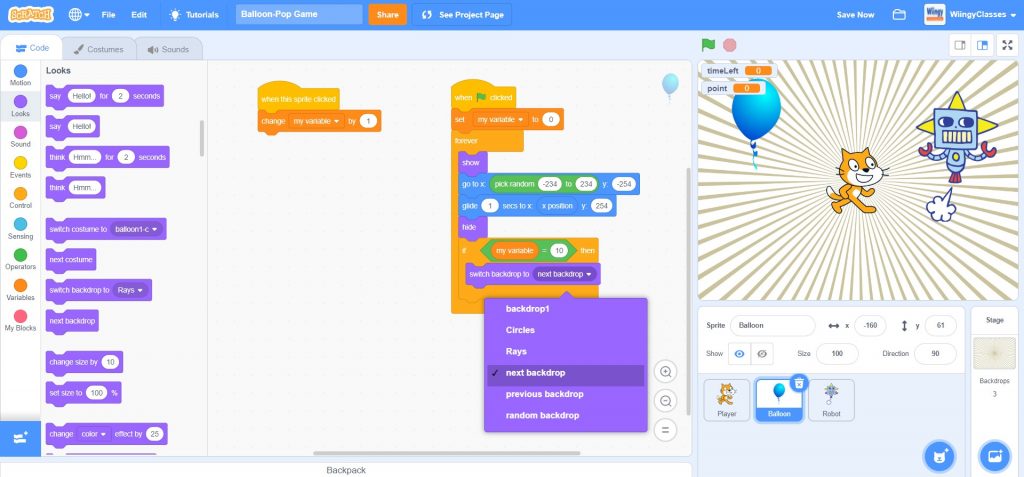
- Step 4: Go to the “Looks” block in the block palette, select the ‘switch backdrop to ( )’ block, drag it to the coding area, and place it in the then condition of the ‘if ( ) then ( )’ block.
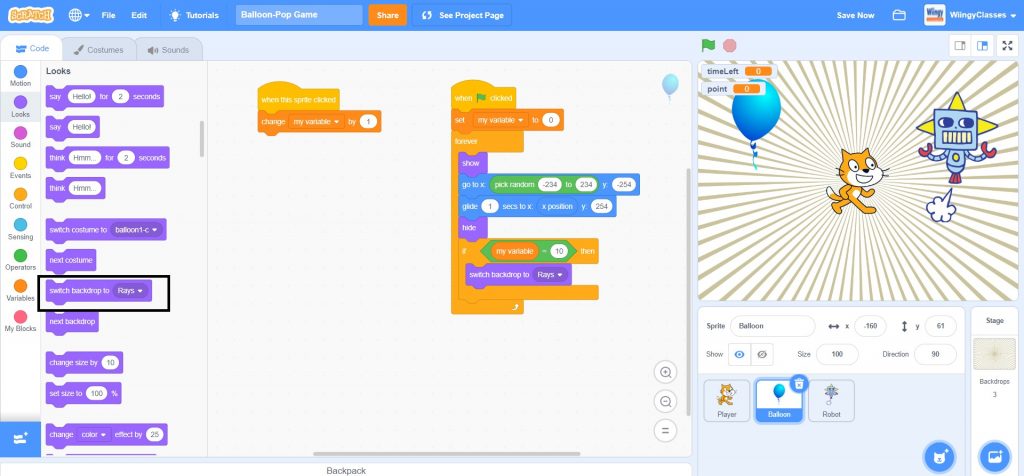
- Step 5: In the ‘switch backdrop to ( )’ block, select the value as ‘next backdrop’ from the drop-down menu.
Code to move to the next level
In this part, you need to code to move the player to the next level if he matches all the requirements needed to go to the next level. Make sure that the ‘Player’ sprite is selected while coding this part.
- Step 1: Go to the “Events” block in the block palette, select the ‘when green flag clicked’ block, and drag it to the coding area.
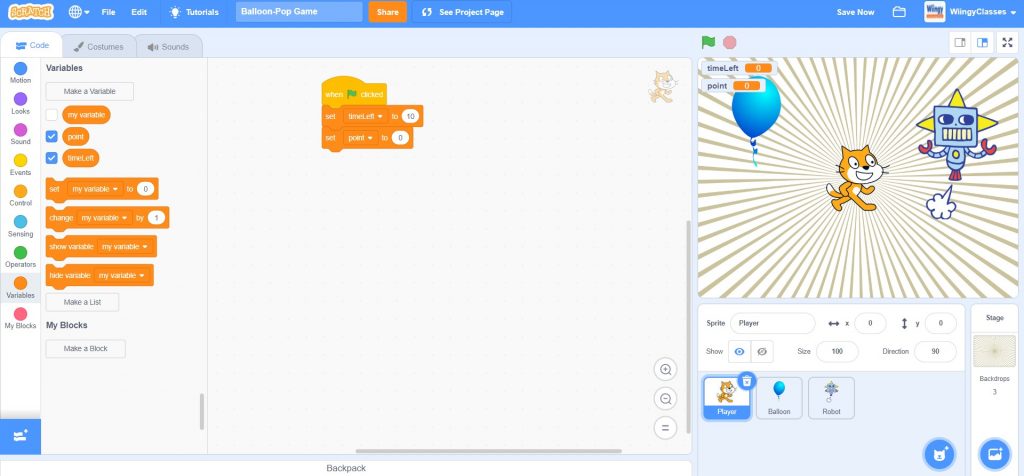
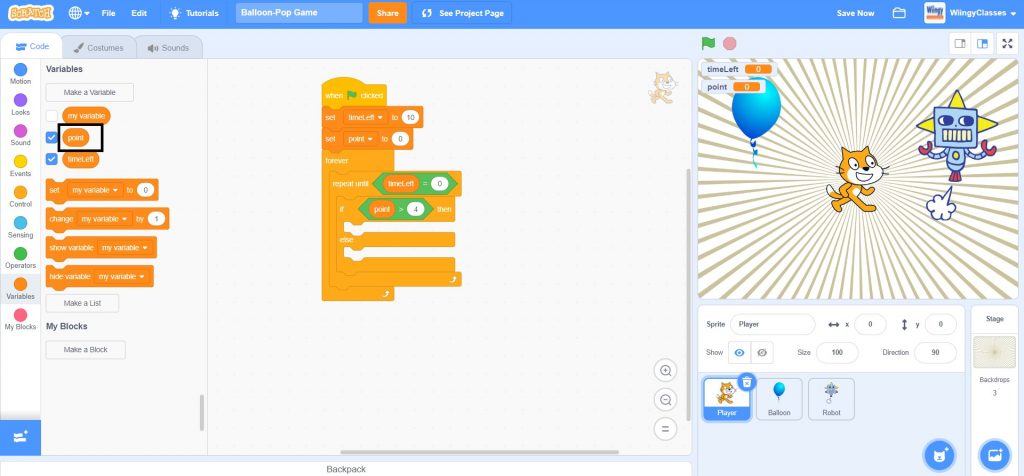
- Step 2: Go to the “Variables” block in the block palette, select 2 ‘set ( ) to ( )’ blocks, drag them to the coding area, and place them under the ‘when green flag clicked’ block.
- Step 3: In the first ‘set ( ) to ( )’ block, select the first value as ‘timeLeft’ from the drop-down menu and change the second value to ‘10’ and in the second ‘set ( ) to ( )’ block, select the first value as ‘point’ from the drop-down menu and leave the second value as ‘0’, as shown below.
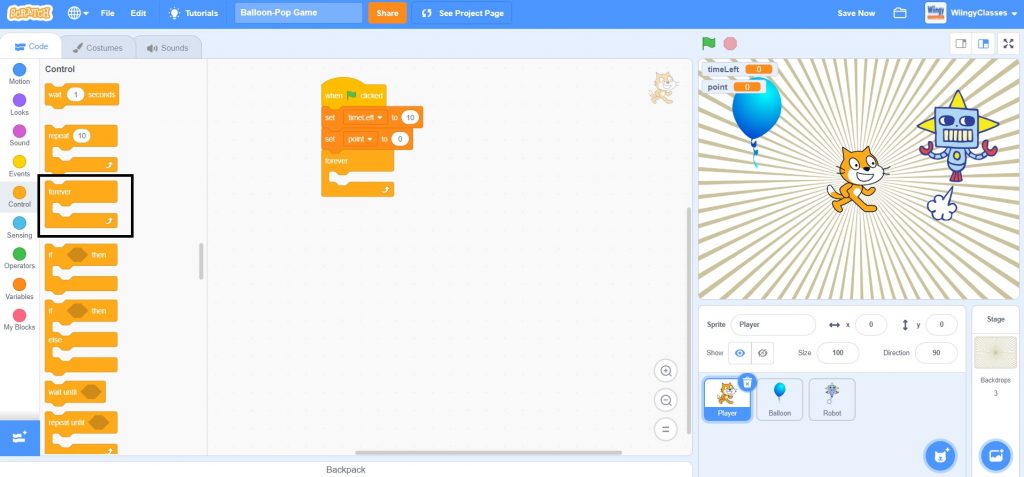
- Step 4: Go to the “Control” block in the block palette, select the ‘forever’ block, drag it to the coding area, and place it under the second ‘set ( ) to ( )’ block.
- Step 5: From the “Control” block in the block palette, select the ‘repeat until ( )’ block, drag it to the coding area, and place it inside the ‘forever’ block.
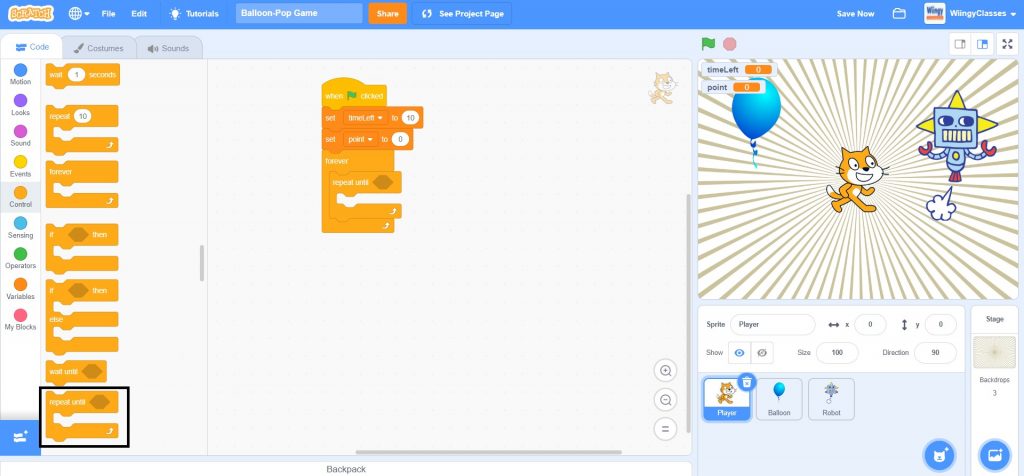
- Step 6: Go to the “Operators” block in the block palette, select the ‘( ) = ( )’ block, drag it to the coding area, and place it in the value part of the ‘repeat until ( )’ block.
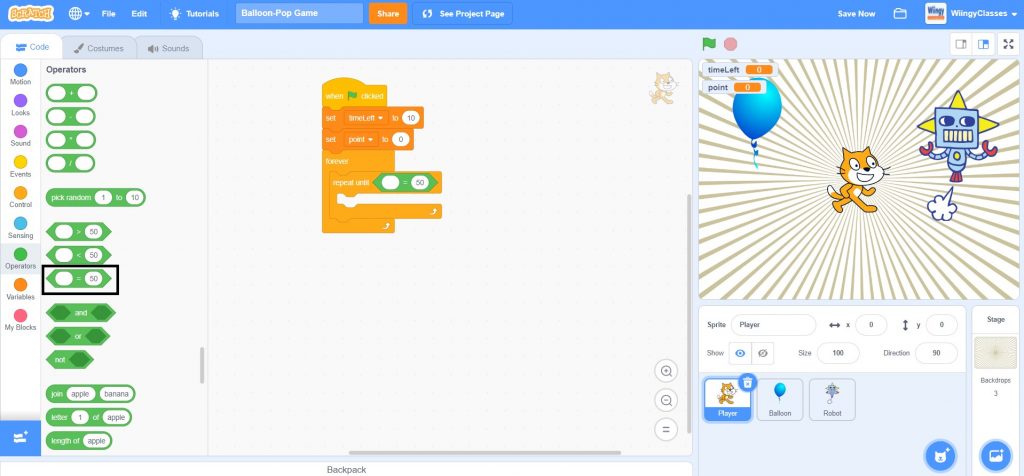
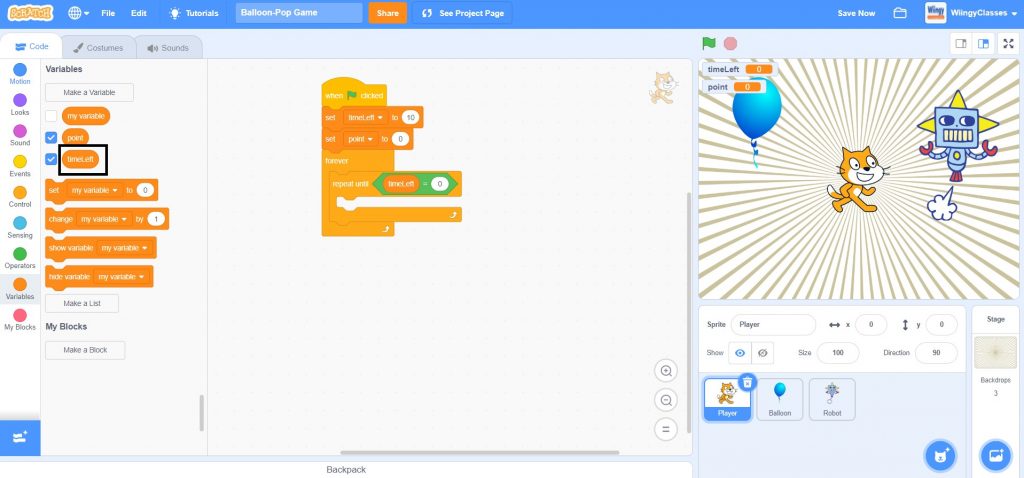
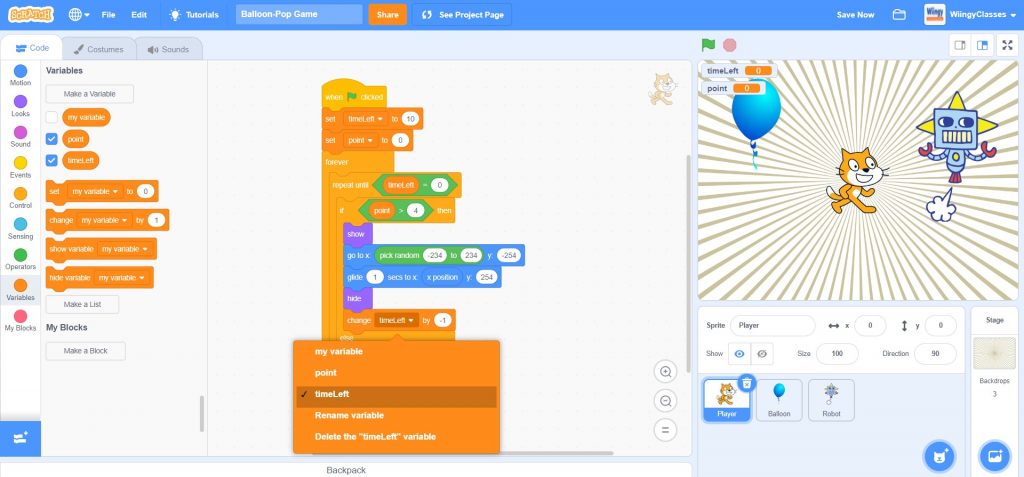
- Step 7: Go to the “Variables” block in the block palette, select the ‘timeLeft’ block, drag it to the coding area, and place it in the first value part of the ‘( ) = ( )’ block and in the second value part of the ‘( ) = ( )’, enter the value ‘0’, as shown below.
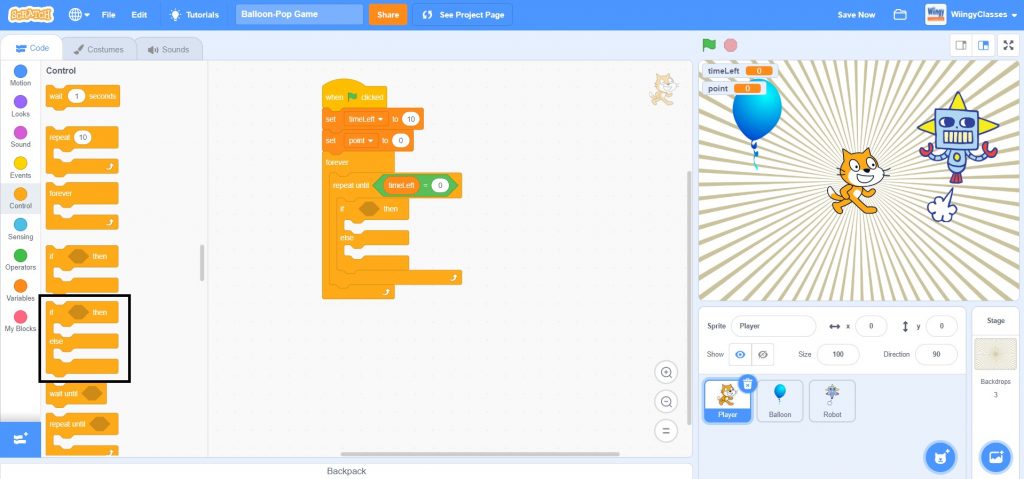
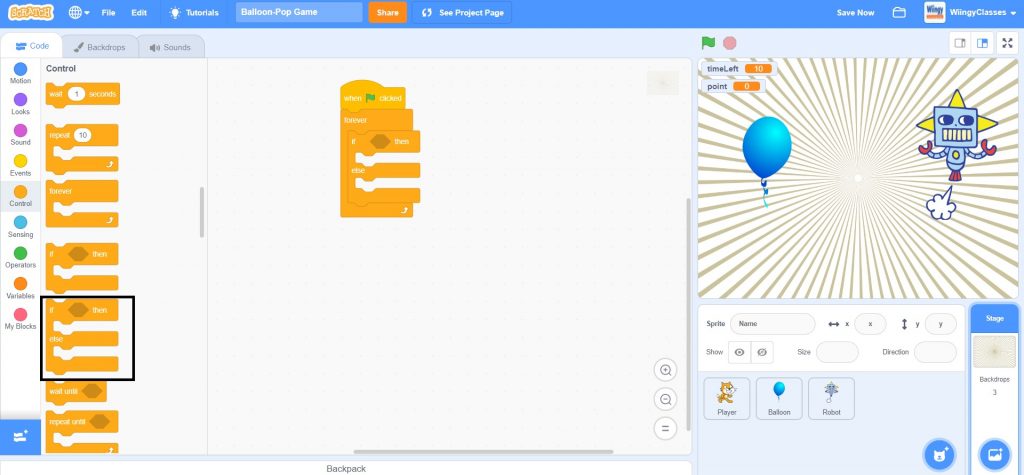
- Step 8: Go to the “Control” block in the block palette, select ‘if ( ) then ( ) else ( )’ block, drag it to the coding area, and place it inside the ‘repeat until ( )’ block which is inside the ‘forever’ block.
- Step 9: Go to the “Operators” block in the block palette, select the ‘( ) > ( )’ block, drag it to the coding area, and place it in the if condition of the ‘if ( ) then ( ) else ( )’ block.
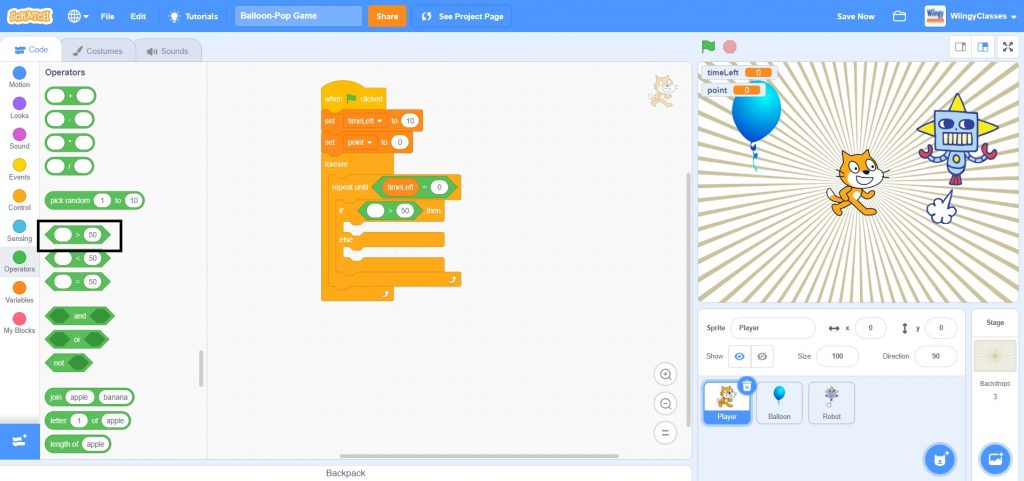
- Step 10: Go to the “Variables” block in the block palette, select the ‘point’ block, drag it to the coding area, and place it in the first value part of the ‘( ) > ( )’ block and in the second value part of the ‘( ) > ( )’, enter the value ‘4’, as shown below.
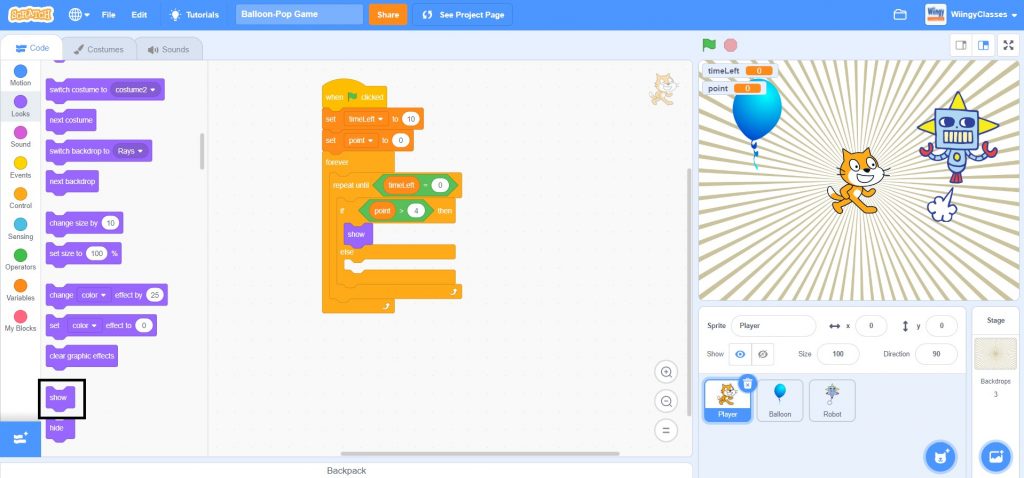
- Step 11: Go to the “Looks” block in the block palette, select the ‘show’ block, drag it to the coding area, and place it the then condition of the ‘if ( ) then ( ) else ( )’ block.
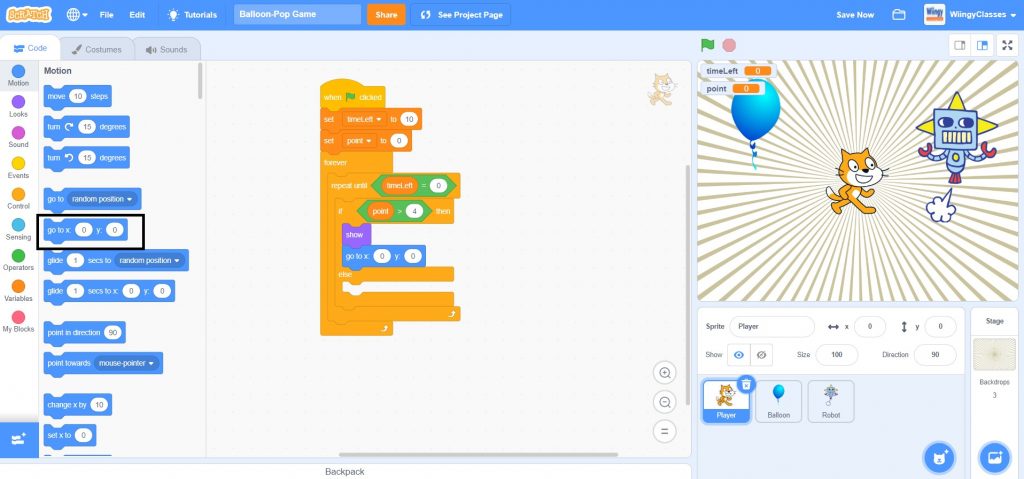
- Step 12: Go to the “Motion” block in the block palette, select the ‘go to x: ( ) y: ( )’ block, drag it to the coding area, and place it under the ‘show’ block inside the then condition of the ‘if ( ) then ( ) else ( )’ block.
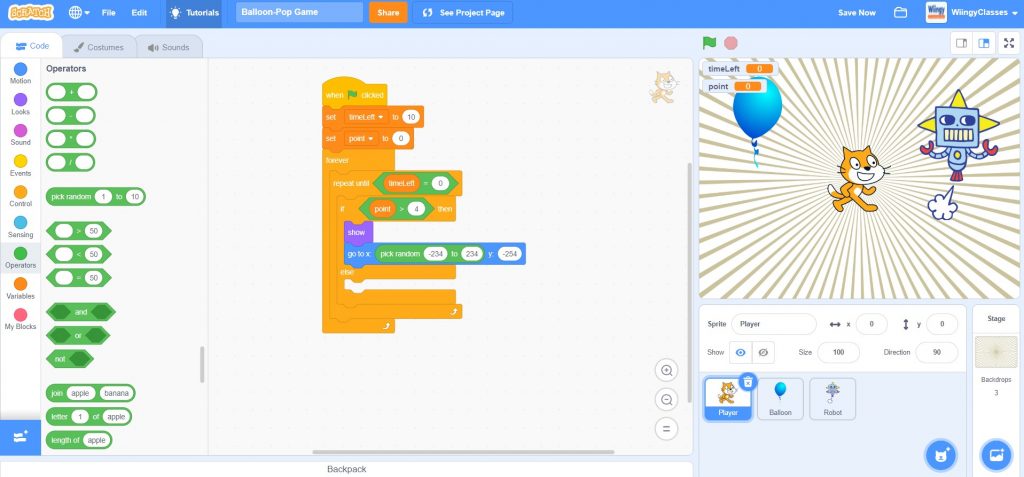
- Step 13: Go to the “Operators” block in the block palette, select the ‘pick random ( ) to ( )’ block, drag it to the coding area, and place it in the first value part of the ‘go to x: ( ) y: ( )’ block and enter the value ‘-254’ in the second value part of the ‘go to x: ( ) y: ( )’ block.
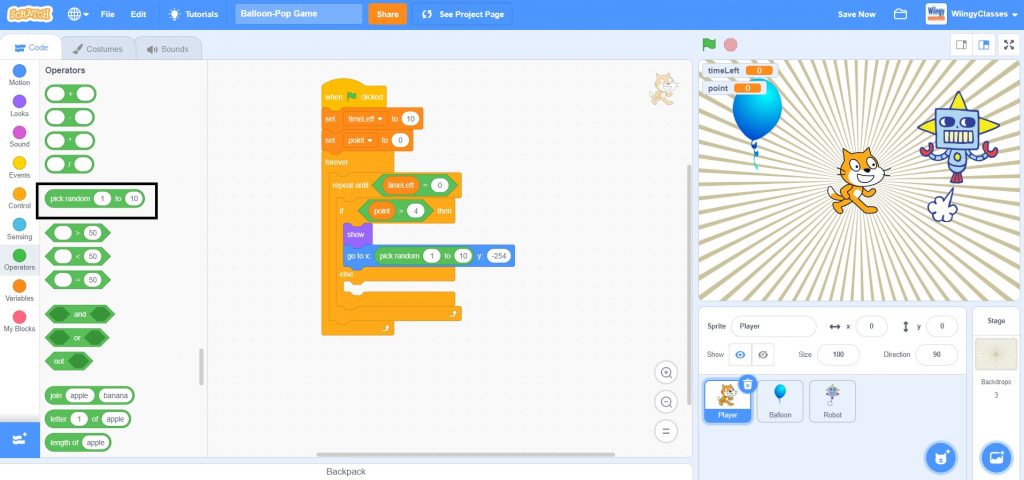
- Step 14: In the ‘pick random ( ) to ( )’ block, enter the values ‘-234’ and ‘234’ in the first and second value places, respectively.
- Step 15: Go to the “Motion” block in the block palette, select the ‘glide ( ) secs to x: ( ) y: ( )’ block, drag it to the coding area, and place it under the ‘go to x: ( ) y: ( )’ block inside the then condition of the ‘if ( ) then ( ) else ( )’ block.
- Step 16: From the “Motion” block in the block palette, select the ‘x position’ block, drag it to the coding area, and place it in the second value place of the ‘glide ( ) secs to x: ( ) y: ( )’ block. For the third value place of the ‘glide ( ) secs to x: ( ) y: ( )’ block, enter the value ‘254’ and for the first value place of the ‘glide ( ) secs to x: ( ) y: ( )’ block, leave the value as ‘1’.
- Step 17: Go to the “Looks” block in the block palette, select the ‘hide’ block, drag it to the coding area, and place it under the ‘glide ( ) secs to x: ( ) y: ( )’ block inside the then condition of the ‘if ( ) then ( ) else ( )’ block.
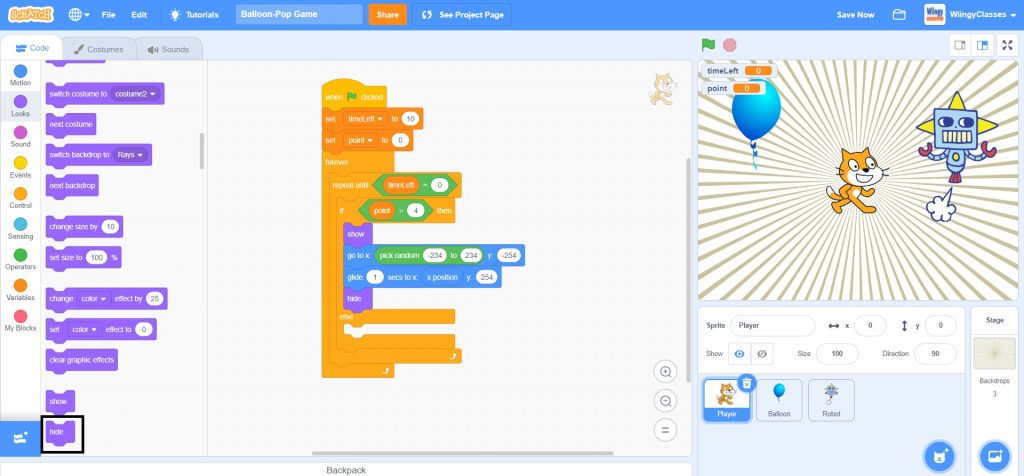
- Step 18: Go to the “Variables” block in the block palette, select ‘change ( ) by ( )’ blocks, drag them to the coding area, and place it under the ‘hide’ block inside the then condition of the ‘if ( ) then ( ) else ( )’ block.
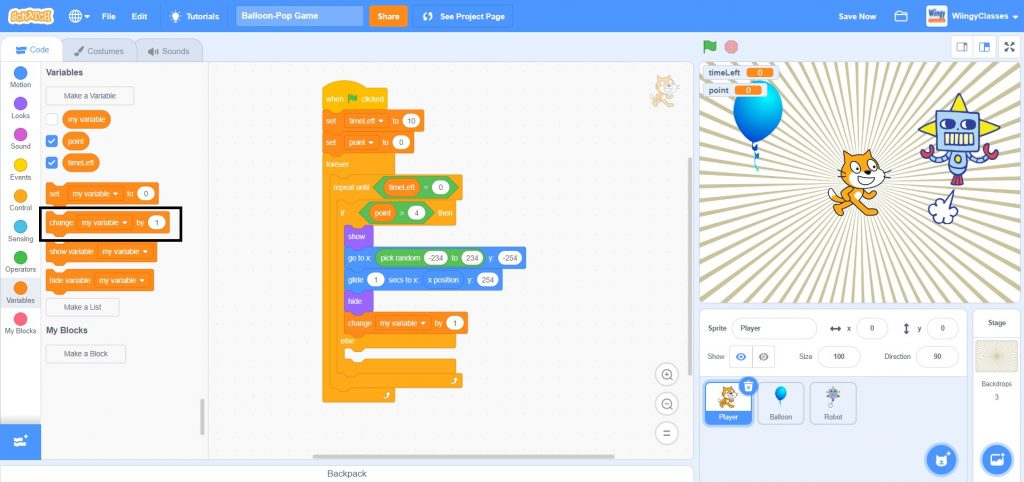
- Step 19: In the ‘change ( ) by ( )’ block, select the first value as ‘timeLeft’ from the drop-down menu and change the second value to ‘-1’.
- Step 20: Repeat the steps from 11 to 19 and place the blocks in the else condition of the ‘if ( ) then ( ) else ( )’ block with the only change in the ‘glide ( ) secs to x: ( ) y: ( )’ block. In the ‘glide ( ) secs to x: ( ) y: ( )’ block, for the first value place, enter the value ‘2’, as shown below.

- Step 21: Go to the “Events” block in the block palette, select the ‘when this sprite clicked’ block, and drag it to the coding area.
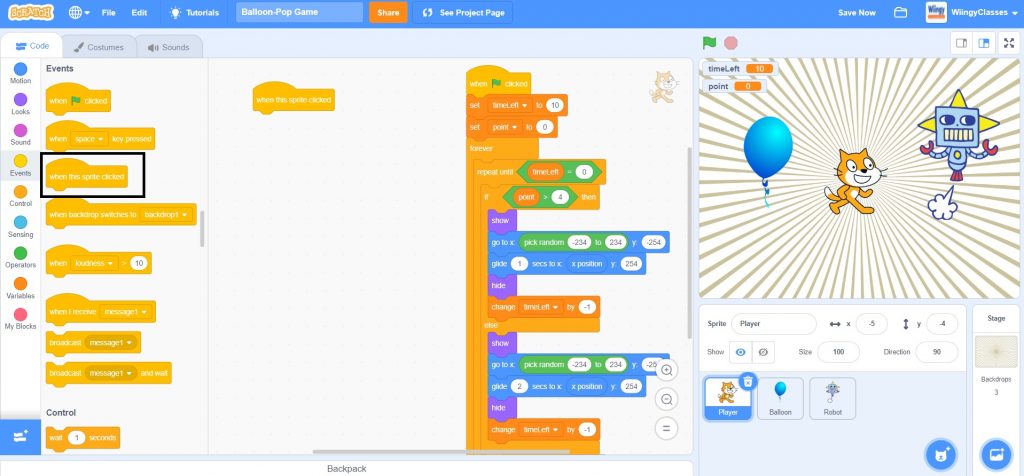
- Step 22: Go to the “Looks” block in the block palette, select the ‘play sound ( ) until done’ block, drag it to the coding area, and place it under the ‘when this sprite clicked’ block.
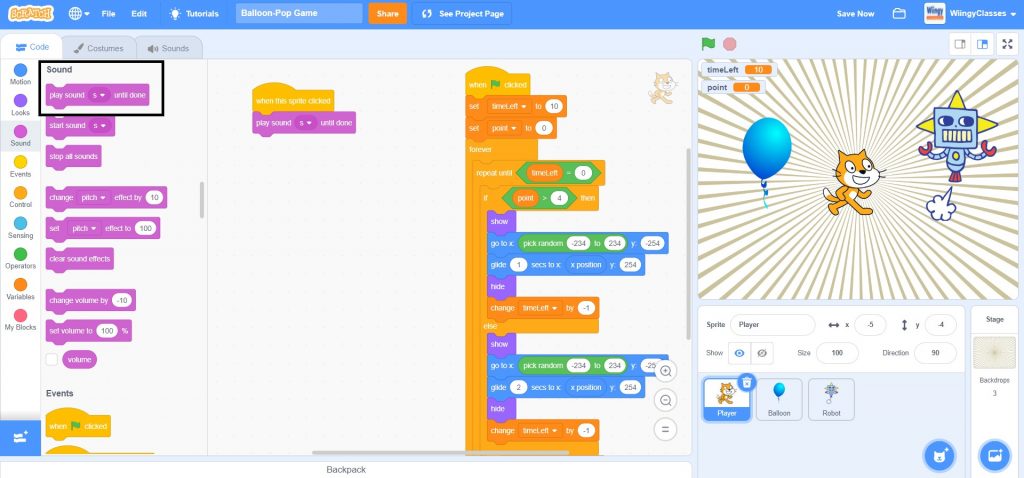
- Step 23: Go to the “Variables” block in the block palette, select the ‘change ( ) by ( )’ block, drag it to the coding area, and place it under the ‘play sound ( ) until done’ block.
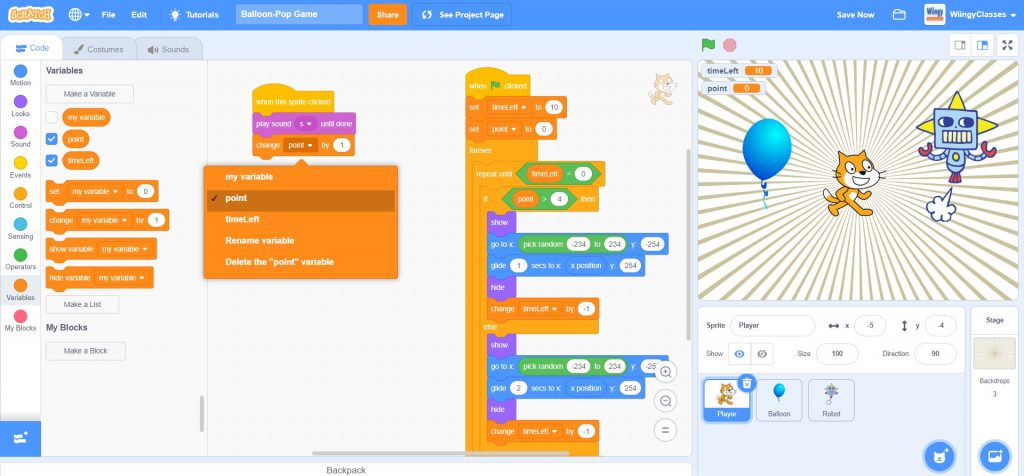
- Step 24: In the ‘change ( ) by ( )’ block, select the first value as ‘point’ from the drop-down menu and leave the second value as ‘1’.
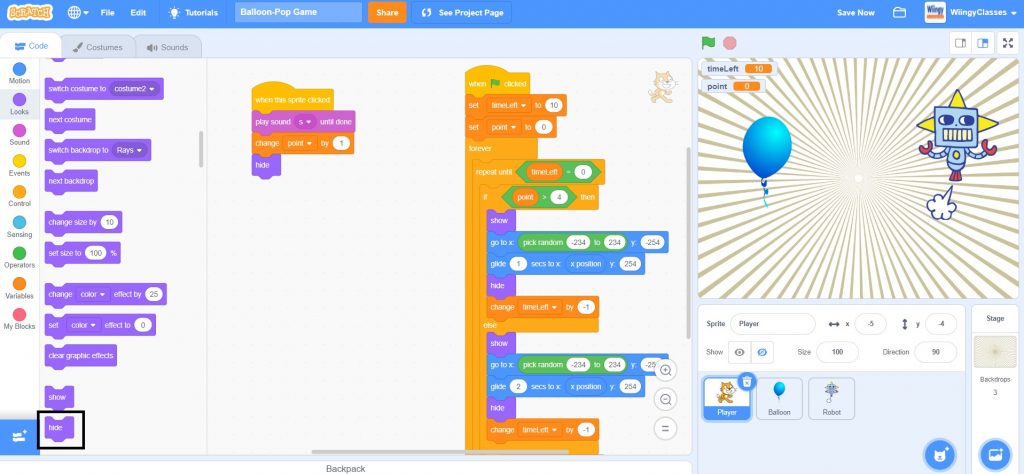
- Step 25: Go to the “Looks” block in the block palette, select the ‘hide’ block, drag it to the coding area, and place it under the ‘change ( ) by ( )’ block.
Code to control the backdrop display
In this part, you need to code to control the backdrop display. In the first level of the game, the ‘Rays’ backdrop will be visible and in the second level of the game, the ‘Circles’ backdrop will be visible. Make sure that the ‘Backdrop’ option is selected while coding this part.
- Step 1: Go to the “Events” block in the block palette, select the ‘when green flag clicked’ block, and drag it to the coding area.
- Step 2: Go to the “Control” block in the block palette, select the ‘forever’ block, drag it to the coding area, and place it under the ‘when green flag clicked’ block.

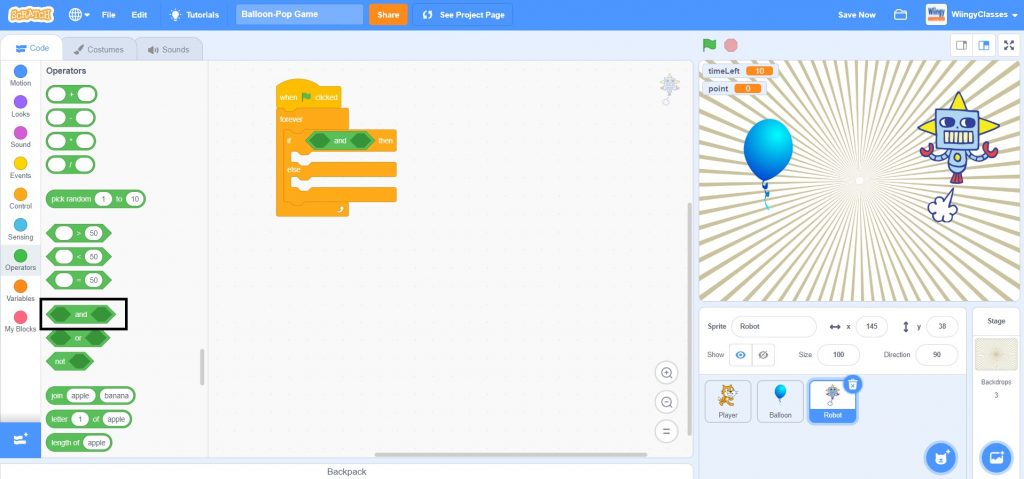
- Step 3: From the “Control” block in the block palette, select the ‘if ( ) then ( ) else ( )’ block, drag it to the coding area, and place it inside the ‘forever’ block.
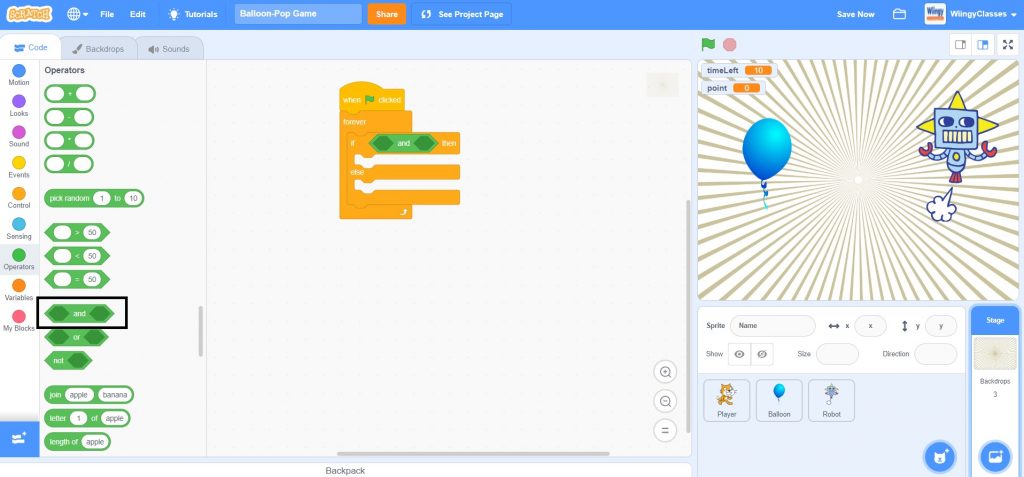
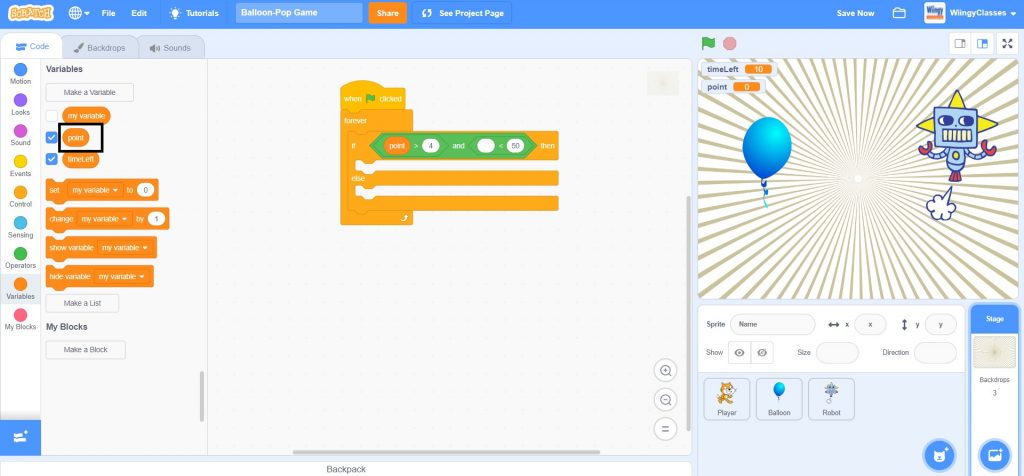
- Step 4: Go to the “Operators” block in the block palette, select the ‘( ) and ( )’ block, drag it to the coding area, and place it in the if condition of the ‘if ( ) then ( ) else ( )’ block.
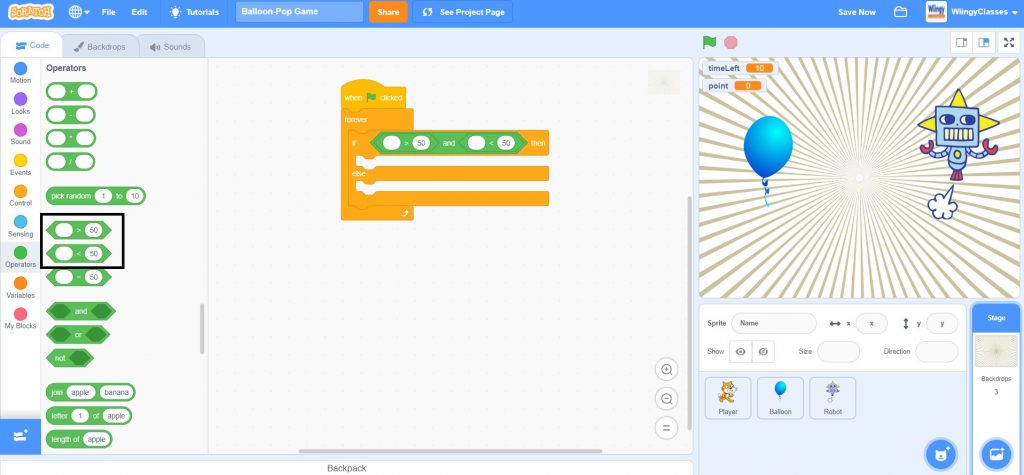
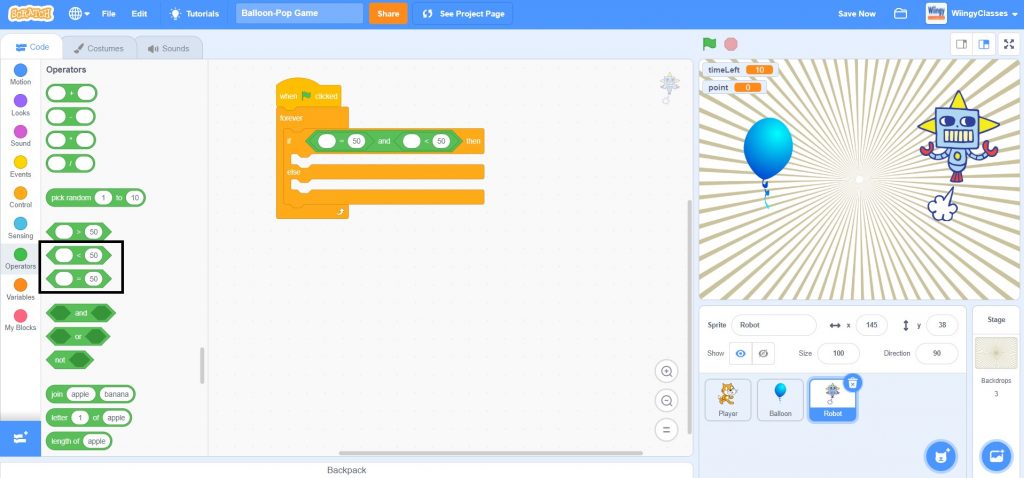
- Step 5: From the “Operators” block in the block palette, select the ‘( ) > ( )’ block and ‘( ) < ( )’ block, drag them to the coding area, and place them in the first and second value places of the ‘( ) and ( )’, respectively.
- Step 6: Go to the “Variables” block in the block palette, select the ‘point’ block, drag it to the coding area, and place it in the first value part of the ‘( ) > ( )’ block and in the second value part of the ‘( ) > ( )’, enter the value ‘4’, as shown below.
- Step 7: Again go to the “Variables” block in the block palette, select the ‘timeLeft’ block, drag it to the coding area, and place it in the first value part of the ‘( ) < ( )’ block and in the second value part of the ‘( ) < ( )’, enter the value ‘11’, as shown below.
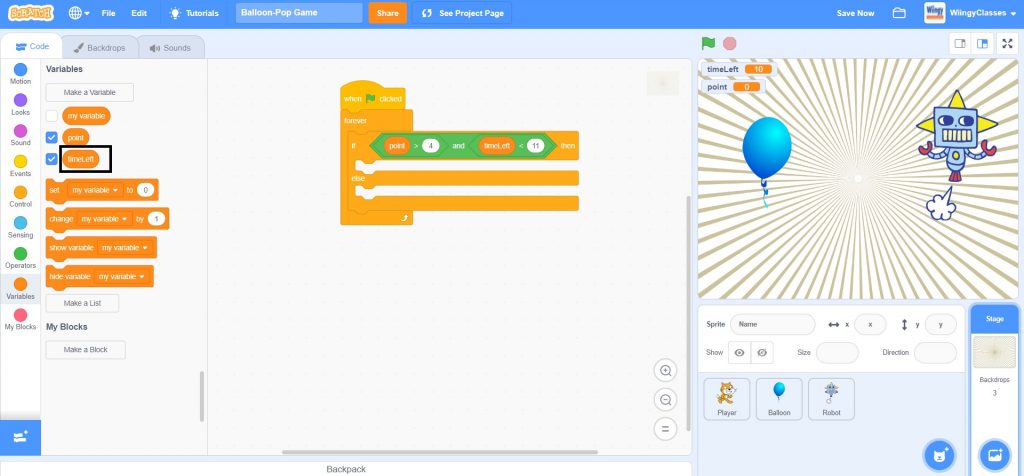
- Step 8: Go to the “Looks” block in the block palette, select the ‘switch backdrop to ( )’ block, drag it to the coding area, and place it in the then condition of the ‘if ( ) then ( ) else ( )’ block.
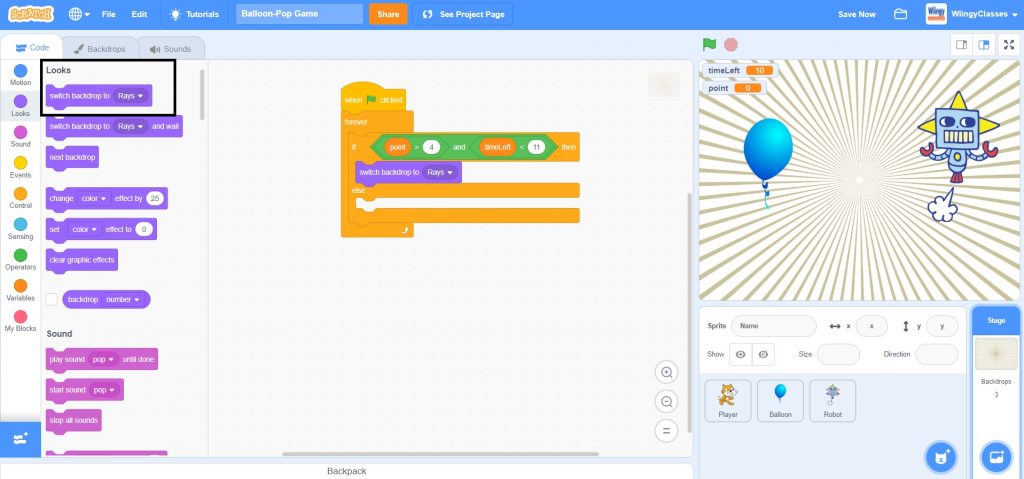
- Step 9: In the ‘switch backdrop to ( )’ block, select the value as ‘Circles’ from the drop-down menu.
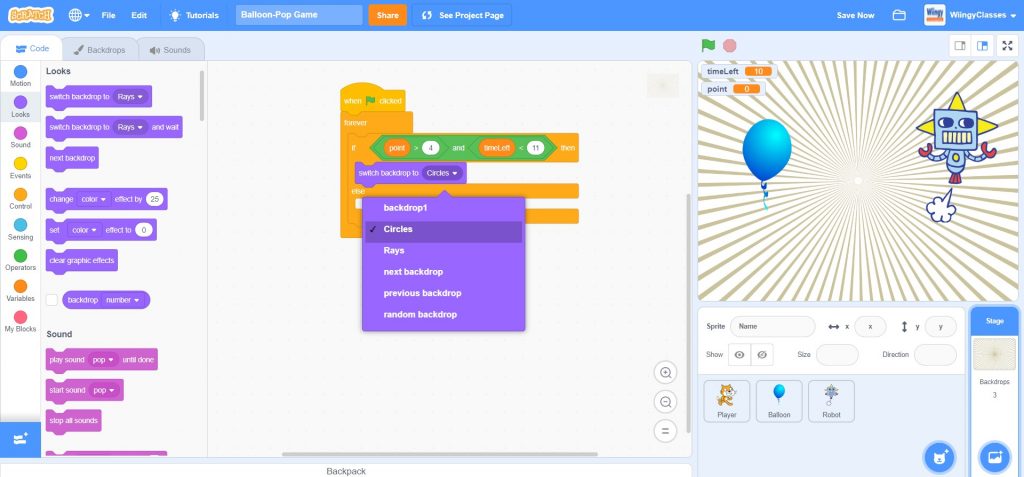
- Step 10: From the “Looks” block in the block palette, again select the ‘switch backdrop to ( )’ block, drag it to the coding area, and place it in the else condition of the ‘if ( ) then ( ) else ( )’ block.
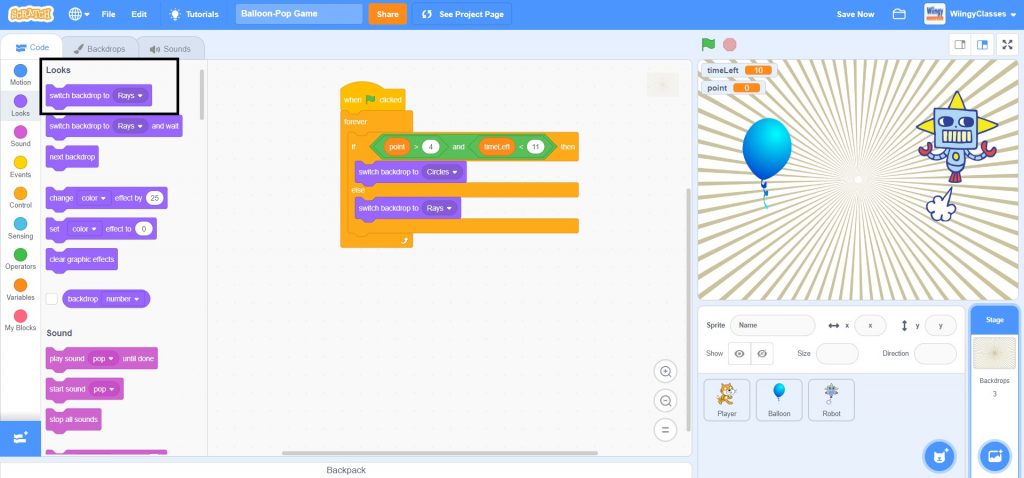
- Step 11: In the ‘switch backdrop to ( )’ block, select the value as ‘Rays’ from the drop-down menu.

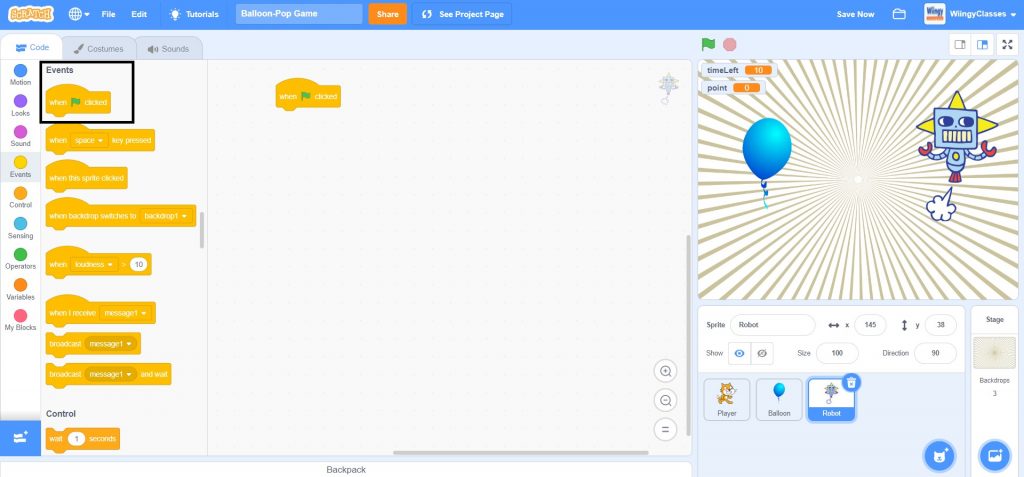
Code for the ‘Robot’ sprite
In this part, you need to code for the ‘Robot’ sprite which will keep track of the time which is left in the game for the player. Make sure that the ‘Robot’ sprite is selected while coding this part.
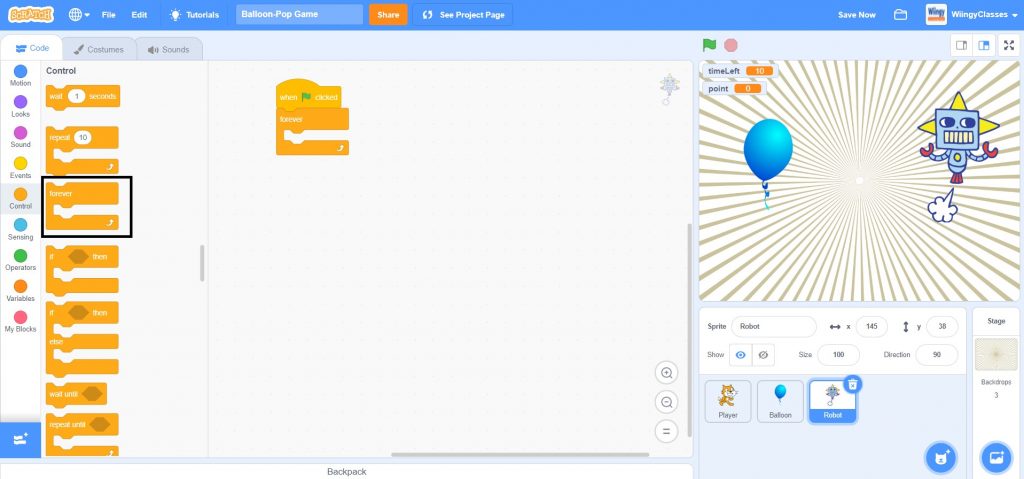
- Step 1: Go to the “Events” block in the block palette, select the ‘when green flag clicked’ block, and drag it to the coding area.
- Step 2: Go to the “Control” block in the block palette, select the ‘forever’ block, drag it to the coding area, and place it under the ‘when green flag clicked’ block.
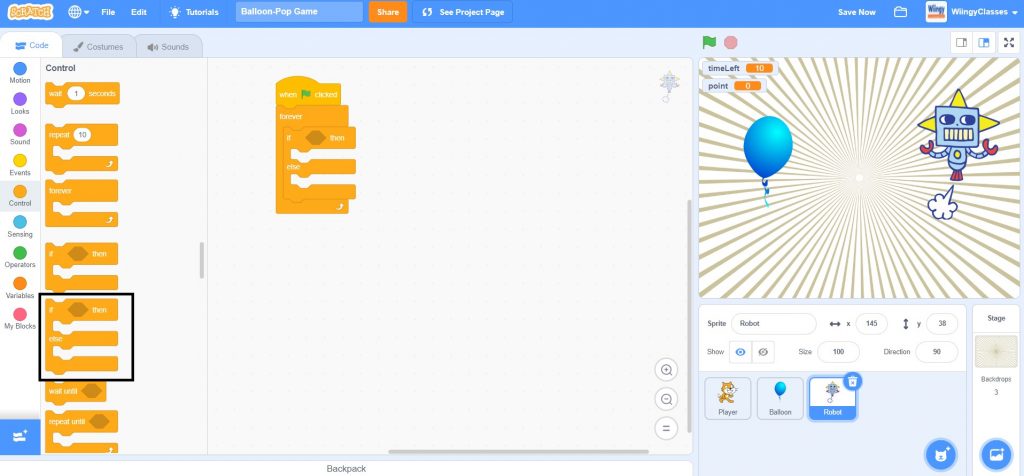
- Step 3: From the “Control” block in the block palette, select the ‘if ( ) then ( ) else ( )’ block, drag it to the coding area, and place it inside the ‘forever’ block.
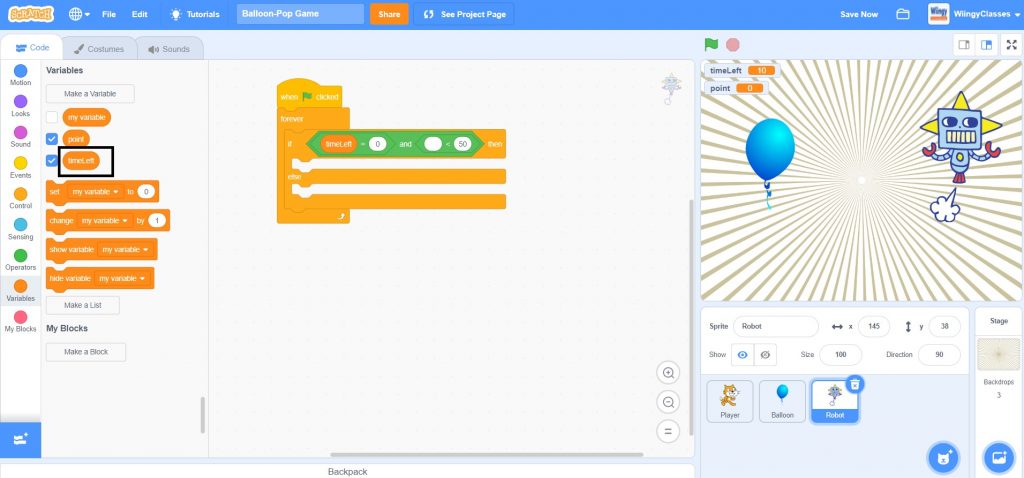
- Step 4: Go to the “Operators” block in the block palette, select the ‘( ) and ( )’ block, drag it to the coding area, and place it in the if condition of the ‘if ( ) then ( ) else ( )’ block.
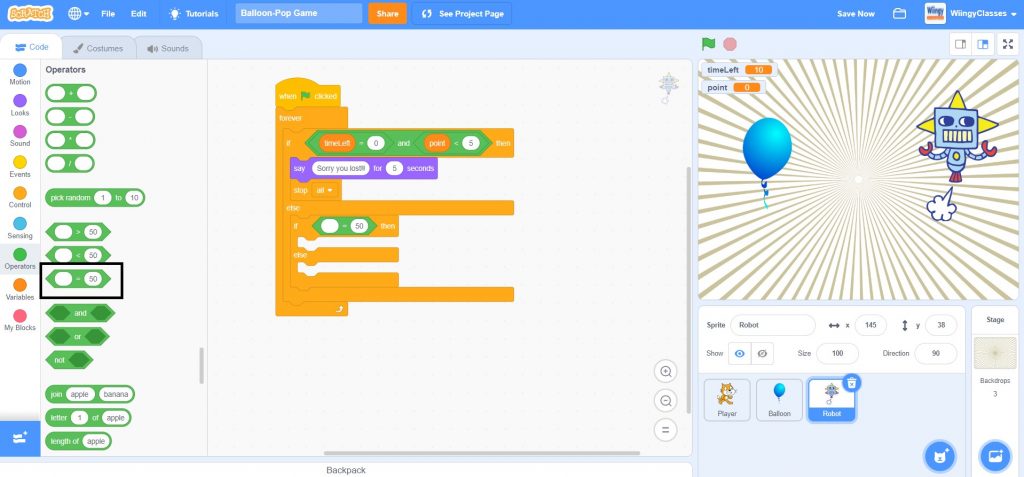
- Step 5: From the “Operators” block in the block palette, select the ‘( ) = ( )’ block and ‘( ) < ( )’ block, drag them to the coding area, and place them in the first and second value places of the ‘( ) and ( )’, respectively.
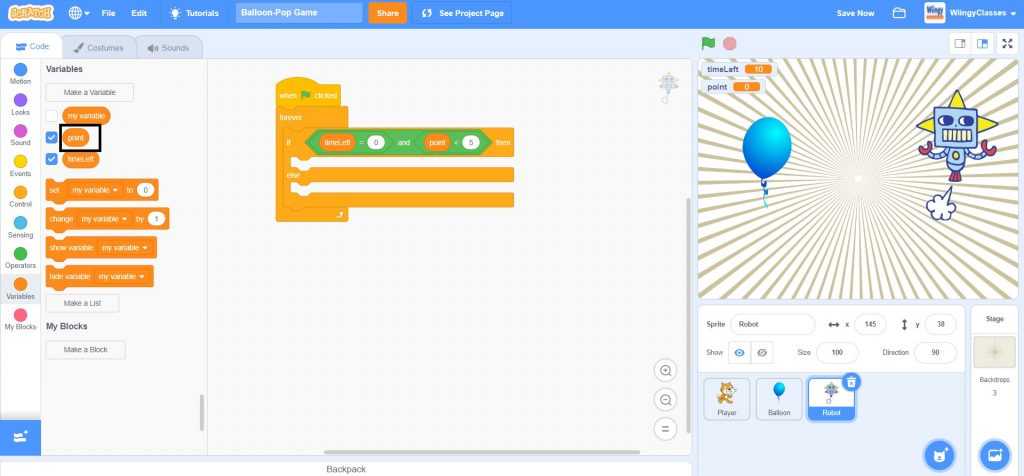
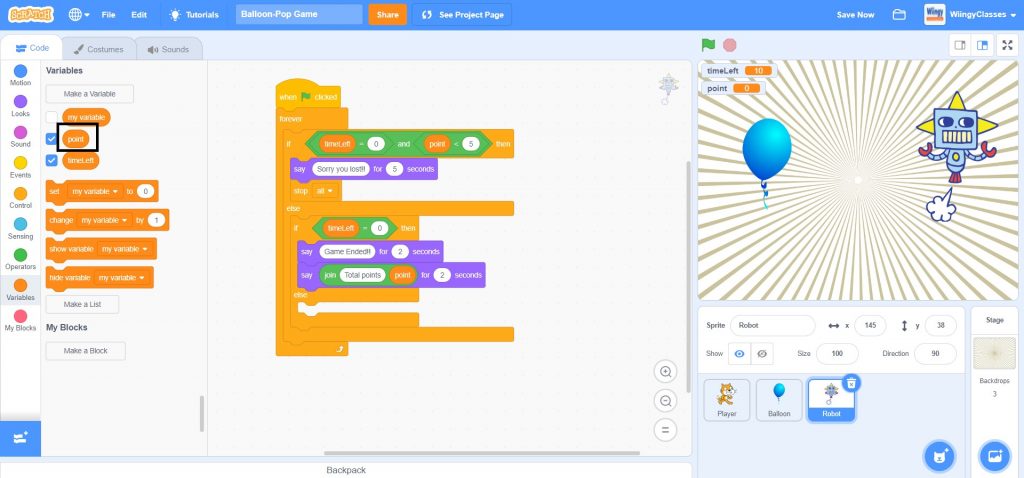
- Step 6: Go to the “Variables” block in the block palette, select the ‘timeLeft’ block, drag it to the coding area, and place it in the first value part of the ‘( ) = ( )’ block and in the second value part of the ‘( ) = ( )’, enter the value ‘0’, as shown below.
- Step 7: Again go to the “Variables” block in the block palette, select the ‘point’ block, drag it to the coding area, and place it in the first value part of the ‘( ) < ( )’ block and in the second value part of the ‘( ) < ( )’, enter the value ‘5’, as shown below.
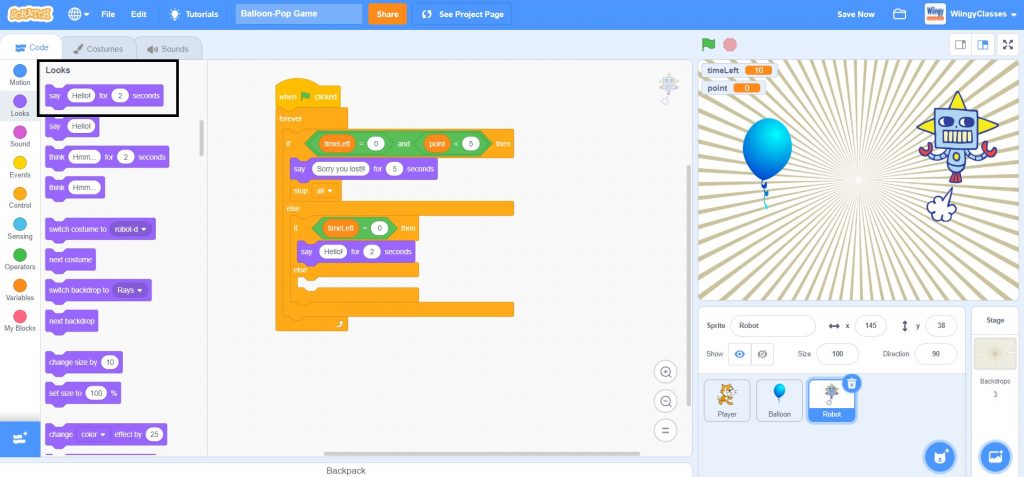
- Step 8: Go to the “Looks” block in the block palette, select the ‘say ( ) for ( ) seconds’ block, drag it to the coding area, and place it in the then condition of the ‘if ( ) then ( ) else ( )’ block.

- Step 9: In the ‘say ( ) for ( ) seconds’ block, enter the text ‘Sorry you lost!!’ in the first value place, and for the second value place, enter the value ‘5’.
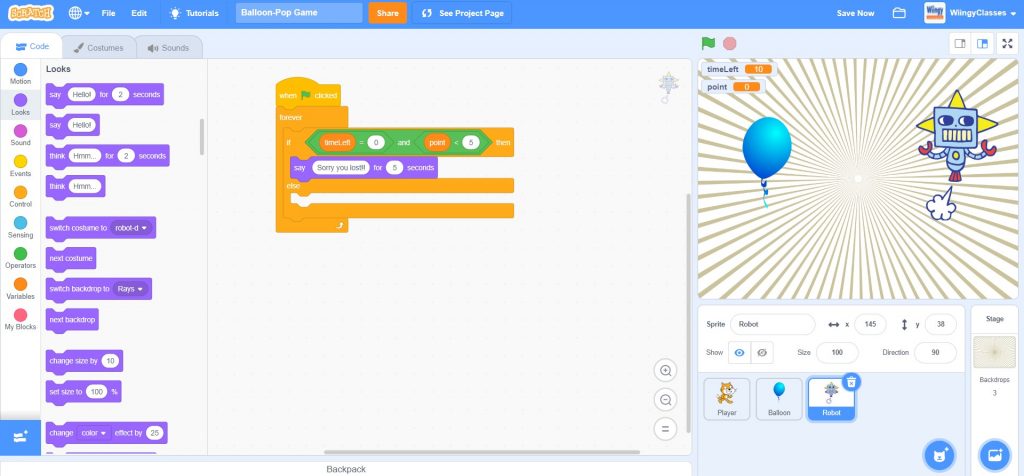
- Step 10: Go to the “Control” block in the block palette, select the ‘stop (all)’ block, drag it to the coding area, and place it under the ‘say ( ) for ( ) seconds’ block in the then condition of the ‘if ( ) then ( ) else ( )’ block.
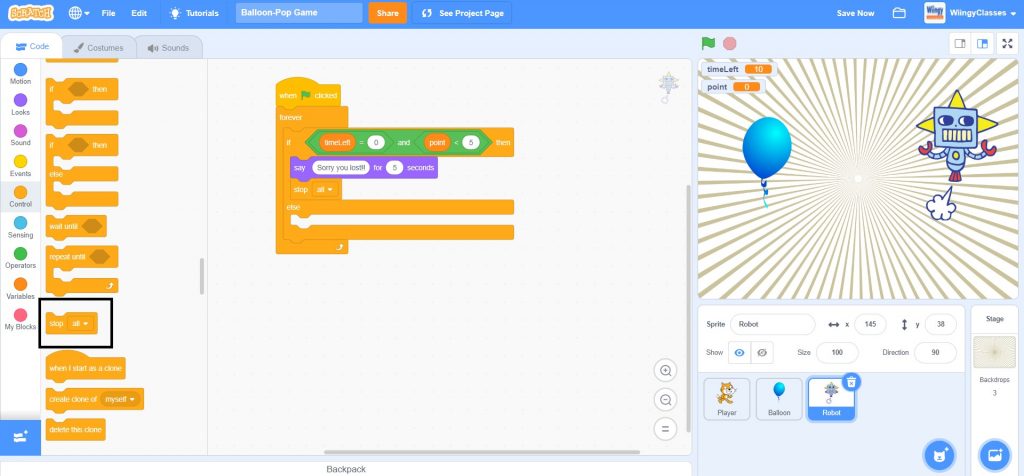
- Step 11: Go to the “Control” block in the block palette, again select the ‘if ( ) then ( ) else ( )’ block, drag it to the coding area, and place it in the else condition of the ‘if ( ) then ( ) else ( )’ block.
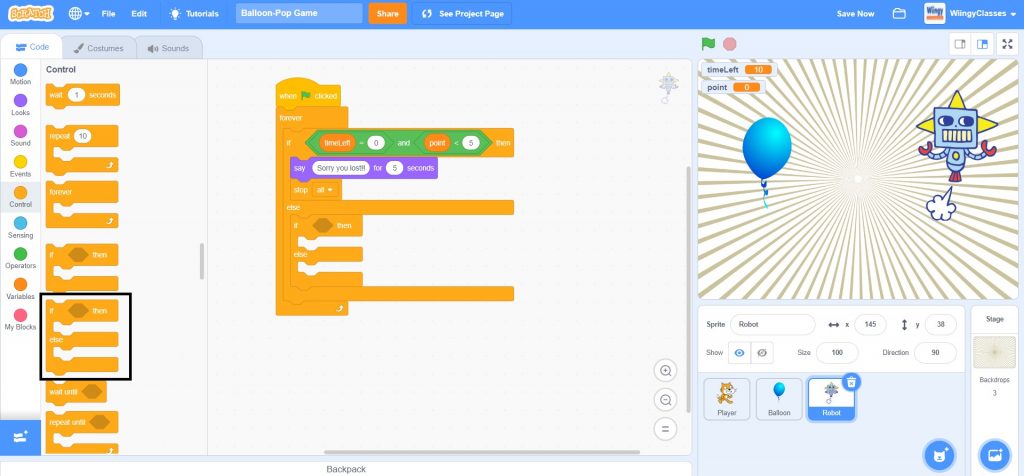
- Step 12: Go to the “Operators” block in the block palette, select the ‘( ) = ( )’ block, drag it to the coding area, and place it in the if condition of the ‘if ( ) then ( ) else ( )’ block.
- Step 13: Go to the “Variables” block in the block palette, select the ‘timeLeft’ block, drag it to the coding area, and place it in the first value part of the ‘( ) = ( )’ block and in the second value part of the ‘( ) = ( )’, enter the value ‘0’, as shown below.

- Step 14: Go to the “Looks” block in the block palette, select the ‘say ( ) for ( ) seconds’ block, drag it to the coding area, and place it in the then condition of the ‘if ( ) then ( ) else ( )’ block.
- Step 15: In the ‘say ( ) for ( ) seconds’ block, enter the text ‘Game Ended!!’ in the first value place and for the second value place, enter the value ‘2’.
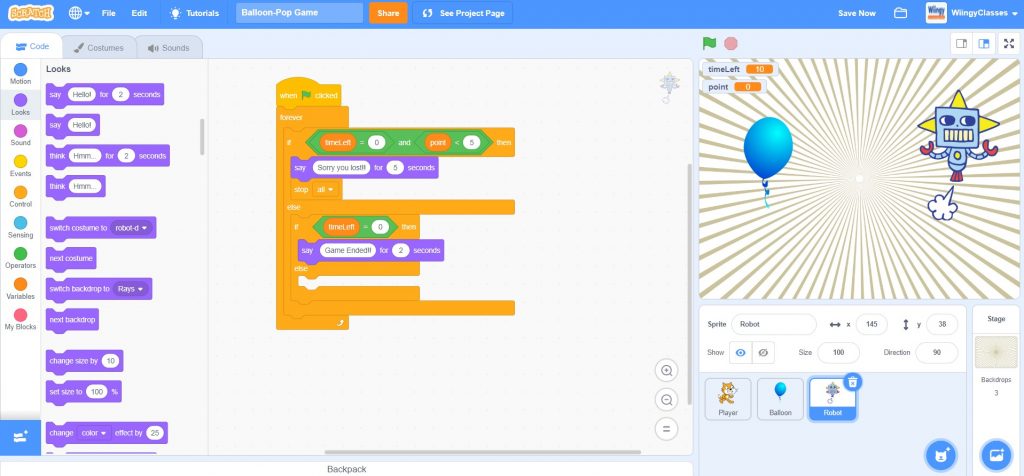
- Step 16: From the “Looks” block in the block palette, again select the ‘say ( ) for ( ) seconds’ block, drag it to the coding area, and place it under the first ‘say ( ) for ( ) seconds’ block in the then condition of the ‘if ( ) then ( ) else ( )’ block.
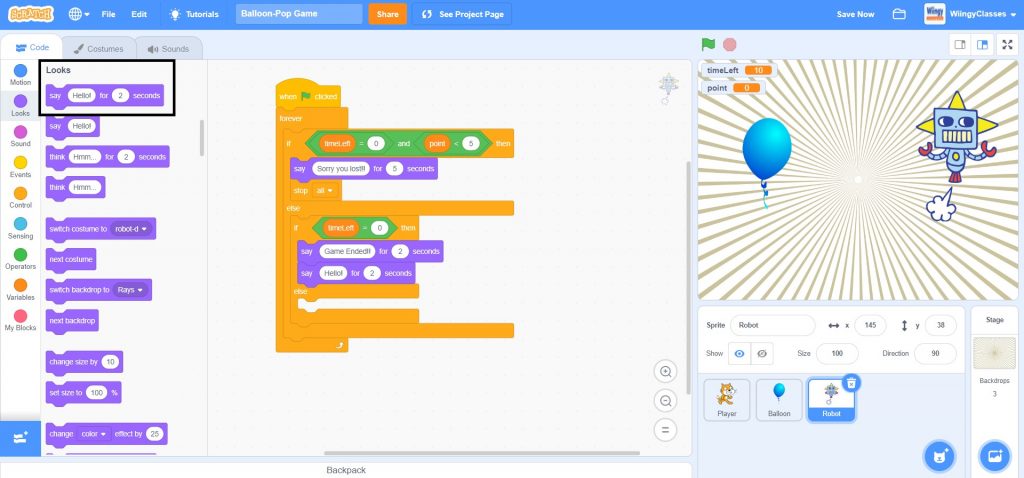
- Step 17: Go to the “Operators” block in the block palette, select the ‘join ( ) ( )’ block, drag it to the coding area, and place it in the first vale part of the ‘say ( ) for ( ) seconds’ block.
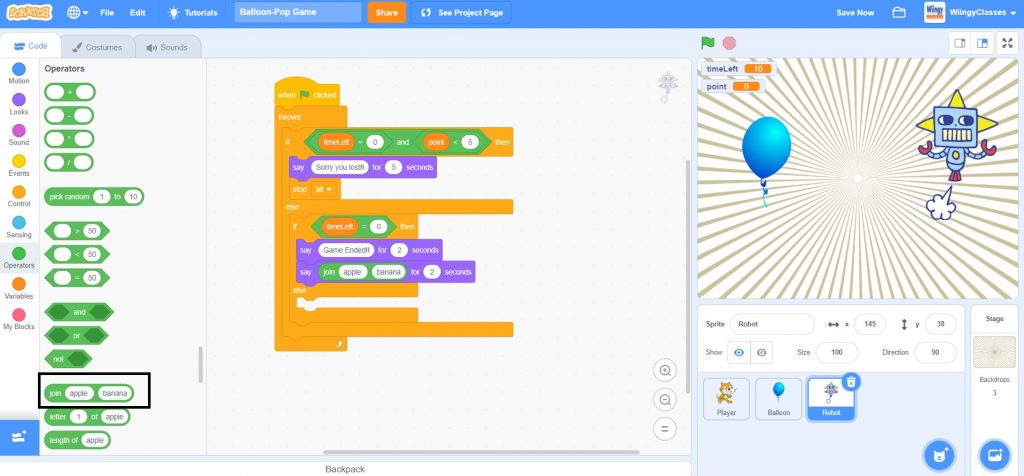
- Step 18: Go to the “Variables” block in the block palette, select the ‘point’ block, drag it to the coding area, and place it in the second value part of the ‘join ( ) ( )’ block and in the first value part of the ‘join ( ) ( )’ block, enter the text ‘Total points’. Also, enter the value ‘2’ in the second value part of the second ‘say ( ) for ( ) seconds’.
- Step 19: Go to the “Control” block in the block palette, select the ‘if ( ) then ( )’ block, drag it to the coding area, and place it in the else condition of the second ‘if ( ) then ( ) else ( )’ block.
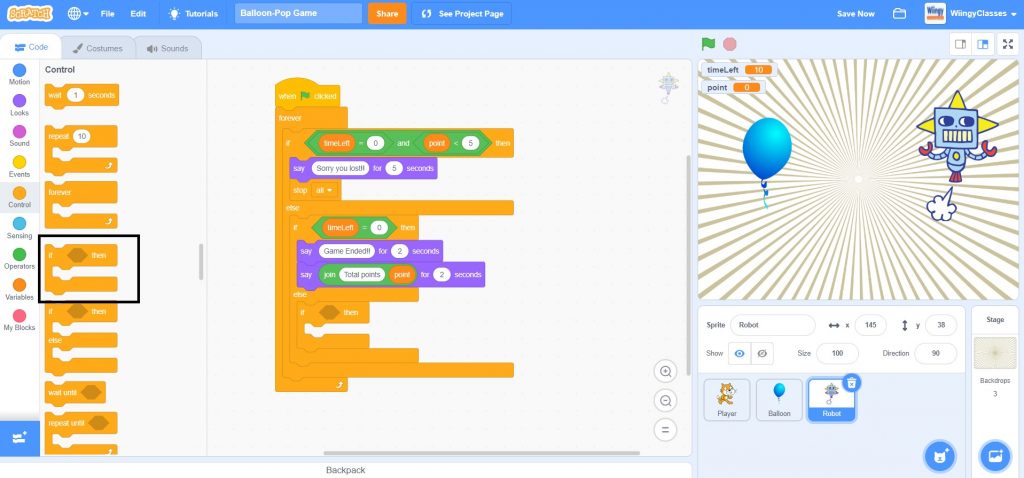
- Step 20: Go to the “Operators” block in the block palette, select the ‘( ) and ( )’ block, drag it to the coding area, and place it in the if condition of the ‘if ( ) then ( )’ block.

- Step 21: From the “Operators” block in the block palette, select the ‘( ) < ( )’ block and ‘( ) > ( )’ block, drag them to the coding area, and place them in the first and second value places of the ‘( ) and ( )’, respectively.
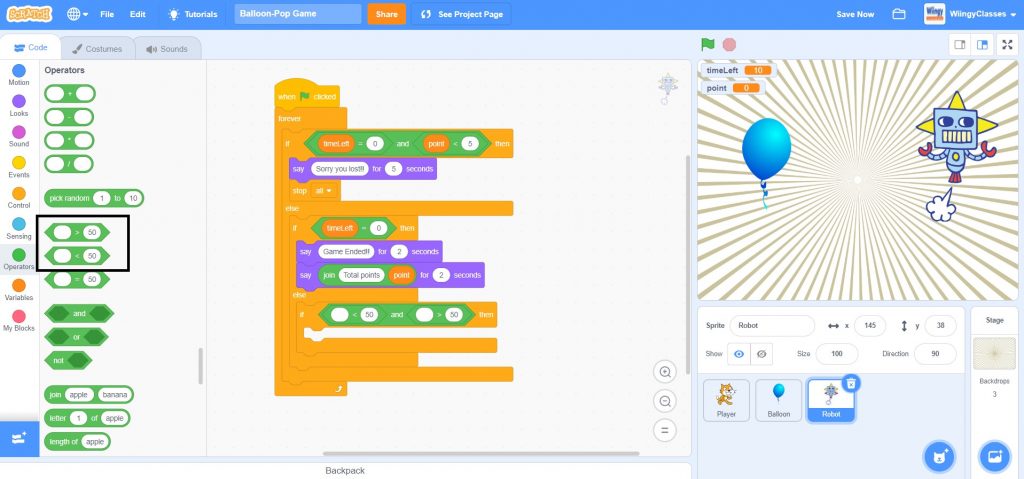
- Step 22: Go to the “Variables” block in the block palette, select the ‘timeLeft’ block, drag it to the coding area, and place it in the first value part of the ‘( ) < ( )’ block and in the second value part of the ‘( ) < ( )’, enter the value ‘10’, as shown below.
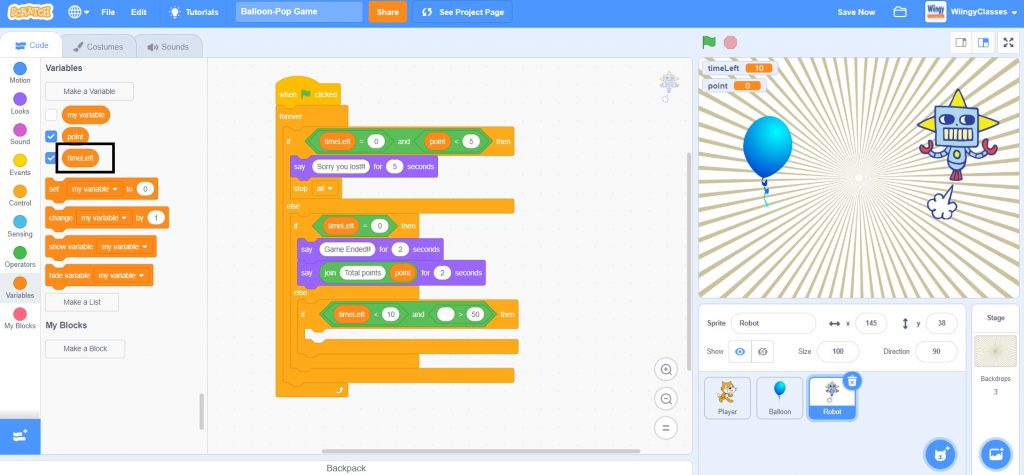
- Step 23: Again go to the “Variables” block in the block palette, select the ‘point’ block, drag it to the coding area, and place it in the first value part of the ‘( ) > ( )’ block and in the second value part of the ‘( ) > ( )’, enter the value ‘4’, as shown below.
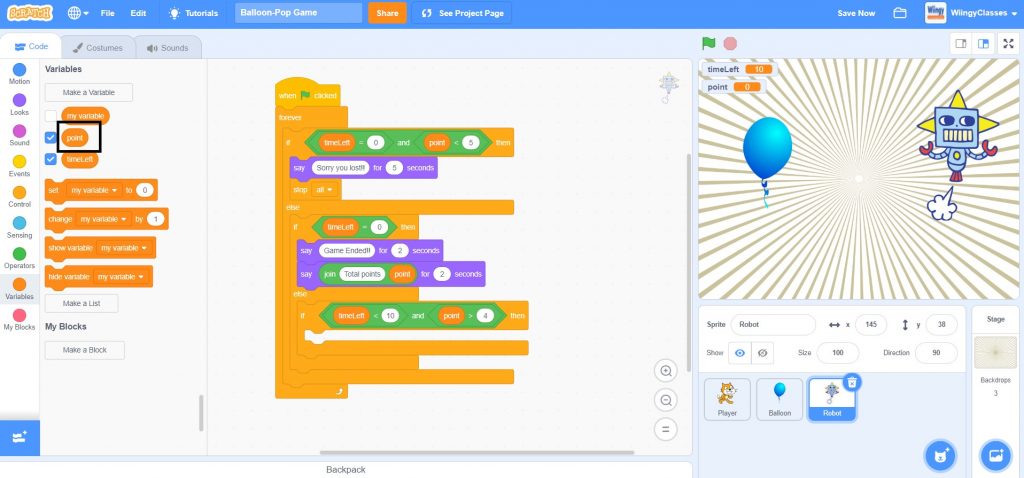
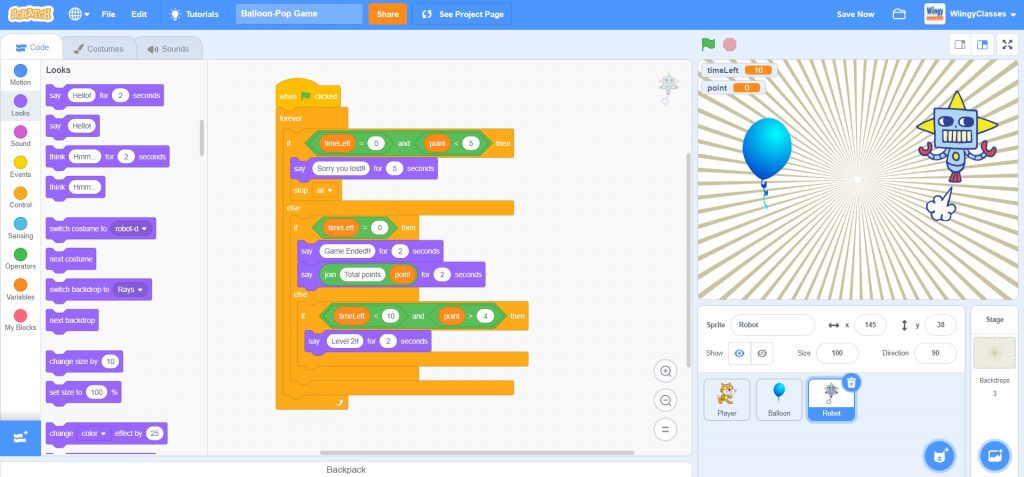
- Step 24: Go to the “Looks” block in the block palette, select the ‘say ( ) for ( ) seconds’ block, drag it to the coding area, and place it in the then condition of the ‘if ( ) then ( )’ block.
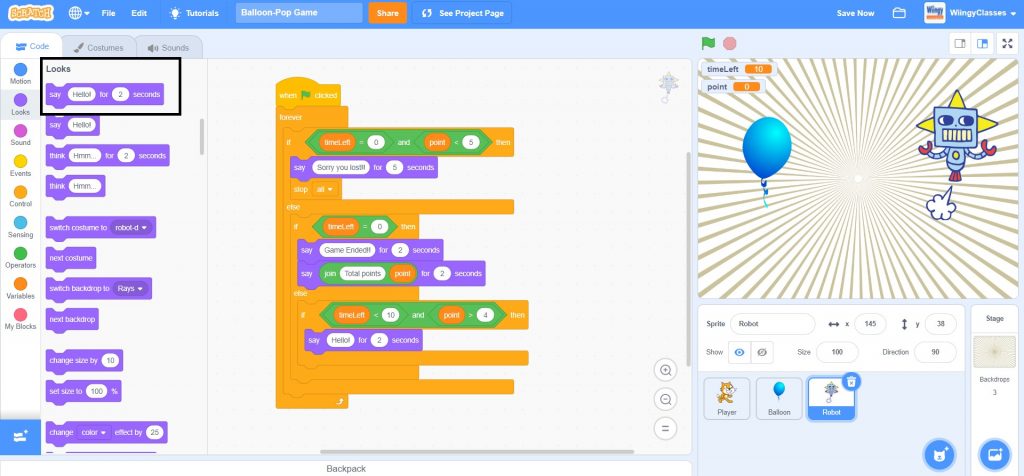
- Step 25: In the ‘say ( ) for ( ) seconds’ block, enter the text ‘Level 2!!’ in the first value place and for the second value place, enter the value ‘2’.
Your ‘Balloon-Pop’ game is finally ready !!
Free game code access
Conclusion
Making multi-level games in Scratch is super fun!! Adding levels to a simple game makes the game more exciting, fun, adventurous, and interesting for the players to play. Also, multi-level games are always considered better than single-level games by the users.
Looking to learn Scratch coding? Explore Wiingy’s Online Scratch Coding Classes For Kids to learn from top Scratch coding experts.
FAQs on How to make a game with levels in Scratch
Which types of games among the single-level games and multi-level games are more fun to play?
Multi-level games are more fun to play because a game having multiple levels brings new challenges for the players to explore and win.
Why more levels should be added to a game?
More levels should be added to the games as the levels keep the players going. The more levels the player completes, the more powerful and achievable they feel in the game which helps them in gaining more experience with each new level and challenge.
What is the purpose of the game explained in this blog?
The game explained in this blog is a “Balloon-Pop” game which is a multilevel game in which the player has to pop at least 10 balloons which will be moving at a fast pace and as the player accomplishes the challenge, he/she will be moving on to the next level.
How does a multi-level game works?
In multi-level games, each level contains some set of obstacles and the player needs to overcome the obstacles to complete the game. When a player clears one level, they will be moving on to the next level of that game which has slightly more difficulty than the previous level.
What is the use of Events blocks in Scratch?
In Scratch, Events blocks are the most important blocks as these blocks are used to define when a script should run.
We hope you understand how to make a game with levels in Scratch. If you have any doubts, you can ask your doubts in the comment section. If you found this game interesting, then read our other game tutorials like Pac-man game, multiplayer game, and many more!


