Extensions in Scratch are a category of blocks that can be added to the block palette to enhance the scope of the Scratch editor and make Scratch projects much more creative. There are different types of extensions that can be added from the category of extensions block palette to enhance the scope of the Scratch editor and make Scratch projects much more creative. In this article, we will discuss the extensions of Scratch in detail.
Looking to learn Scratch coding? Explore Wiingy’s Online Scratch Coding Classes For Kids to learn from top Scratch coding experts.
What are extensions in Scratch?
The Extension block in Scratch adds new blocks to the block palette. Apart from the nine basic blocks in Scratch, we can add some extra blocks like music, pens, etc. We can also connect external hardware like micro:bit, LEGO Mindstorms, etc., with the help of the extension blocks in Scratch.
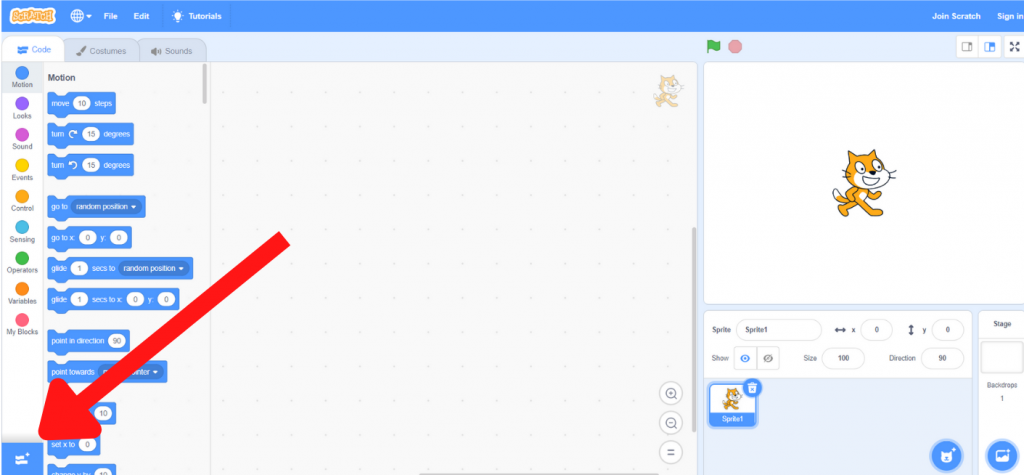
It is also possible to connect our Scratch projects with sources of information on the web, such as Amazon text-to-speech and Google translate. The extension block in Scratch is located at the bottom of the block palette, as shown in the image below. There are a total of 11 extension blocks in Scratch. Let’s discuss them in detail.
Scratch extensions list
In the extension block, a total of 11 code blocks can be added to the block palette to extend the scope of the Scratch editor. Let’s discuss in detail the different types of blocks in the extension block.
1. Music extension in Scratch
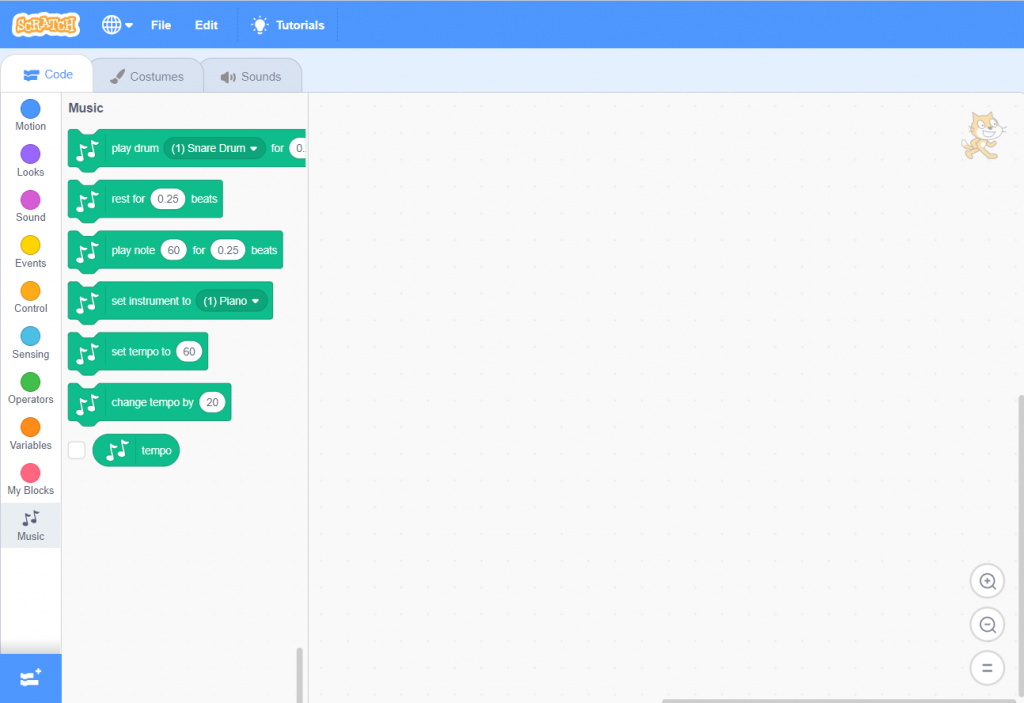
The music extension block in Scratch allows you to play MIDI notes with different instruments. There are a total of 7 music extension blocks; 6 are stack blocks, and 1 is a reporter block. Stack blocks are rectangular-shaped blocks that are shaped to fit above and below other blocks. whereas the reporter blocks are blocks that report a value, and these blocks cannot be placed above or below any blocks.
You can add some interesting instrumental music, like a drum, bongo, etc., to your Scratch project. All the code blocks under the extension blocks are:
- “play drum for () sec”– with this code block you can play the selected instrument for the given period of time. You can select the instrument from the drop-down menu. You can also edit the time inside the block to fit your requirements.
- “rest for () beats”– this block pauses the script for a specified number of beats. You can edit the number of beats for specified beats.
- “play note for () for () beats“- with this block you can play a specified note with the selected set instrument for the specified number of beats.
- “set instrument to ()”– this block will change the instrument that the “play note for () for () beats” block will play.
- “set tempo ()”– this block will set the Scratch project’s tempo or speed to a specified amount mentioned inside the block.
- “change tempo by ()“- this block will change the Scratch project’s tempo or speed to a specified amount mentioned inside the block.
- “tempo“- this block reports the project’s tempo.
2. Pen extension in Scratch
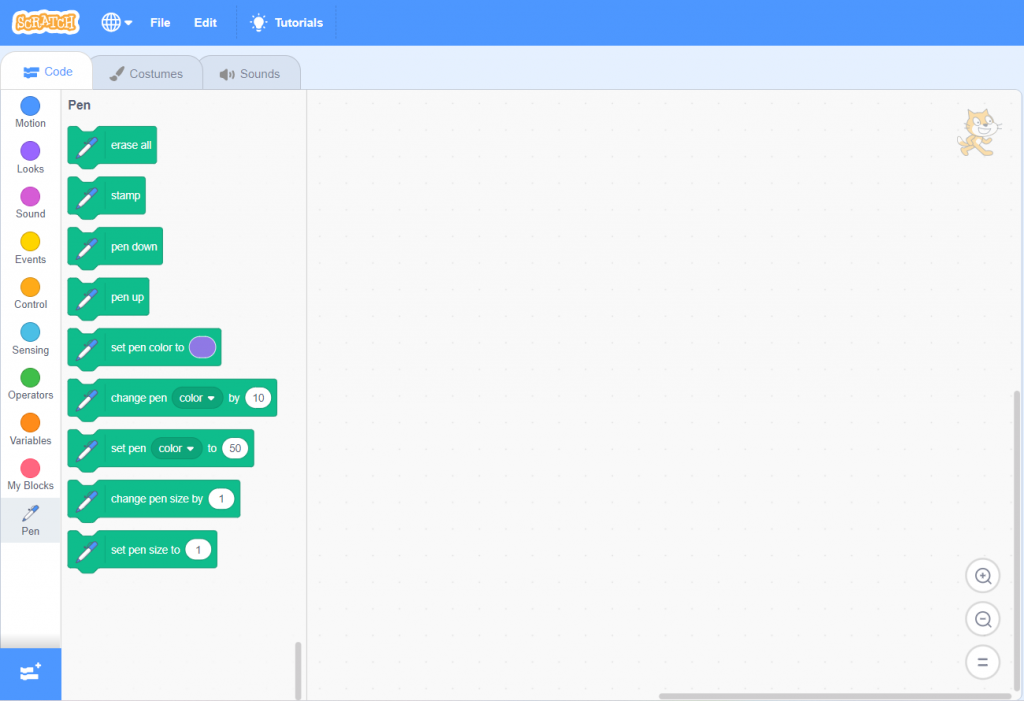
The pen extension block allows you to draw with a pen on the scratch stage. It allows the sprite to draw shapes, plot colored pixels, etc. There are a total of 9 blocks on the pen extension block, and all of them are stack blocks. Stack blocks are rectangular-shaped blocks that are shaped to fit above and below other blocks. Let’s discuss them in detail.
- “erase all“- this block will erase all the marks made by the pen or stamping.
- “stamp“- when you use this particular block, the sprite will create a bitmap image of itself which is stamped on the screen.
- “pen up“- If you use this block, it will stop the sprite from drawing.
- “pen down“- using this block will make the sprite draw a trail with the pen whenever it moves until the “pen up” block is used.
- “set pen color to ()“- this block will set the color of the pen to the selected color. You can select any color from the drop-down menu.
- “change pen () by ()“- this block changes the specified value by the number input. You can change the pen’s brightness, transparency, and many more features from the drop-down menu.
- “set pen () to ()“- this block sets the pen’s color, brightness, saturation, and transparency by the number input.
- “change pen size ()“- this block will change the size of the pen by a specified amount.
- “set pen size ()“- this block will set the pen size to the specified amount.
3. Video extension in Scratch
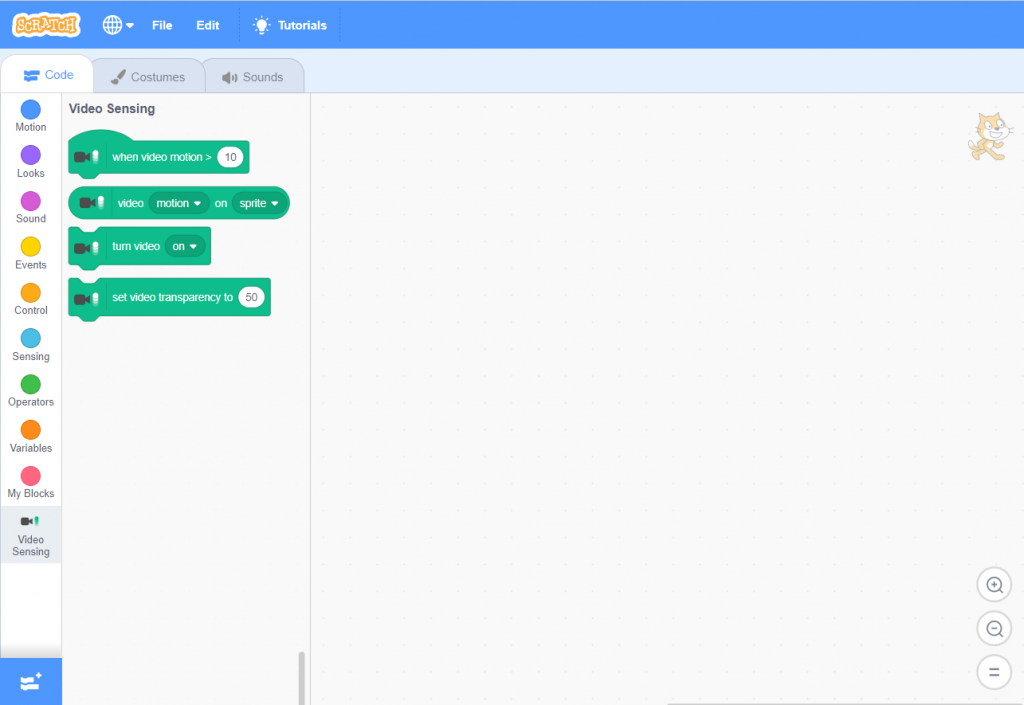
The video sensing extension block in Scratch lets your projects interact with your webcam. The blocks under this extension sense motion with the webcam. There are a total of 4 sensing blocks: 1 hat block, 1 reporter, and 2 stack blocks. Let’s discuss them in detail.
Stack blocks are rectangular-shaped blocks that are shaped to fit above and below other blocks. The reporter blocks are blocks that report a value, and these blocks cannot be placed above or below any other blocks. The hat blocks are those blocks that start a script when a specific event occurs.
- “when video motion > ()“- this block gets activated when the current motion picture on the stage is greater than the number entered inside the block.
- “video () on ()“- this block gets the value of the video, either the motion or direction on either the sprite or stage.
- “turn video ()“- this block turns the camera on or off.
- “set video transparency to ()“- this block sets the video transparency to a specified number mentioned inside the block.
4. Text to speech extension in Scratch
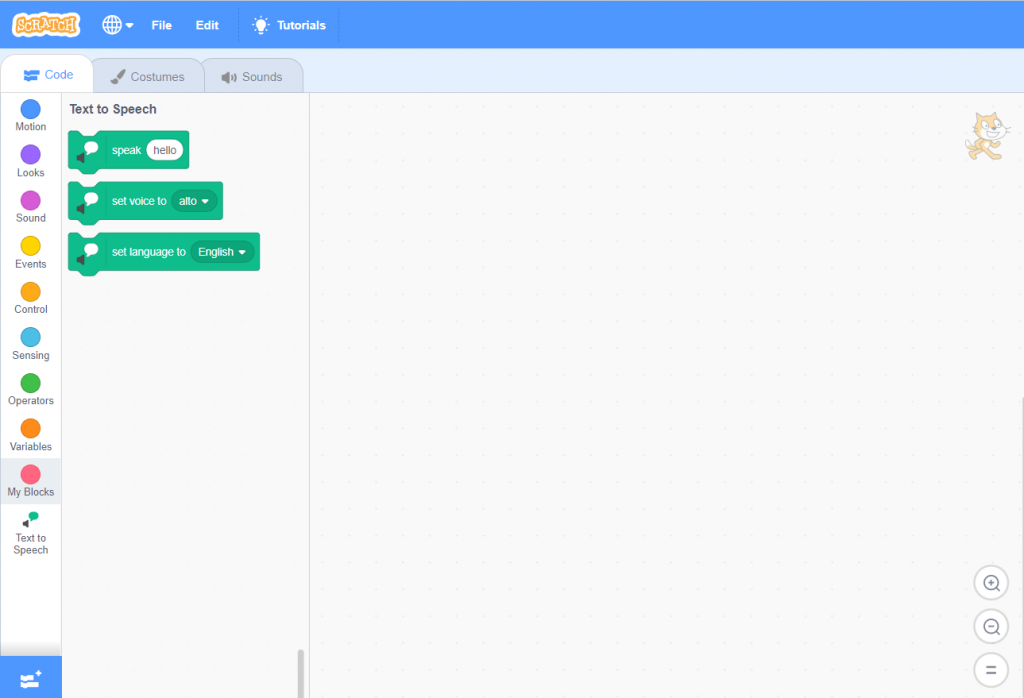
This extension block will make your Scratch projects talk. The text-to-speech extension in Scratch allows the text in the Scratch projects to be read out aloud. There are a total of three blocks in this extension, and all of them are stack blocks. Stack blocks are rectangular-shaped blocks that are shaped to fit above and below other blocks. Let’s discuss them in detail.
- “speak ()“- this block uses a text-to-speech tool to read out the given text in your project.
- “set voice to ()“- this block changes the current voice in the project.
- “set language to ()“- with this block, you can choose which language you want the text to be read in. There are multiple languages you can choose from.
5. Translate extension in Scratch
This extension block translates a given word into the selected language. There are a lot of languages you can choose from. There are a total of 2 blocks under this extension, and all of them are reporter blocks. The reporter blocks are blocks that report a value, and these blocks cannot be placed above or below any other blocks. Let’s discuss them in detail.
- “translate () to ()“- This block translates the specific word or sentence, mentioned inside the block, to the selected language from the drop-down menu. There are currently 48 languages you can translate your text to
- “language“- this block returns the Scratch website language back to the current user unless the language is not available in the drop-down menu of the “translate () to ()” block.

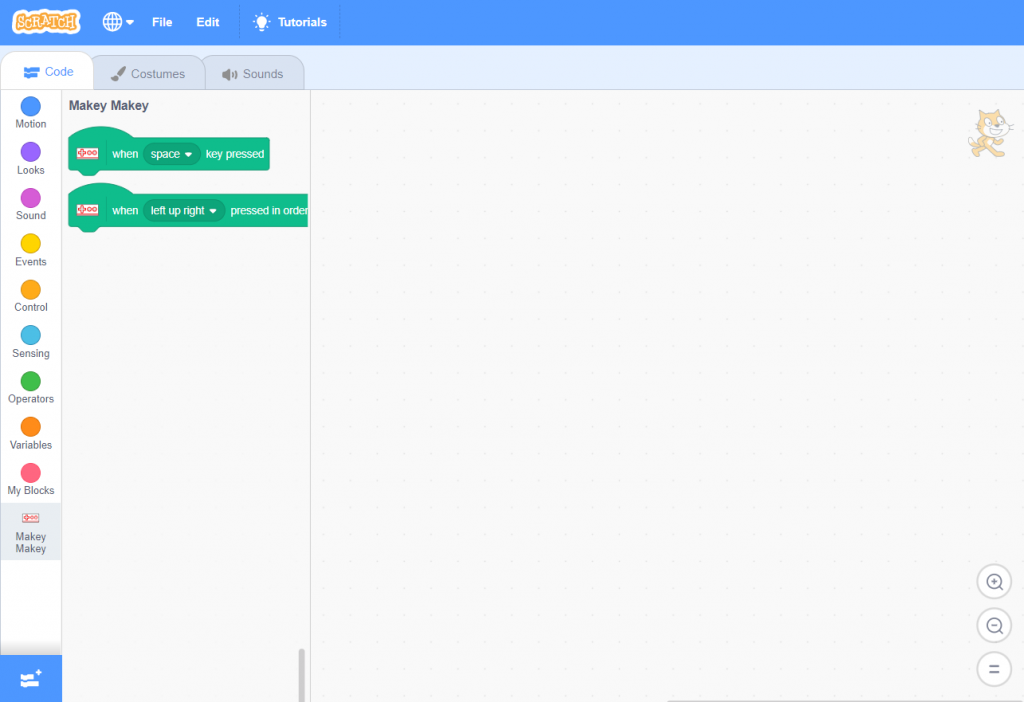
6. Makey Makey extension in Scratch
The Makey Makey extension allows Scratch to interact with Makey Makey. Makey Makey is a hardware kit that is designed to connect everyday objects to computer keys. There are a total of 2 blocks under this extension, and both of them are hat blocks. The hat blocks are those blocks that start a script when a specific event occurs. Let’s discuss them in detail.
- “when () key pressed“- this block activates the script when the specified key is pressed.
- “when () pressed in order“- this block activates when the specified keys are pressed in that order.
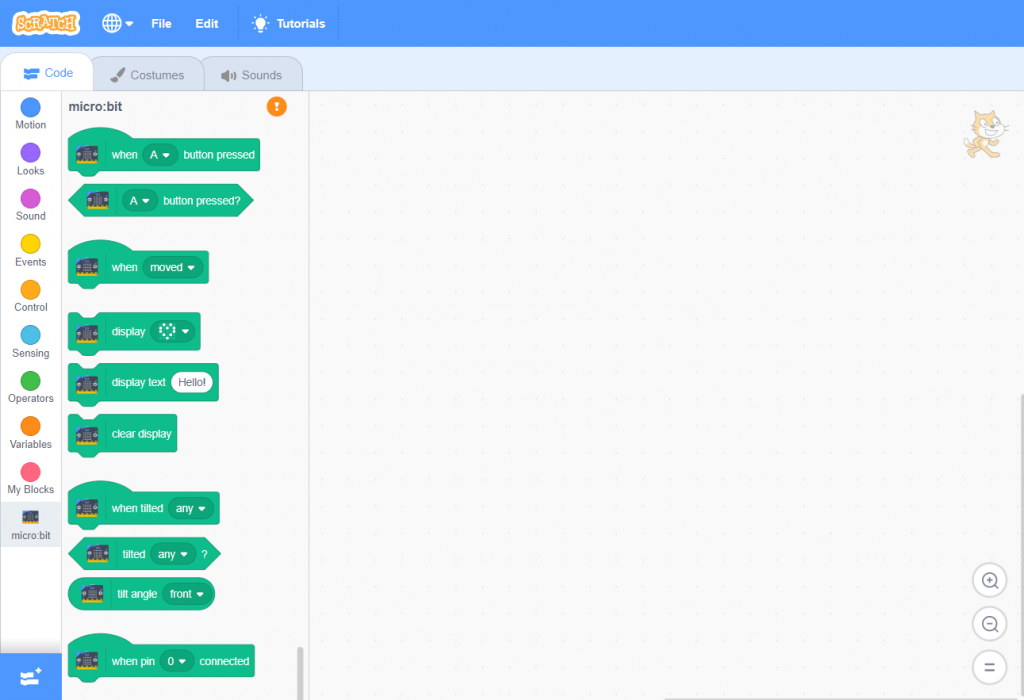
7. Micro:bit extension in Scratch
With this extension, you can run your Scratch project on your micro:bit device and give it a physical outlet. A micro:bit is a pocket-size computer that introduces kids to how software and hardware work together. It is an interactive and programmable device that consists of various input-output features such as an LED light display, sensors, buttons, etc. For this extension to work, you need to first connect your micro:bit to your computer or laptop.
There are a total of 10 blocks under this extension: 4 hat blocks, 4 stack blocks, and 2 boolean blocks. Stack blocks are rectangular-shaped blocks that are shaped to fit above and below other blocks. The hat blocks are those blocks that start a script when a specific event occurs. Boolean blocks are elongated hexagonal blocks that report values that are true or false, and reporter blocks are blocks that report a value. Let’s discuss these blocks in detail.
- “when () button pressed“- this activates the script when A, B, or any button is pressed on the micro:bit device.
- “() button pressed?“- this is a boolean block. The options are A, B, or any. So, the block checks and reports if the specified button is being pressed or not on the micro:bit device.
- “when ()“- this block is activated when any of the following actions are performed, moved, shaken, and jumped.
- “display ()“- this block displays an icon on the micro:bit’s display when an action is performed. The default one is a heart icon.
- “display ()“- this block will display a text.
- “clear display“- this block will clear the micro:bit and turn off the LEDs.
- “when titled ()“- this block activates when the micro:bit is tilted in a specific direction.
- “tilted any?“- this is a boolean block. The options are left, right, front, back, or any. So, the block checks and reports if the micro:bit is being tilted in a specific direction or not.
- “tilt angle“- this block returns the micro:bit device’s tilt value in the specified direction.
- “when pin () connected“- this block is activated when the micro:bit is connected to a wire or any electrical conductor.
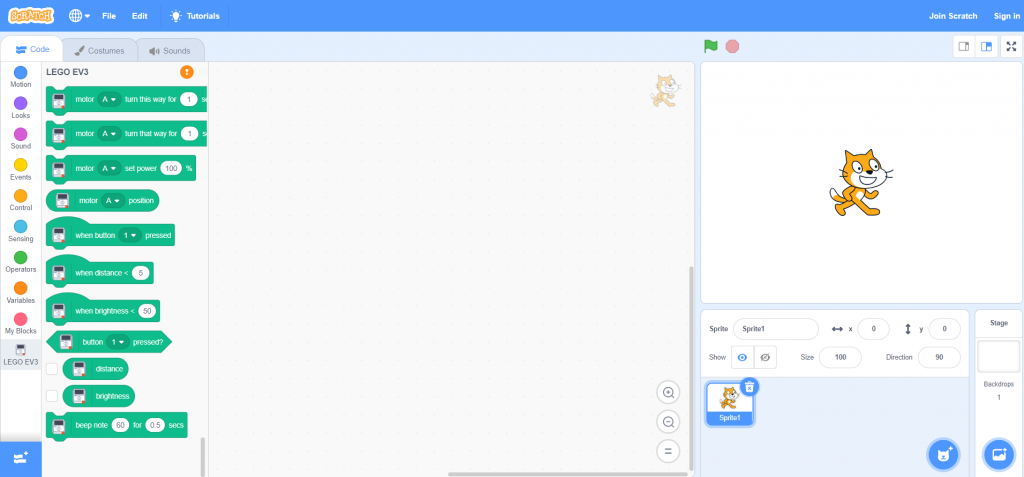
8. Lego Mindstorms EV3 extension in Scratch
This extension lets your projects interact with the Lego Mindstorms EV3. The Lego Mindstorms EV3 is a set that lets you build and program five starter, robot models. There are a total of 11 Lego Mindstorms EV3 extension blocks: 4 of them are stack blocks, 3 are hat blocks, 3 are reporter blocks, and 1 is a boolean block.
Stack blocks are rectangular-shaped blocks that are shaped to fit above and below other blocks. The reporter blocks are blocks that report a value, and these blocks cannot be placed above or below any other blocks. The hat blocks are those blocks that start a script when a specific event occurs. Boolean blocks are elongated hexagonal blocks that report values that are true or false, and reporter blocks are blocks that report a value. Let’s discuss these blocks in detail.
- “motor () turn () way for ()“- this block turns the specified motor, A, B, C, or D, in a clockwise direction for the specified number of seconds.
- “motor () turn () way for () ” this block turns the specified motor, A, B, C, or D, in a counterclockwise direction for the specified number of seconds.
- “motor () set power ()“- this block sets the specified motor’s, A, B, C, or D, battery to a specific percentage, 100 being the highest, mentioned inside the block.
- “motor () position“- this block returns the angles in degrees that the selected motor is positioned at.
- “when button () pressed“- this block activates when the specified button is pressed on the Lego Mindstorms EV3 device.
- “when distance < ()“- this block activates when the Lego Mindstorms EV3 device’s distance from the computer is less than the specified value.
- “when brightness < ()“- this block activates when the Lego Mindstorms EV3 device’s brightness is less than the specified value.
- “when () pressed?“- this block checks and reports whether the button connected to the Lego Mindstorms EV3 specified port is pressed or not.
- “distance“- this block checks and reports the distance between the Lego Mindstorms EV3 device and the computer system.
- “brightness“- this block checks and reports the brightness that the Lego Mindstorms EV3 device is sensing.
- “deep note () for ()“- this block beeps the selected MIDI note on the Lego Mindstorms EV3 device for the mentioned number of seconds.
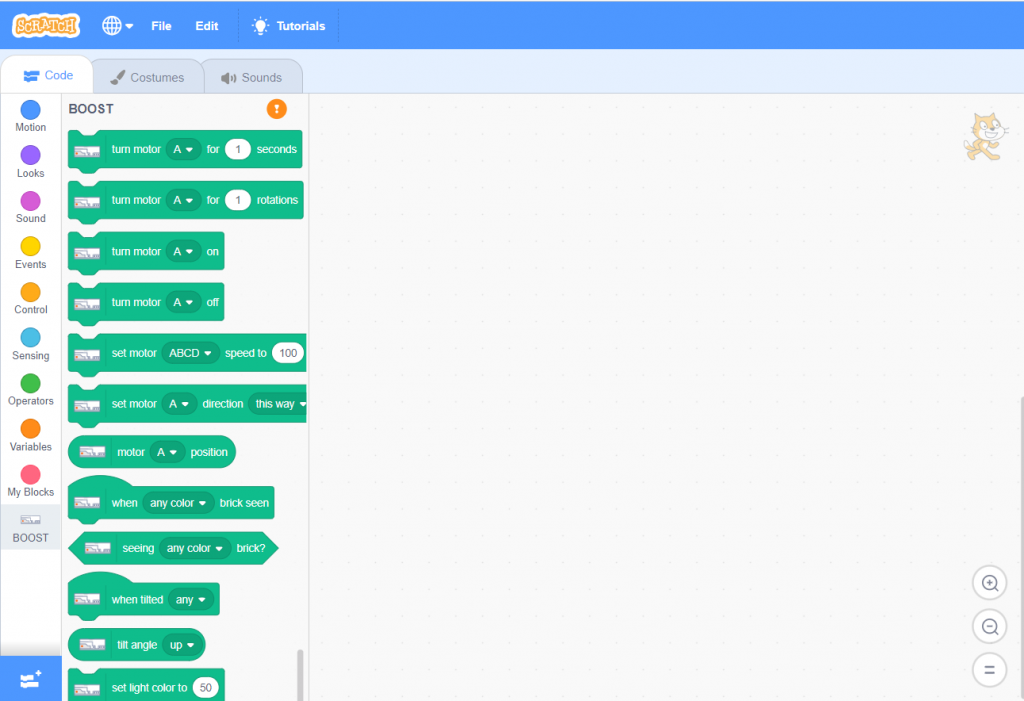
9. Lego Boost extension in Scratch
The Lego Boost extension lets you connect your Scratch project to your Lego Boost device. Lego Boost allows you to create models with motors and sensors and bring them to life through a simple coding command. There are a total of 12 blocks in this extension; 7 are stack blocks; 2 are reporter blocks; 2 hat blocks; and 1 is a boolean block.
Stack blocks are rectangular-shaped blocks that are shaped to fit above and below other blocks. The reporter blocks are blocks that report a value, and these blocks cannot be placed above or below any other blocks. The hat blocks are those blocks that start a script when a specific event occurs. Boolean blocks are elongated hexagonal blocks that report values that are true or false, and reporter blocks are blocks that report a value. Let’s discuss these blocks in detail.
- “turn motor () for () seconds“- this block turns the specified motor, A, B, C, or D, for the specified number of seconds.
- “turn motor () for () rotations”– this block turns the specified motor, A, B, C, or D, for the specified number of rotations.
- “turn motor () on“- this block turns on the specified motor, A, B, C, or D.
- “turn motor () off“- this block turns off the specified motor, A, B, C, or D.
- “set motor () speed to () %“- with this block you can set the specified motors, A, B, C, or D speed to the specified percentage.
- “set motor () direction ()“- this block sets the direction of the specified motors, A, B, C, or D to the specified direction.
- “motor () position“- this block checks and reports the specified motors, A, B, C, or D position.
- “when () brick seen“- this block has options of red, blue, green, yellow, white, black, and any color.
- “seeing () brick?“- this block has options of red, blue, green, yellow, white, black, and any color.
- “when tilted ()“- this block activates the script when the Lego boost device is tilted with the specified option.
- “tilt angle ()“- this block checks and reports the angle of tilt in a certain direction.
- “set light color to ()“- this block will set the light color on the Lego boost device to a specified value.
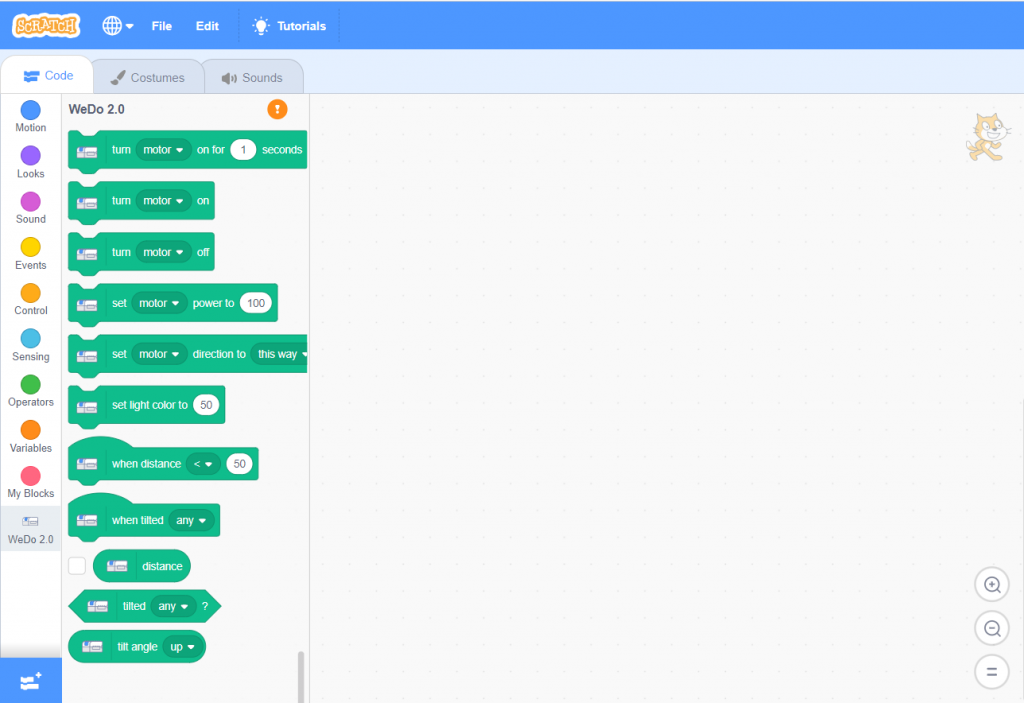
10. Lego Education WeDo 2.0 extension in Scratch
This extension allows your Scratch project to connect with the Lego Education WeDo 2.0 construction set. There are a total of 11 blocks in this extension: 6 stack blocks, 2 hat blocks, 2 reporter blocks, and 1 boolean block. Stack blocks are rectangular-shaped blocks that are shaped to fit above and below other blocks.
The reporter blocks are blocks that report a value, and these blocks cannot be placed above or below any other blocks. The hat blocks are those blocks that start a script when a specific event occurs. Boolean blocks are elongated hexagonal blocks that report values that are true or false, and reporter blocks are blocks that report a value. Let’s discuss these blocks in detail.
- “turn () on for () seconds“- this block activates the Lego WeDo motor for the specified amount of seconds.
- “turn () on“- this block turns on the Lego WeDo motor for an indefinite time until you manually turn it off.
- “turn () off“- this block turns off the Lego WeDo motor.
- “set () power to ()“- this block will set the Lego motor power to 100 from 1.
- “set () direction to ()“- this block will set the Lego motor to the specified direction
- “set light color to ()“- this block will set the Lego WeDo unit’s color to the specified color.
- “when distance () “- this block is activated when the distance is lesser than the specified value.
- “when tilted ()“- this block activates when the Lego WeDo device is tilted in the specified direction.
- “distance“- this block will activate only when used with the Lego WeDo robotics kit.
- “tilted () ?“- this block checks and reports whether or not the Lego WeDo device is being tilted in the specified direction.
- “tilt angle“- this block checks and reports in which direction the Lego WeDo device is being tilted.
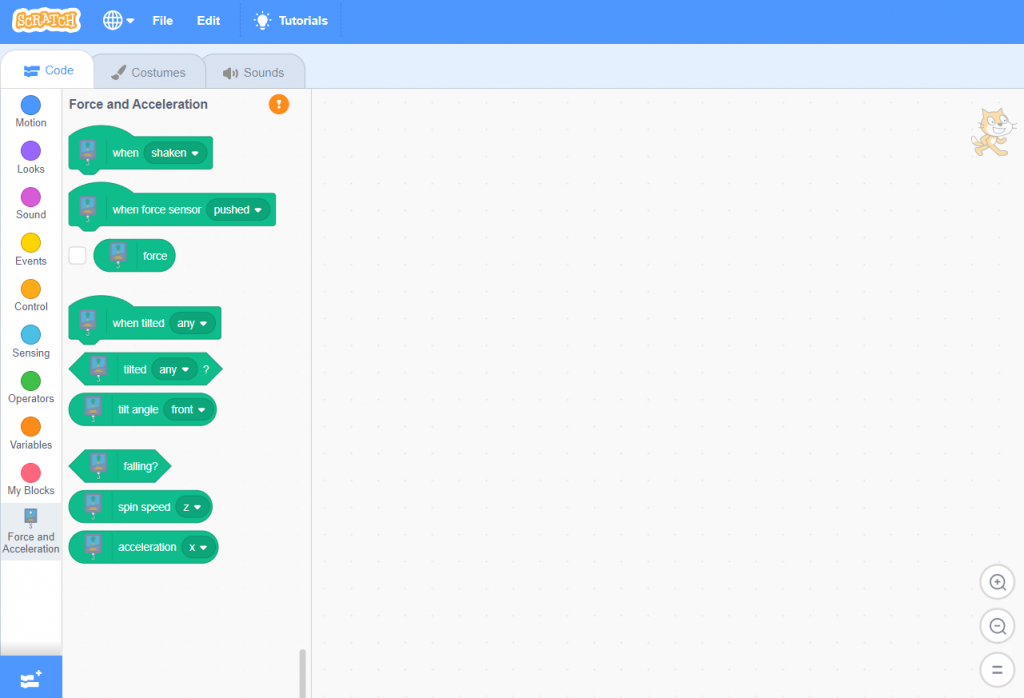
11. Go Direct force and acceleration extension in Scratch
This extension allows your Scratch project to connect with the Go direct force sensor. This extension contains nine blocks: four stack blocks, three hat blocks, and two boolean blocks. Stack blocks are rectangular-shaped blocks that are shaped to fit above and below other blocks.
The hat blocks are those blocks that start a script when a specific event occurs. Boolean blocks are elongated hexagonal blocks that report values that are true or false, and reporter blocks are blocks that report a value. Let’s discuss these blocks in detail.
- “when ()“- this block is activated when the selected event occurs.
- “when force sensor“- this block is activated when the selected event occurs.
- “force“- this block checks and reports the Go direct force sensor’s force.
- “when tilted ()“- this block activates when the Go direct force sensor is tilted.
- “tilted () ?“- this block checks and reports whether the Go direct force sensor is tilted or not.
- “tilt angle ()“- this block checks and reports the Go direct force sensor’s title angle.
- “falling?“- this block checks and reports whether the Go direct force sensor is falling or not.
- “spin speed ()“- this block returns the Go direct force sensor spinning in the specified direction.
- “acceleration“- this block checks and reports the Go direct force sensor’s acceleration.
How to use extensions in Scratch?
You can use Scratch extensions in a few easy steps.
- Step 1: Click on the “extension” icon which is located at the bottom of the block palette in the Scratch editor.
- Step 2: After clicking on the “extension” icon, you will now see the extension library in Scratch. Click on the extension that you wish to use in your project.
- Step 3: Now, the extension will be automatically added to the block palette.
- Step 4: Now that the extension blocks are added to the block simply drag and drop the required block onto the Scratch editor.
Looking to learn Scratch coding? Explore Wiingy’s Online Scratch Coding Classes For Kids to learn from top Scratch coding experts.
FAQs on extensions in Scratch
How to use a pen extension in Scratch?
The pen extension in Scratch allows the user to draw with a pen on the Scratch stage. To add the pen extension, click on the extension block icon at the bottom of the block palette. This will take you to the extension page. Select the pen extension and the extension will be added to your Scratch editor.
How to delete an extension in Scratch?
To delete the extension in Scratch, simply refresh the page and the extension block will be deleted from the Scratch editor.
What is a music extension in Scratch?
The music extension block in Scratch allows you to play MIDI notes with different instruments. You can add interesting instrumental music to your Scratch project.
How do I include extensions in Scratch?
To add to the extension in Scratch, click on the extension icon at the bottom of the block palette. This will take you to the extension page, where you can select the extension that you want for your Scratch project.
How to use the Makey Makey extension in Scratch?
The Makey Makey extension allows Scratch to interact with Makey Makey. This is a hardware kit that is designed to connect everyday objects to computer keys. To use this extension, connect the Makey Makey unit to your computer and transfer your code to the unit.
List of Scratch extensions.
There are a total of 11 extensions in Scratch and they are pen, music, text-to-speech, translate, video sensing, makey makey, micro:bit, Lego Mindstorms EV3, Lego boost, Lego education WeDo 2.0, and Go direct force and acceleration.
What are Scratch addons?
Scratch addons are all-in-one browser extension that provides Scratch users with some extra features and themes that they can use in their projects.
How to use extensions in Scratch?
To use extensions in Scratch, simply click on the “extension” icon at the bottom of the block palette in the Scratch editor. After clicking on the icon, you see the extension library containing all 11 extensions. Click on the extension that you to use in your project. The extension will be added to your block palette.
Extensions in Scratch add extra blocks and features to your Scratch project. You can connect your computer to your hardware kit like Makey Makey, Micro: Bit, etc., and run your script through them to give it a physical outlet. We hope this blog has answered your query. Let us know what other topic you want to cover in the comment section below!
Want to learn more about Scratch block? Continue your learning journey with our blog on motion blocks!