Adding lives to a game in Scratch is a great way to add an extra layer of challenge and engagement to your game. By giving players multiple chances to complete a task or reach a goal, you can increase the replay value of your game and keep players coming back for more.
In this tutorial, we will cover the basic steps of how to add lives to a Scratch game, so whether you are a beginner or an experienced Scratch user, this blog will help you in understanding how to add lives to your games. So let’s get started!
Looking to learn Scratch coding? Explore Wiingy’s Online Scratch Coding Classes For Kids to learn from top Scratch coding experts.
How to add lives to a Scratch game?
To add lives to a game in Scratch, just patiently follow the below steps:
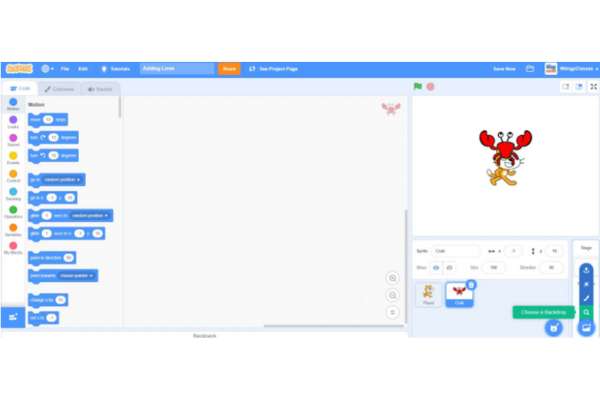
- Step 1: Open Scratch and start creating sprites. For this game, you will be using the pre-made Scratch cat sprite as the player, so rename it as ‘Player’ to avoid confusion while coding.
- Step 2: It’s time to choose another sprite, so to choose another sprite, click on the blue circle with the cat icon.
- Step 3: After clicking on the blue circle for choosing a sprite, select the first option from below that says ‘Choose a Sprite’.
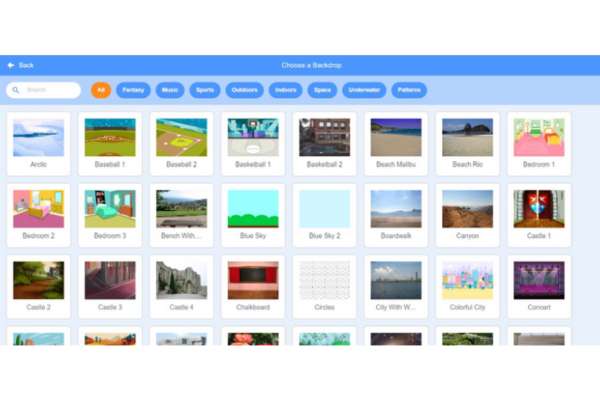
- Step 4: Once you click on the ‘Choose a Sprite’ option, the following screen will appear.
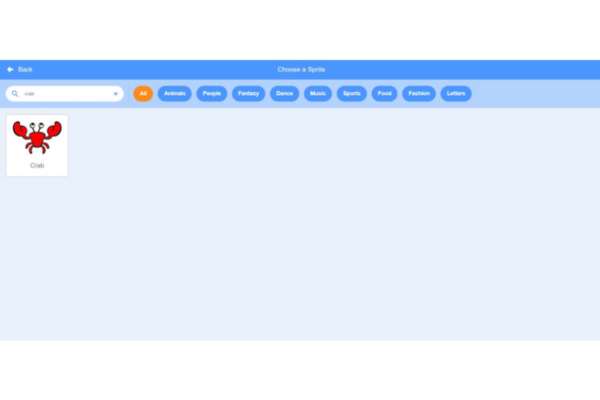
- Step 5: Search for ‘Crab’ and select it, as shown below. Rename the sprite as ‘Crab’ to avoid confusion while coding.
- Step 6: Now, it’s time to choose the backdrops for this game. So, to choose the backdrop, click on the blue circle available at the extreme bottom right of the screen.
- Step 7: After clicking on the blue circle for choosing a backdrop, select the first option from below that says ‘Choose a Backdrop’.
- Step 8: Once you click on the ‘Choose a Backdrop’ option, the following screen will appear.
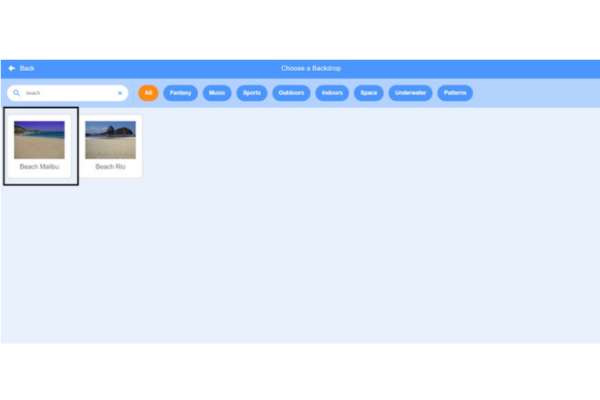
- Step 9: Search for ‘Beach’ and select it, as shown below. Change the name of the backdrops to ‘Beach’ to avoid confusion while coding.
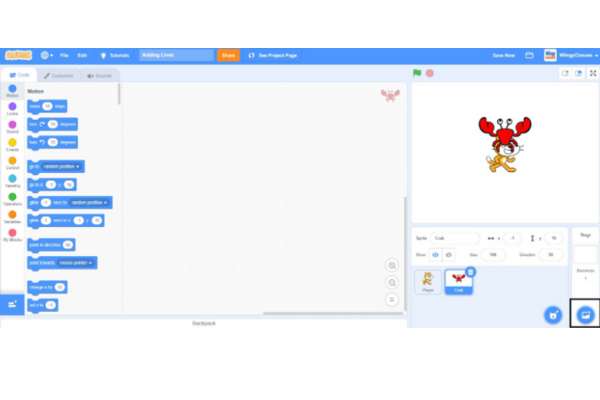
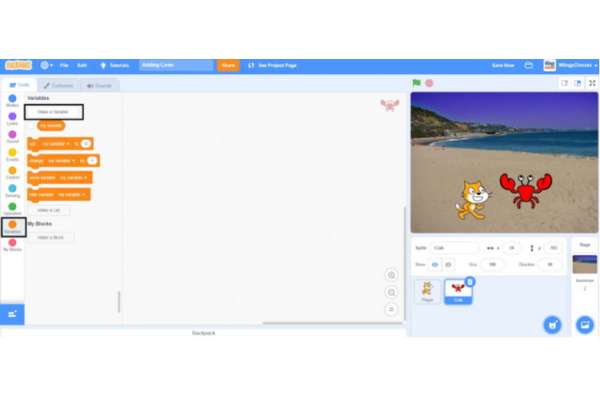
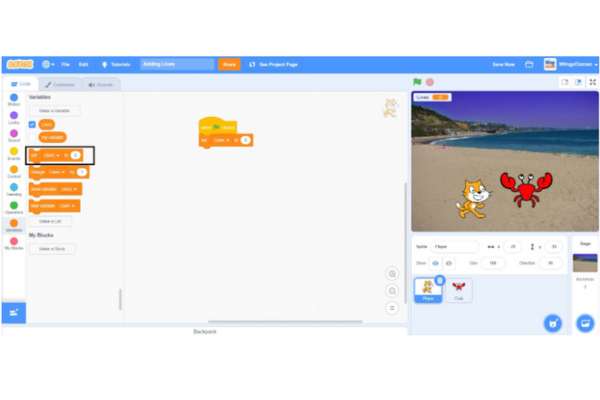
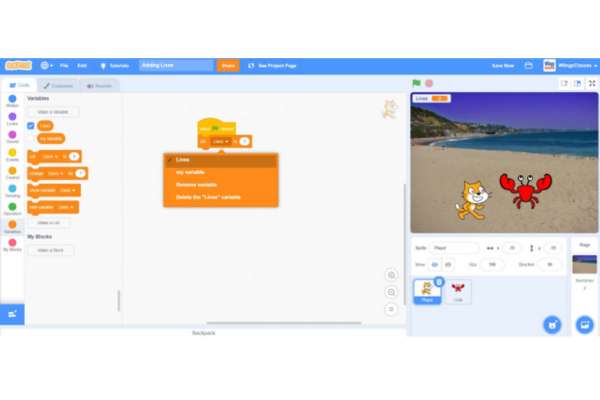
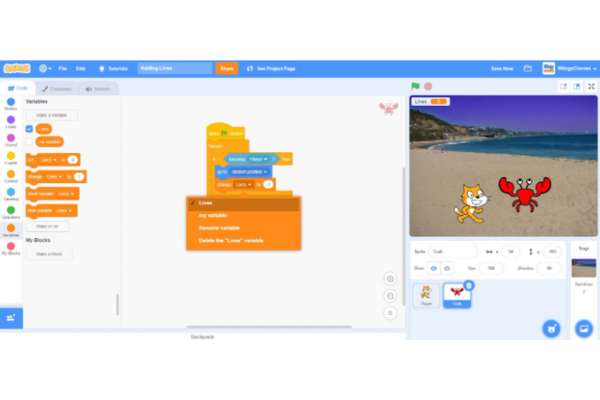
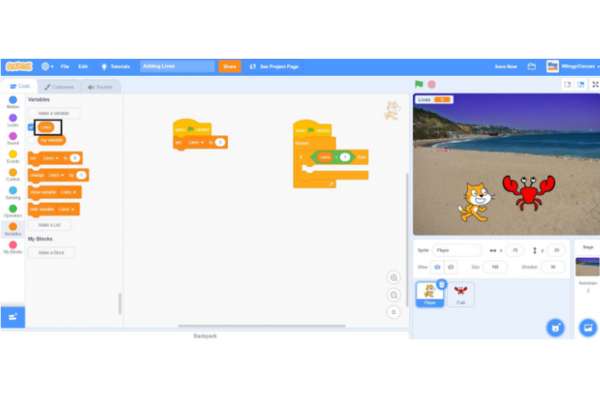
- Step 10: After selecting the sprites and the backdrops, it’s time to make the variables of the game. So, go to the “Variables” block in the block palette, click on the ‘Make a Variable’ option, and create variables named ‘Lives’. Make sure to select the ‘For all sprites’ option while creating the sprites.
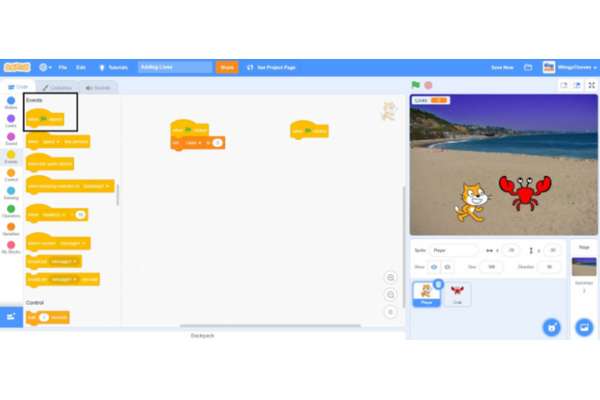
Code for the ‘Player’ sprite
It’s time for coding, so let’s start by creating a code for the ‘Player’ sprite. Make sure that the ‘Player’ sprite is selected while coding this part.
- Step 1: Go to the “Events” block in the block palette, select the ‘when green flag clicked’ block, and drag it to the coding area.
- Step 2: Go to the “Variables” block in the block palette, select the ‘set ( ) to ( )’ block, drag it to the coding area, and place it under the ‘when green flag clicked’ block.
- Step 3: In the ‘set ( ) to ( )’ block, select the first value as ‘Lives’ from the drop-down menu and enter the second value ‘3’.
Code for the ‘Crab’ sprite
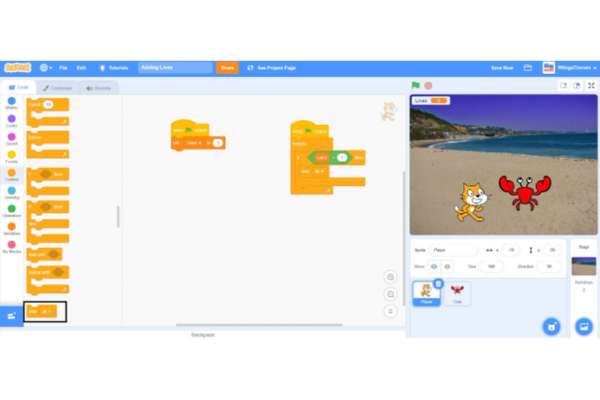
Now, every time the player touches the crab, the player will lose one life. Make sure that the ‘Crab’ sprite is selected while coding this part.
- Step 1: Go to the “Events” block in the block palette, select the ‘when green flag clicked’ block, and drag it to the coding area.
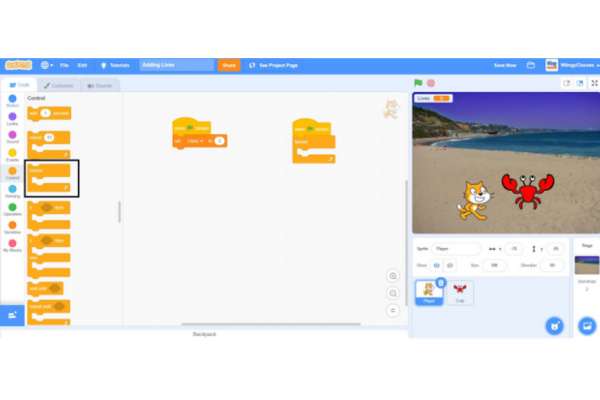
- Step 2: Go to the “Control” block in the block palette, select the ‘forever’ block, drag it to the coding area, and place it under the ‘when green flag clicked’ block.

- Step 3: From the “Control” block in the block palette, select the ‘if ( ) then ( )’ block, drag it to the coding area, and place it inside the ‘forever’ block.

- Step 4: Go to the “Sensing” block in the block palette, select the ‘touching ( )?’ block, drag it to the coding area, and place it in the if condition of the ‘if ( ) then ( )’ block.
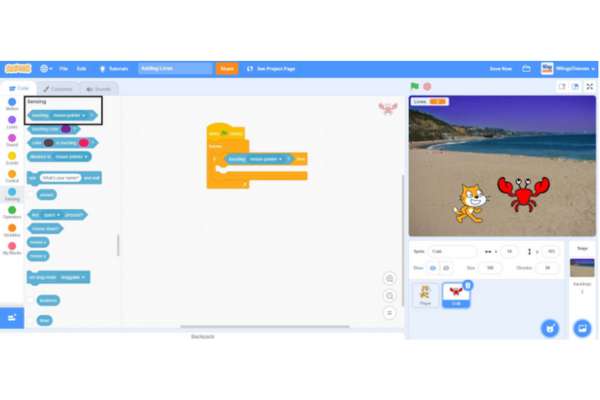
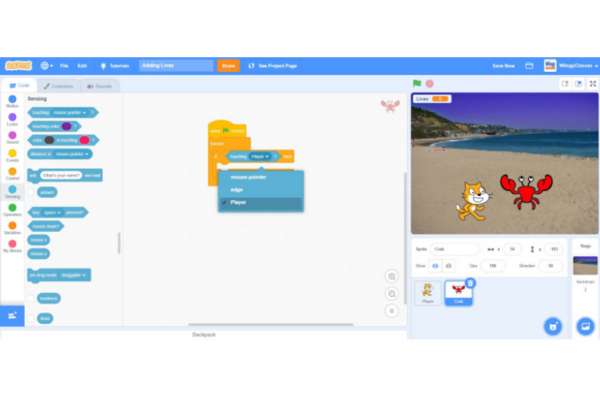
- Step 5: In the ‘touching ( )?’ block, select the value ‘Player’ from the drop-down menu.
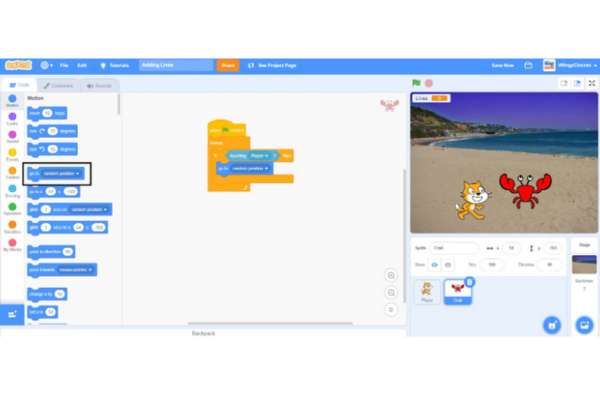
- Step 6: Go to the “Motion” block in the block palette, select the ‘go to (random position)’ block, drag it to the coding area, and place it in the then condition of the ‘if ( ) then ( )’ block.
- Step 7: Go to the “Variables” block in the block palette, select the ‘change ( ) by ( )’ block, drag it to the coding area, and place it under the ‘go to (random position)’ in the then condition of the ‘if ( ) then ( )’ block.
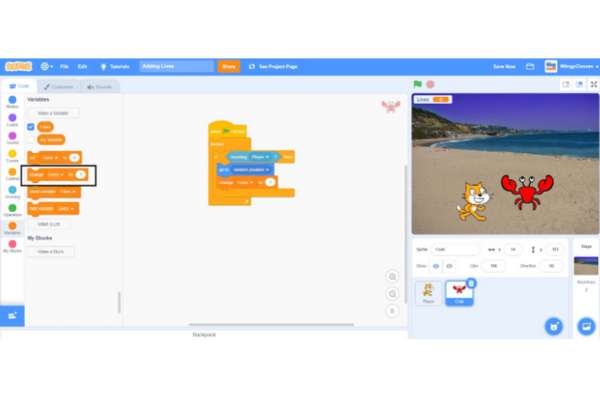
- Step 8: In the ‘change ( ) by ( )’ block, select the first value as ‘Lives’ from the drop-down menu and enter the second value ‘-1’.
Again code for the ‘Player’ sprite
Make sure that the ‘Player’ sprite is selected while coding this part.
- Step 1: Go to the “Events” block in the block palette, select the ‘when green flag clicked’ block, and drag it to the coding area.
- Step 2: Go to the “Control” block in the block palette, select the ‘forever’ block, drag it to the coding area, and place it under the ‘when green flag clicked’ block.
- Step 3: From the “Control” block in the block palette, select the ‘if ( ) then ( )’ block, drag it to the coding area, and place it inside the ‘forever’ block.

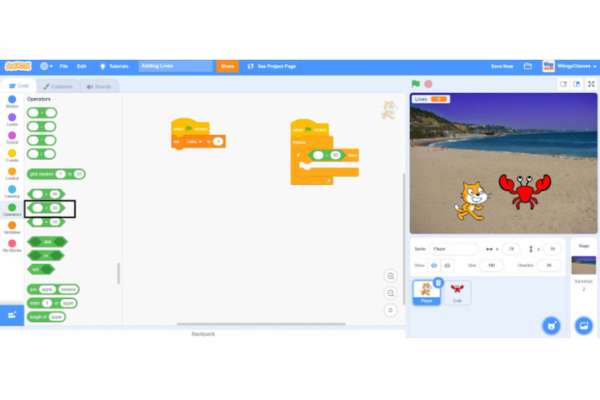
- Step 4: Go to the “Operators” block in the block palette, select the ‘( ) < ( )’ block, drag it to the coding area, and place it in the if condition of the ‘if ( ) then ( )’ block.
- Step 5: Go to the “Variables” block in the block palette, select the ‘Lives’ block, drag it to the coding area, and place it in the first value place of the ‘( ) < ( )’ block. In the second value place of the ‘( ) < ( )’ block, enter the value ‘1’.
- Step 6: Go to the “Control” block in the block palette, select the ‘stop (all)’ block, drag it to the coding area, and place it in the then condition of the ‘if ( ) then ( )’ block.
Once you follow all the above-mentioned steps, you will be successfully able to add lives to your game in Scratch!!
Looking to learn Scratch coding? Explore Wiingy’s Online Scratch Coding Classes For Kids to learn from top Scratch coding experts.
Frequently asked questions (FAQs)
What is the purpose of adding lives to a game in Scratch?
The purpose of adding lives to a game in Scratch is to give players multiple chances to complete a task or reach a goal.
Can you display the number of lives in a Scratch game?
Yes, you can display the number of lives in a Scratch game by using the “watch” feature to show the value of a variable. You can also use the “say” block to display the number of lives as a text message.
Is it possible to reset the lives in a Scratch game?
Yes, it is possible to reset the lives in a Scratch game by using a reset button or by using a block to set the lives variable back to its starting value.
How can you end a Scratch game when the player runs out of lives?
To end a Scratch game when the player runs out of lives, you can use an “if-then” statement to check if the lives variable has reached 0. If it has, you can use a “stop all” block to end the game.
Can you have different lives for different levels or stages in a Scratch game?
Yes, you can have different lives for different levels or stages in a Scratch game by using separate variables for each level or stage. You can use conditions to switch between the different variables and keep track of the lives for each stage.
We hope you understand how to add lives to a Scratch game. If you have any doubts, you can ask your doubts in the comment section. If you this blog interesting and want to learn about how to create different types of cool games in Scratch, then read our game tutorial on Scratch games!